Friday, January 31, 2014
Quick Chocolate Mousse
Quick Chocolate Mousse
1 cup heavy whipping cream (35%)
1/4 cup unsweetened cocoa powder
1/4 cup granulated (white) sugar
1 teaspoon vanilla extract
In a medium bowl, beat all ingredients together until fluffy and stiff.
That's it! This doesn't require gradually beating in sugar or beating eggs or melting chocolate like most mousse recipes. It can also be kept in the refrigerator for a few days, but may not be as fluffy and may need to rewhipped briefly. This is an incredible versatile recipe and can be eaten as is, piped on cakes, filled into cream puffs, used as garnishes, put into crêpes, piled onto ice cream, etc. This is a small recipe, but quantities are easily adjusted. This is more of a dark chocolate, decadent mousse, so add more sugar if you would prefer.
Thursday, January 30, 2014
Chocolate Cream Puff Dough
Chocolate Choux Pastry
1 cup water
1/2 cup + 1 Tablespoon butter
3 Tablespoons unsweetened cocoa powder
1 Tablespoon granulated (white) sugar
1 cup all-purpose (plain) flour
1/4 teaspoon salt
4 large eggs
Preheat oven to 425◦F. Line a baking sheet with parchment paper.
In a medium saucepan, bring the water and butter to a boil. Add the cocoa and sugar.
Add the flour and salt all at once and stir vigorously until the dough forms a ball in the middle of the pan. Remove from heat.
Add the eggs, one at a time, beating until smooth after each addition, until dough is thick and glossy. Pipe or spoon dough into mounds or log shapes (this dough can be used for cream puffs or eclairs). This recipe will make 24 small or 12 large.
Bake for 25 minutes, or until dough looks dry. Mini puffs will take less time to bake. Immediately transfer to a rack to cool, poking a small hole in each to allow steam to escape.
This is a good, basic chocolate recipe that can be used for cream puffs, éclairs, and other pastries. It's pretty easy, but doesn't make a very large batch. I have used it to make éclairs before, and also for my croquembouche from yesterday's post.
Wednesday, January 29, 2014
Chocolate Croquembouche

Croquembouche has been on my list of things I would like to make for a while now. I realize that it is somewhat elaborate and tedious, and I thought I would have a good period of time to make it. Turns out I had to complete everything in the span of about forty minutes. No problem, right? Well sort of, since cream puffs need to be cool to be filled with a mousse, and it's difficult to stack warm cream puffs, and they take about twenty minutes to bake. But using some shortcuts, and slightly sacrificing the elaborateness of this dish, I did pull it off with help.
I began immediately with whipping up the cream puff dough and baking it. I made them quite mini so they would bake and cool faster, and were baked within fifteen minutes. Meanwhile, the chocolate mousse was whipped up. Once the cream puffs were baked, they were placed in the freezer to cool as quickly as possible. However, they were still too warm (and too tiny) to fill with the mousse filling (basically chocolate whipped cream), which is why some mousse was piped and piled on top, and beginning to melt a little. Extra mousse was provided for dipping of course. Now to actually assemble the tower. I whipped up some light caramel on the stove, and dipped the cream puffs in the hot caramel so they would stick together. Since the tower was relatively small, only containing about thirty cream puffs or so, I didn't use a cone base for support, and didn't plan out the structure, I just stuck the cream puffs together. Then I drizzled a little extra caramel over top. The picture isn't great, and doesn't really do the mini tower justice, but I am happy with the result considering the time period I had and it being my first attempt at this dessert!
Tuesday, January 28, 2014
Very Nutty Oatmeal
This is another Overnight Oatmeal recipe. There are several others on this blog, and I love them because they are tasty, hearty, and nutritious, and really quick to make and are prepared in advance. The other recipe variations can be found by typing "overnight oatmeal" into the search bar on this blog (I don't want to link them all in this post as it would be too long).
This recipe is especially hearty because it is high in protein and contains heart-healthy fats due to all of the tasty nuts and nut butters in the recipe. Of course the types of nuts can be changed as desired. This breakfast is a complete breakfast in a bowl and very filling - it got me through a rather tedious and demanding math exam this morning.
Very Nutty Oatmeal
1/2 cup old-fashioned rolled oats
1 Tablespoon ground nuts (or flaxseed)
1 Tablespoon chopped walnuts
1 Tablespoon whole natural almonds
1 Tablespoon unsweetened shredded coconut
1 teaspoon unsweetened cocoa powder (optional)
1 teaspoon ground cinnamon
1/2 teaspoon ground ginger
1/4 teaspoon ground cloves
3/4 cup almond milk
2 Tablespoons unsweetened applesauce
1 Tablespoon natural smooth peanut butter
1 Tablespoon natural almond butter
 In a jar or bowl with a lid, measure the first nine dry ingredients, then stir or shake to mix. Add the milk, applesauce, and peanut butter and mix well. Place in the refrigerator overnight, then heat or enjoy cold topped with the almond butter.
This recipe is especially hearty because it is high in protein and contains heart-healthy fats due to all of the tasty nuts and nut butters in the recipe. Of course the types of nuts can be changed as desired. This breakfast is a complete breakfast in a bowl and very filling - it got me through a rather tedious and demanding math exam this morning.
Very Nutty Oatmeal
1/2 cup old-fashioned rolled oats
1 Tablespoon ground nuts (or flaxseed)
1 Tablespoon chopped walnuts
1 Tablespoon whole natural almonds
1 Tablespoon unsweetened shredded coconut
1 teaspoon unsweetened cocoa powder (optional)
1 teaspoon ground cinnamon
1/2 teaspoon ground ginger
1/4 teaspoon ground cloves
3/4 cup almond milk
2 Tablespoons unsweetened applesauce
1 Tablespoon natural smooth peanut butter
1 Tablespoon natural almond butter
Monday, January 27, 2014
Fall Vegetable Curry
This is a quick and nutritious one pan meal that tantalizes with its spicy aroma. This is a vegan recipe, and is chock full of vegetables and lean protein. It is perfect served over a bed of rice. It is not too spicy, so increase the amount of spice if you wish. You can also add more tomatoes or broth if you like your curry to have more of a stew-like consistency.

Fall Vegetable Curry
1 teaspoon olive oil
1 package firm tofu, drained and
cut into 1 inch cubes
½ large sweet potato, cubed
½ head cauliflower, chopped
½ small white onion, chopped
2 teaspoons curry powder
½ cup vegetable broth
½ can chickpeas, rinsed
½ can diced tomatoes, drained
cilantro, for garnish
Heat the oil in a large frying pan
over medium heat. Add the tofu and sweet potato and sauté for three minutes.
Add the cauliflower, onion, and curry powder and sauté for a few minutes. Stir
in the broth, chickpeas, and tomatoes and bring to a boil. Simmer for ten
minutes. Garnish with cilantro. Makes about four servings served over a bed of rice, couscous, or quinoa.
Sunday, January 26, 2014
Pumpkin Grain Breakfast Cake
I always like to have some type of bread, muffin, or biscuit on hand. This time, I decided to try a little something different. I made a healthy snacking cake, then cut it into squares to have on hand in the freezer. This snack cake is soft and moist, yet contains several whole grains. It has a mild pumpkin and spice purée. The seeds are optional, and nuts or raisins would be a nice substitute. This cake is lower in fat and sugar, so modify amounts to suit your personal tastes. I use this more of a bread spread with a topping than a cake.
 Pumpkin Grain Breakfast Cake
scant 1 cup pumpkin purée
1/2 cup applesauce
2/3 cup plain yogurt (I used Greek)
2 large eggs
1/4 cup molasses
1/4 cup each: ground flaxseed, wheat germ, wheat bran, oat bran
1/2 cup sunflower or pumpkin seeds
2 teaspoons ground cinnamon
2 teaspoons ground ginger
1/2 teaspoon ground cloves
1 1/2 teaspoons baking powder
1/2 teaspoon baking soda
1/2 teaspoon salt
1 cup milk (I used almond)
2 cups whole wheat flour
Preheat oven to 350◦F. Line a 9x13 inch pan with parchment paper.
In a large bowl, mix the first five wet ingredients together. Stir in all of the dry ingredients except the flour. Stir in half of the milk. Stir in 1 cup of flour, the remaining 1/2 cup milk, and the remaining 1 cup flour. Spread batter evenly in prepared pan. Bake for about 40 minutes, until a toothpick inserted in the center comes out clean.
Saturday, January 25, 2014
Yogurt Grain Flatbreads
Yogurt Grain Flatbreads
1/2 cup whole wheat flour
1/2 cup oat bran
1/2 cup natural wheat bran
1-4 teaspoons sugar, or to taste
1/2 teaspoon salt
1/4 teaspoon baking soda
1 cup plain yogurt (I used Greek)
1 cup + 2 Tablespoons water
In a large bowl, stir together the flour, oat bran, bran, salt, and baking soda. Make a well in the center.
Whisk together the yogurt and water. Add to well and stir well. Mixture will seem fairly liquidy. Let mixture sit for thirty minutes to thicken.
Heat a large greased griddle or skillet over medium-high heat. Check the mixture, and add a little extra water if necessary to thin it. Cook as desired, spreading batter to desired size.
 For soft, thick flatbreads: Keep the dough a little thicker, don't spread as thinly in the pan. Cook over medium heat for a few minutes on each side until golden.
For crispy, thin flatbreads: Add a little extra water to make the dough thin and pourable, spread very thinly in the pan. Cook over high heat for a few minutes on each side until golden and crispy.
These may also be baked, or kept warm in the oven.
This is a pretty versatile recipe. They can be made thick or thin, crispy or soft; if you want to experiment, cook one at a time in a skillet and add more water or spread the dough thicker or thinner next time if desired. For really thin and crispy breads, I recommend cooking them in a skillet, but if you want to cook many smaller ones at once, a griddle works really well. Whichever way, grease the pan between batches. These can be made any size you want. They can be used for a variety of dishes, sweet or savory, including sandwiches, wraps, burgers, falafels, crêpes, fruit desserts, etc.
1/2 cup whole wheat flour
1/2 cup oat bran
1/2 cup natural wheat bran
1-4 teaspoons sugar, or to taste
1/2 teaspoon salt
1/4 teaspoon baking soda
1 cup plain yogurt (I used Greek)
1 cup + 2 Tablespoons water
In a large bowl, stir together the flour, oat bran, bran, salt, and baking soda. Make a well in the center.
Whisk together the yogurt and water. Add to well and stir well. Mixture will seem fairly liquidy. Let mixture sit for thirty minutes to thicken.
Heat a large greased griddle or skillet over medium-high heat. Check the mixture, and add a little extra water if necessary to thin it. Cook as desired, spreading batter to desired size.

For crispy, thin flatbreads: Add a little extra water to make the dough thin and pourable, spread very thinly in the pan. Cook over high heat for a few minutes on each side until golden and crispy.
These may also be baked, or kept warm in the oven.
This is a pretty versatile recipe. They can be made thick or thin, crispy or soft; if you want to experiment, cook one at a time in a skillet and add more water or spread the dough thicker or thinner next time if desired. For really thin and crispy breads, I recommend cooking them in a skillet, but if you want to cook many smaller ones at once, a griddle works really well. Whichever way, grease the pan between batches. These can be made any size you want. They can be used for a variety of dishes, sweet or savory, including sandwiches, wraps, burgers, falafels, crêpes, fruit desserts, etc.
Friday, January 24, 2014
On The Fly Fried Rice
On The Fly Fried Rice
1 teaspoon oil
2 Tablespoons chopped onion
1 small carrot, thinly sliced
2 Tablespoons green beans
1 large egg
salt and ground black pepper, to taste
1 cup cooked rice
1 teaspoon Italian seasoning
1 heaping Tablespoon hummus
optional: some shredded cheese
Heat the oil in a small frying pan over medium heat. Sauté the vegetables for a few minutes until crisp-tender. Push vegetables to the outside of the pan. Beat the egg with the salt and pepper and pour into the middle of the pan. Scramble the egg until cooked, then mix with the vegetables. Stir in the rice, seasoning, and hummus and cook, stirring, until heated through. Sprinkle in the cheese, if desired.
 This is a dish I came up with quickly one night when I was in need of a quick supper using leftovers. I took the idea of fried rice and enhanced it with the ingredients I had on hand. I had a bowlful of leftover rice and some leftover green beans. I quickly chopped up some onion and carrot, used some hummus and spices I had on hand to flavor the dish, and added an egg, which is traditional in fried rice, for some protein. Obviously ingredient amounts are approximate, and ingredients and amounts can be varied to create any quick supper dish. I served my rice with some leftover toasted fish cakes on top for a complete meal.
1 teaspoon oil
2 Tablespoons chopped onion
1 small carrot, thinly sliced
2 Tablespoons green beans
1 large egg
salt and ground black pepper, to taste
1 cup cooked rice
1 teaspoon Italian seasoning
1 heaping Tablespoon hummus
optional: some shredded cheese
Heat the oil in a small frying pan over medium heat. Sauté the vegetables for a few minutes until crisp-tender. Push vegetables to the outside of the pan. Beat the egg with the salt and pepper and pour into the middle of the pan. Scramble the egg until cooked, then mix with the vegetables. Stir in the rice, seasoning, and hummus and cook, stirring, until heated through. Sprinkle in the cheese, if desired.
Thursday, January 23, 2014
Cinnamon Cream Cheese Loaf Cake
This is a little recipe my mom whipped up, seeing a block of cream cheese in the fridge and using it as inspiration. She used a basic loaf recipe to start, but changed it up a lot. This makes a nice, comforting snack cake. The cake itself gets some flavor from cinnamon, and is slightly moist, but it's the cream cheese filling that really makes it decadent and pulls it all together. It's rather quick to make and I think it even gets better with age, not that it sticks around for very long.
 Cinnamon Cream Cheese Loaf Cake
2 large eggs
1/2 cup oil
1/2 cup milk
1 teaspoon vanilla extract
2 1/4 cups all-purpose (plain) flour
1/3 cup granulated (white) sugar
1/3 cup packed light brown sugar
2 teaspoons ground cinnamon
1 teaspoon baking soda
1 teaspoon salt
CREAM CHEESE FILLING
1 package (8 ounces / 250 grams) cream cheese, softened
1/3 cup granulated (white) sugar
1 large egg
Preheat oven to 350◦F. Grease an 8x8 inch square pan.
In a large bowl, beat the eggs until frothy. Beat in the oil, milk, and vanilla. Stir in the remaining dry ingredients.
In a separate small bowl, beat the filling ingredients together until smooth.
Spread half of the batter in prepared pan. Top evenly with the cream cheese mixture. Spread carefully with remaining batter. Bake for about 35-40 minutes, until a toothpick inserted in the center comes out clean. This can be served warm, but is much better well chilled just like a cheesecake.
Wednesday, January 22, 2014
Bread Coated Haddock
Pan-fried fish, and haddock in particular, is an old, delicious stand-by. Usually the fish is dipped in a flour and/or egg mixture, then coated in some type of tasty, crispy coating. Breadcrumbs are very popular, as are panko breadcrumbs, crushed cereal, crushed crackers, nuts, and seeds and mixtures with herbs and spices. However, did you ever think of coating the fish (or chicken or pork for that matter) in something different? Have you ever considered using an actual slice of bread, instead of breadcrumbs? I sure hadn't, until I saw it on a cooking show on tv the other day. If you think about it, it makes perfect sense. If you make your own homemade breadcrumbs, it is less work as the bread doesn't need to be ground into crumbs. It has the same flavor and similar texture. I was intrigued as to whether this idea would really be successful, as it was on the show. So the next time we had haddock, I suggested my father try it.
We used a slice of (gasp) store-bought sandwich bread, which is soft and easy to work with. My father flattened it out, then put it onto the fish. He only placed it on top so it coated one side, then pan-fried it as usual.
The result? Although only one side of the fish is coated, the bread is thicker than a layer of breadcrumbs would be, so it really only needs a single side coating. The other side, which is fried directly in the hot pan, developed a nice sear with a tasty crust. The bread was so crispy and golden and just delicious. Frying flattened bread with fish juices really makes a gourmet version of toast. The only complaints I would have, which could easily be fixed with some alterations, would be that the bread doesn't have as much flavor, as it is not seasoned as breadcrumbs would be. Seasoning the fish, spreading a mixture on the bread, or serving a sauce over top would easily solve this. The second problem is the bread doesn't stick to the fish as well as breadcrumbs would, but we will need to experiment with pre-dipping ingredients to solve this.
Tuesday, January 21, 2014
Horse Cupcakes


Monday, January 20, 2014
Dark Chocolate Cake
This is a new chocolate cake recipe I decided to try instead of making my usual chocolate cake. Dark chocolate is my favorite, and although I wouldn't necessarily categorize this cake as a really dark chocolate cake, it is dark in color and has a nice flavor and a texture that is easy to work with. It is not quite as moist as my other chocolate cake, but I like how this makes a nice big batch of cake but doesn't require any extra effort. I used it for my Luigi cake from yesterday's post, and I used the extra batter to make cupcakes which I will feature in tomorrow's post!
Dark Chocolate Cake
1 cup unsweetened cocoa powder
2 cups boiling water
1 cup butter or hard margarine, softened
2 cups granulated (white) sugar
4 large eggs
2 teaspoons vanilla extract
2 teaspoons baking soda
1/2 teaspoon baking powder
1/2 teaspoon salt
2 3/4 cups all-purpose (plain) flour
Preheat oven to 350◦F. Grease or line baking pans.
Baking options: three 8-inch round pans, three 9-inch round pans, three 8x8-inch square pans, three 9x9-inch square pans, one 9x13-inch pan plus one pan from the previous options, 36 cupcakes, 72 miniature cupcakes.
I baked one 9x13-inch pan, 6 cupcakes, and 24 miniature cupcakes.
 In a medium bowl, pour the boiling water slowly over the cocoa. Whisk until smooth. Set aside to cool.
In a large bowl, cream the butter until fluffy. Cream in the sugar until dissolved. Beat in the eggs, one at a time, beating well after each addition. Beat in the vanilla.
Add the baking soda, baking powder, salt, and 1 cup of flour, mix well. Mix in half the cocoa mixture, followed by another cup of flour, the remaining cocoa mixture, and the remaining 3/4 cup of flour, mix well. Pour batter in prepared pans. Baking time will vary depending on pan size, but 9x13-inch and 8 or 9-inch round or squares will take around 30 minutes. Cupcakes take 20 and miniature cupcakes take 10-15. The cake is done when a toothpick inserted in the center comes out clean.
Dark Chocolate Cake
1 cup unsweetened cocoa powder
2 cups boiling water
1 cup butter or hard margarine, softened
2 cups granulated (white) sugar
4 large eggs
2 teaspoons vanilla extract
2 teaspoons baking soda
1/2 teaspoon baking powder
1/2 teaspoon salt
2 3/4 cups all-purpose (plain) flour
Preheat oven to 350◦F. Grease or line baking pans.
Baking options: three 8-inch round pans, three 9-inch round pans, three 8x8-inch square pans, three 9x9-inch square pans, one 9x13-inch pan plus one pan from the previous options, 36 cupcakes, 72 miniature cupcakes.
I baked one 9x13-inch pan, 6 cupcakes, and 24 miniature cupcakes.
In a large bowl, cream the butter until fluffy. Cream in the sugar until dissolved. Beat in the eggs, one at a time, beating well after each addition. Beat in the vanilla.
Add the baking soda, baking powder, salt, and 1 cup of flour, mix well. Mix in half the cocoa mixture, followed by another cup of flour, the remaining cocoa mixture, and the remaining 3/4 cup of flour, mix well. Pour batter in prepared pans. Baking time will vary depending on pan size, but 9x13-inch and 8 or 9-inch round or squares will take around 30 minutes. Cupcakes take 20 and miniature cupcakes take 10-15. The cake is done when a toothpick inserted in the center comes out clean.
Sunday, January 19, 2014
Luigi Cake

I began with a new chocolate cake recipe I had not yet tried - a dark chocolate cake. I poured over my favorite new glaze to cover the cake in a shiny base on which to build the design (see Cocoa Glaze). Then I mapped out a pattern of 1/2 inch squares (12 across and 16 down) in the top center of the cake. Following an online sprite image I had printed out, I filled in the small squares with an upside-down basket weave tip using tan, chocoalte, green, and blue vanilla buttercream. At the end, I added a blue wave border around the top of the cake, a swirl green border around the bottom, and piped "Happy Birthday Julian!" in green. Then I heated a little extra ganache and recovered the top of the cake, to hide the lines of the grid I had mapped out that were not covered in buttercream. That is another advantage to ganache - you can always add another layer, and it sets just as evenly and nicely as the first.
I think last year's cake did turn out better - my buttercream was more cooperative, the design was bigger, and I just preferred it, but this one did tun out great as well. To check out the past cakes, follow these links (a link to Link, haha!). There is last year's {Link Cake}. and a little explanation on the designs and how I do it {8-Bit Pixel Design}. And this is the {Minecraft Cake} from two years ago.
Saturday, January 18, 2014
Good and Grainy Machine Bread
Good and Grainy Machine Bread
1 cup water
2 Tablespoons hard margarine
2 Tablespoons honey
1 teaspoon salt
2 1/3 cups whole wheat flour
1/2 cup oats
1/4 cup natural wheat bran
3 Tablespoons skim milk powder
1 Tablespoon ground flaxseeds
1 1/2 teaspoons yeast
Place all ingredients in bread machine pan in order given, or according to manufacturer's instructions for whole wheat cycle. This makes one large loaf, although size setting will depend on machine.
This bread has a good dose of healthy whole grains, therefore it will not rise as high as a whole wheat or white loaf would. Add a little wheat gluten if you would like a higher rise. Skim milk powder is used in this recipe to avoid using perishable milk. It is also easier because skim milk powder is stored at room temperature unlike fluid milk, and this is more cost efficient.
 I apologize for publishing yet another bread (and bread machine at that) recipe so soon, but i promise I will have an awesome cake to show tomorrow.
1 cup water
2 Tablespoons hard margarine
2 Tablespoons honey
1 teaspoon salt
2 1/3 cups whole wheat flour
1/2 cup oats
1/4 cup natural wheat bran
3 Tablespoons skim milk powder
1 Tablespoon ground flaxseeds
1 1/2 teaspoons yeast
Place all ingredients in bread machine pan in order given, or according to manufacturer's instructions for whole wheat cycle. This makes one large loaf, although size setting will depend on machine.
This bread has a good dose of healthy whole grains, therefore it will not rise as high as a whole wheat or white loaf would. Add a little wheat gluten if you would like a higher rise. Skim milk powder is used in this recipe to avoid using perishable milk. It is also easier because skim milk powder is stored at room temperature unlike fluid milk, and this is more cost efficient.
Friday, January 17, 2014
Kefir Biscuits
Kefir Biscuits
1 cup whole wheat flour
1/4 cup each old-fashioned oats, ground flaxseed, natural wheat bran, and sesame seeds
1 Tablespoon baking powder
1 Tablespoon granulated (white) sugar
1 teaspoon salt
1 cup kefir milk
Preheat oven to 425◦F. Line a cookie sheet with parchment paper. Place on top of another cookie sheet in order to prevent bottoms from becoming too brown.
In a large bowl, stir together all ingredients except the kefir. Add in the kefir. Drop dough by tablespoonfuls onto prepared baking sheet, a large ice cream scoop works really well for this. Bake for 12-15 minutes until golden.
 This is my latest creation using kefir. Kefir is just like using yogurt or buttermilk in these biscuits- it adds a little flavor and makes the biscuits moist. It also keeps the biscuits from being too heavy, even though they contain a good amount of hearty whole grains.
Here are two other kefir creations: {Kefir Smoothie} and {Kefir Oatmeal}.
1 cup whole wheat flour
1/4 cup each old-fashioned oats, ground flaxseed, natural wheat bran, and sesame seeds
1 Tablespoon baking powder
1 Tablespoon granulated (white) sugar
1 teaspoon salt
1 cup kefir milk
Preheat oven to 425◦F. Line a cookie sheet with parchment paper. Place on top of another cookie sheet in order to prevent bottoms from becoming too brown.
In a large bowl, stir together all ingredients except the kefir. Add in the kefir. Drop dough by tablespoonfuls onto prepared baking sheet, a large ice cream scoop works really well for this. Bake for 12-15 minutes until golden.

Here are two other kefir creations: {Kefir Smoothie} and {Kefir Oatmeal}.
Thursday, January 16, 2014
Machine True Whole Wheat Bread
This is the whole wheat bread recipe that came with my bread machine book. I think it's the best recipe I have made in my new bread machine yet. The appearance was rather uneven on the outside, but it rose very well and was extremely tasty. The texture was crusty on the outside and soft and fluffy on the inside. Bread machine (and some traditional) recipes calling for heavier flours such as whole wheat, rye, and other whole grains often call for the addition of a little bit of wheat gluten, as these flours tend to be denser and contain less gluten. Wheat gluten is pricey and can be tricky to find, but only a small amount is used in most recipes and it is apparently completely worth it. It can be omitted in a pinch, and since I didn't have any on hand, I left it out in this recipe. Well, the bread still rose very well (it may have rose over the pan if I had added the extra gluten), and personally I think there is enough gluten around without purposely adding extra, so I probably won't be buying it anytime soon. However, for last minute bread machine loaves, wheat gluten is vital.
 Machine True Whole Wheat Bread
1 1/2 cups water
1 1/4 teaspoons salt
2 Tablespoons honey
4 cups whole wheat flour
5 1/2 teaspoons wheat gluten (optional)
2 1/4 teaspoons yeast
Place all ingredients in bread machine pan in order given, or according to manufacturer's instructions for whole wheat cycle. This makes one large loaf, although size setting will depend on machine.
Wednesday, January 15, 2014
Chocolate-Topped Peanut Butter Melts
Here is an easy, no-bake chocolate peanut butter bar. There are many similar recipes out there, but this one is likely one of the quickest and easiest. It is also, in my opinion, one of the tastier ones. It isn't simply a regular chocolate and peanut butter flavored square. The crust, with icing sugar, is truly peanut buttery and melts in your mouth. The chocolate topping, unlike simply using melted chocolate, adds more flavor depth, is sweeter, and does not crack when cut like plain chocolate often does.
Peanut Butter Crust
1/2 cup hard margarine
1/2 cup smooth peanut butter
2 cups icing sugar
1/3 cup graham cracker crumbs
Chocolate Topping
1/2 cup granulated (white) sugar
3 Tablespoons water
2 Tablespoons hard margarine
1/2 cup semi-sweet chocolate chips
 Line an 8x8 inch square pan with foil.
CRUST: In a medium saucepan, melt the butter and peanut butter together. Mix in sugar and crumbs. Press into prepared pan.
TOPPING: In a medium saucepan, bring the sugar, water, and margarine to a boil over high heat, stirring constantly. Boil for one minute. Add chocolate chips and stir until smooth. Pour over crust. Chill until set.
Recipe is from my favorite cookbook, Company's Coming "Chocolate Everything".
Paré, Jean. "Peanut Butter Squares." Recipe. Chocolate Everything, Edmonton Alberta: Company's Coming Publishing Limited, 2000. 166.
Peanut Butter Crust
1/2 cup hard margarine
1/2 cup smooth peanut butter
2 cups icing sugar
1/3 cup graham cracker crumbs
Chocolate Topping
1/2 cup granulated (white) sugar
3 Tablespoons water
2 Tablespoons hard margarine
1/2 cup semi-sweet chocolate chips

CRUST: In a medium saucepan, melt the butter and peanut butter together. Mix in sugar and crumbs. Press into prepared pan.
TOPPING: In a medium saucepan, bring the sugar, water, and margarine to a boil over high heat, stirring constantly. Boil for one minute. Add chocolate chips and stir until smooth. Pour over crust. Chill until set.
Recipe is from my favorite cookbook, Company's Coming "Chocolate Everything".
Paré, Jean. "Peanut Butter Squares." Recipe. Chocolate Everything, Edmonton Alberta: Company's Coming Publishing Limited, 2000. 166.
Tuesday, January 14, 2014
Haddock Sauté with Brown Butter Sauce
Haddock Sauté with Brown Butter Sauce
cooking oil
4 small fillets haddock
1 cup baby potatoes, halved
1 cup broccoli florets
1/2 onion, coarsely chopped
1/2 cup baby tomatoes, halved
1/4 cup butter
1 clove garlic, finely chopped
2 teaspoons lemon juice
1 teaspoon paprika
 Heat a little oil in two small frying pans over medium heat. Add the haddock to one pan and the potatoes, broccoli, and onion to the others. Cook, stirring often. Break up the haddock into bite-sized pieces and cook until it flakes evenly with a fork. Cook the vegetables until tender, adding in the tomatoes for the last minute or two. The fish and vegetables should take relatively the same amount of time to cook.
Meanwhile, melt the butter in a small saucepan over medium heat. Add the garlic and cook butter until it bubbles then turns a light, golden brown. Do not allow it to get too brown or it will taste burnt. Remove from heat and stir in the lemon juice, careful as it will sputter. Stir in the paprika.
Serve this amazingly easy and quick yet flavorful and tasty dish! Spoon some vegetables on a plate, place some haddock on top, and drizzle with sauce. Makes four modest or two hearty servings.
cooking oil
4 small fillets haddock
1 cup baby potatoes, halved
1 cup broccoli florets
1/2 onion, coarsely chopped
1/2 cup baby tomatoes, halved
1/4 cup butter
1 clove garlic, finely chopped
2 teaspoons lemon juice
1 teaspoon paprika

Meanwhile, melt the butter in a small saucepan over medium heat. Add the garlic and cook butter until it bubbles then turns a light, golden brown. Do not allow it to get too brown or it will taste burnt. Remove from heat and stir in the lemon juice, careful as it will sputter. Stir in the paprika.
Serve this amazingly easy and quick yet flavorful and tasty dish! Spoon some vegetables on a plate, place some haddock on top, and drizzle with sauce. Makes four modest or two hearty servings.
Monday, January 13, 2014
Baguette Sandwiches
Here is one way I served my baguette from yesterday's post. It is delicious enough on its own fresh from the oven, but it doesn't hurt to jazz it up and make it into more of a meal, especially if it is the next day. Making a sandwich isn't exactly rocket science, and recipes aren't really necessary, but I thought I'd share the flavors I used, which seemed to have worked well. Round out the meal with an egg dish, a salad, or a soup, and save room for an extra special dessert!
Baguette Sandwiches
1 piece baguette, cut along the diagonal (as big as you want)
hummus (any variety)
salad greens (any variety)
1 piece Monterey Jack cheese
 Spread hummus on both sides of the baguette. Top artistically with a few leafs of salad. Top with a slice of cheese. Place other piece of baguette on top. Place under the broiler and broil for a few minutes until cheese is melted and baguette is toasted and crisp. Serve immediately.
Baguette Sandwiches
1 piece baguette, cut along the diagonal (as big as you want)
hummus (any variety)
salad greens (any variety)
1 piece Monterey Jack cheese
Sunday, January 12, 2014
Machine Baguette
Here is a really easy way to make a delicious, fresh baguette at home. A bread machine will do all of the mixing, kneading and cycle of rising for you. Then you simply shape the loaf, let it rise again, and bake it. Much faster but definitely tasty. This recipe just makes one baguette. I think this baguette is better suited to sandwiches than bruschetta, but I definitely recommend toasting it before eating it if you don't eat it immediately after baking.
 Machine Baguette
3/4 cup water
1 teaspoon salt
1/2 teaspoon granulated (white) sugar
2 cups white flour
1 1/2 Tablespoons wheat germ (optional)
1 1/4 teaspoons yeast
pinch cornmeal for coating (optional)
Place all ingredients except cornmeal in bread pan in order given, or according to manufacturer's instructions for dough/pizza dough cycle, small loaf.
Once cycle is complete, remove dough, punch down, and let rest for ten minutes.
Shape dough into long, narrow baguette, approximately ten to twelve inches long. Place on a baking sheet that has been lined or dusted with cornmeal or additional flour. Cover loosely with plastic wrap and let rise for about an hour.
Remove baguette from oven, place a pan of water in the bottom of the oven and preheat to 400◦F.
Make three diagonal slashes, about 1/4 inch deep, across the baguette using a serrated knife. Bake for about 20 minutes until golden and hollow-sounding when tapped.
Saturday, January 11, 2014
Frittata For Two

1 teaspoon oil
2 Tablespoons chopped onion
1/2 cup thinly sliced mushrooms
2 large eggs, beaten
1/4 cup diced tomatoes, drained
salt and ground black pepper, to taste
2 Tablespoons chopped or grated Monterey Jack cheese
Heat the oil in a small frying pan over medium heat. Add the oil and mushrooms and sauté for about three minutes until soft. Pour the egg over top and tilt the pan to coat evenly, sprinkle with tomato and salt and pepper. Cook for another three minutes or so until egg is almost set. Sprinkle the cheese over top, then place the pan in the oven under the broiler and broil for a minute or two until the cheese is melted. Slide frittata onto a plate, slice in two, and serve immediately.
Broiling is optional, though it does make the cheese nice and bubbly and makes the top a bit more golden. If you aren't sure your pan is oven safe, wrap the handle in foil or simply don't broil and cook a bit longer on the stove. I am sure ingredients and seasoning could be played with in this dish as well. Quantities could also be increased to make a bigger dish. As is, it makes a nice breakfast, brunch, or quick lunch for two with a sandwich or salad and some fruit.
Friday, January 10, 2014
Applesauce Oatmeal
Applesauce Oatmeal
1/2 cup old-fashioned oats
1 teaspoon ground cinnamon
1/2 teaspoon ground ginger
1/4 teaspoon ground cloves
1/4 cup raisins
1/4 cup applesauce
1/4 cup water
1/4 teaspoon vanilla extract
1-2 teaspoons almond butter (optional)

In a small, microwave-safe bowl, stir together the oats, spices, and raisins. Stir in the remaining ingredients. Microwave on HIGH (100%) power for about 90 seconds, until set.
The almond butter adds a little extra flavor and protein, but isn't necessary. I like to spread a little extra on top after cooking. The addition of a few chopped nuts would also be welcome.
This is another quick, individual, hearty breakfast. Can you tell breakfast is my favorite meal of the day? It is similar to {Pumpkin Spice Oatmeal}. If you have leftover mixture from Vegan French Toast, this can be used in place of the applesauce, spice, and vanilla.
Thursday, January 09, 2014
Machine Bran Bread
Machine Bran Bread
1/2 cup natural wheat bran
1 cup water
1 large egg, beaten
1 1/2 Tablespoon butter or hard margarine
3 Tablespoons molasses
1 teaspoon salt
2 5/8 cups whole wheat flour
2 1/2 teaspoons bread machine yeast
 Place all ingredients in bread pan in order given, or according to manufacturer's instructions for whole wheat cycle, large loaf.
This is another bread machine recipe I tried. It worked really well - uniformly shaped, even textured, and hearty. This is a really heavy, nutritious bread so one slice is all you need. I may have a slightly smaller bread machine than was designed for this recipe, as my dough overflowed a little when rising, but once it baked it seemed to be fine. Next time I may try the amount for a medium loaf and use the large cycle.
1/2 cup natural wheat bran
1 cup water
1 large egg, beaten
1 1/2 Tablespoon butter or hard margarine
3 Tablespoons molasses
1 teaspoon salt
2 5/8 cups whole wheat flour
2 1/2 teaspoons bread machine yeast

This is another bread machine recipe I tried. It worked really well - uniformly shaped, even textured, and hearty. This is a really heavy, nutritious bread so one slice is all you need. I may have a slightly smaller bread machine than was designed for this recipe, as my dough overflowed a little when rising, but once it baked it seemed to be fine. Next time I may try the amount for a medium loaf and use the large cycle.
Wednesday, January 08, 2014
Fruit Salad In A Heart

Tuesday, January 07, 2014
Vegan French Toast
You will not believe until you try this how much this tastes exactly like traditional French toast. It does lack that eggy-flavor, but other than that, taste and texture is very similar! Not only is this vegan, it is also probably a healthier recipe than the traditional. It makes enough to coat 2-4 slices of bread, depending on size. Any leftover batter can be spread on top of the toast, used as a dip, used in baking, or used to cook into oatmeal. Other than that, top it as you wish - fruit, nuts, syrup, peanut butter, honey, etc.
 Vegan French Toast
1/2 cup applesauce
2 Tablespoons milk of choice
1 Tablespoon ground flaxseed
1 teaspoon ground cinnamon
2-4 slices bread of choice
Heat a little oil in a medium frying pan over medium heat. In a shallow dish, mix all ingredients except for the bread. Dip the bread in the mixture, letting it sit for thirty seconds per side. Fry until golden on both sides.
Monday, January 06, 2014
Chocolate Rich Crust
Chocolate Rich Crust
1 cup all-purpose (plain) flour
1/3 cup icing sugar
2 Tablespoons unsweetened cocoa powder
1/2 cup hard margarine, softened slightly and cut into cubes
In a small bowl, mix together the flour, sugar, and cocoa. Add the margarine and cut in until crumbly. It works best to use your hands for this - you will need them anyway to press it into the pan. This crust will fit an 8 or 9 inch round or springform pan, and likely a square pan of similar size as well.
This is a sweeter, softer crust. The use of icing sugar contributes to this, as well as the fact that softened butter is used. Therefore, it is not a flaky crust, but a good crust to hold a heavier, denser filling. It works very well with the chocolate truffle torte from yesterday, but could also be the base for chocolate pies.

Sunday, January 05, 2014
Truffle Torte
If you are looking for a satisfying, rich, delicious chocolate dessert - this is it! The best way to describe this is a chocolate truffle in cake or pie form, which truly melts in your mouth. It takes a few extra steps to make, especially if you choose to decorate it, but it doesn't require many ingredients. It doesn't need a lot of decoration, but a few simple things can transform this into a really special dessert.
 Truffle Torte
9-inch chocolate crust
16 squares (one ounce/ 28 grams each) semi-sweet chocolate
1/2 cup hard margarine, cut into small cubes
1 teaspoon vanilla extract
4 large eggs, separated, at room temperature
Grease a 9-inch springform pan. Wrap the bottom outside of the pan with foil. Preheat oven to 425◦F. Bring a kettle of water to a boil.
Press the crust firmly into the bottom of the pan. Place the pan in a larger pan.
In a medium bowl, melt the chocolate in the microwave for one minute. Stir, then microwave in 30 second intervals until melted. Stir until smooth. Add the butter and stir until melted, then add the vanilla. Set aside to cool slightly.
In a large bowl, beat the egg whites until stiff. Beat the egg yolks into the chocolate mixture, one at a time. Then gently fold in the egg whites. Pour over prepared crust.
Pour boiling water into the larger pan so it reaches halfway up the sides of the round pan. Bake for about 15 minutes, until outer edge is set. Middle may appear soft. Remove from water bath, then remove foil and side of pan. Let cool, then chill for several hours.
Garnish with chocolate glaze, ganache, frosting, sauce, fruit, chocolate curls, flakes, or as desired.
I used what I thought was the perfect chocolate crust recipe to match this torte, but I wonder if it would work without a crust, as it doesn't seem absolutely necessary. I may try that next time. I decorated mine with chocolate ganache, chocolate piping, chocolate filigree hearts, and strawberries.
Saturday, January 04, 2014
Year Of The Cupcake
After the posts from the past two days, I got to thinking. Not only was it a really cupcake Christmas for me, but it was also a cupcake-full year. I am particularly thinking back to my birthday in June, where I also received a number of cupcake-related gifts. Pictured here are two cupcake magazines, a cupcake carousel, a cupcake lip balm, and a cupcake decorating book.
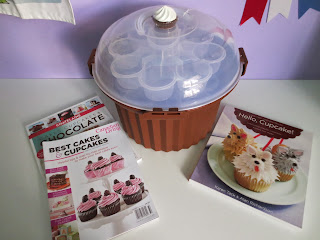 With all of these cupcakes on my mind, I decided to look around a bit more, and I found several more cupcake things in my room, most of which I acquired this year. A cupcake sign with my motto, "Live Life...One Cupcake at a time", a cupcake recipe box, a cupcake recipe tin, a cupcake card, cupcake wrapping paper, and even cupcake clothing.
 Why so many cupcakes? Here is my reasoning. Everyone who knows me at all knows I am a true foodie. Cupcakes are just one of those symbols that are often related with baking and cake decorating and the culinary field. It is just a pretty, universal symbol that really says it all. I have always really liked cupcakes, not so much their taste (although I much prefer the mile-high frosting than the actual cake part), but their look. They are miniature cakes, which automatically gives them that cuteness factor, and they can be decorated in so many different, gorgeous ways. Swirls, different colors, gourmet toppings, sprinkles, animals, holidays, pull-apart shapes, need I go on?
Secondly, I took on a cupcake as a symbol of self, something that represents me, awhile ago. I think cupcakes really describe me, and I use them as a symbol on a plaque in my room, and often when I sign off on things. Cupcakes are also featured in my cover photo, and framed in my room.
I feel some also know me as "the cupcake girl", as I like to present people with a cupcake on their birthday. Just a little simple acknowledgement of their special day!
Friday, January 03, 2014
Gifts of Cupcakes
Here are some more of my gifts, that are not directly cupcake themed, but are at least cake or culinary themed in some way.
 From left to right: tea towel, cookbook, decorating tip organizer, cake leveler, Linzer cookie cutters, homemade vanilla extract, large decorating tip, cake journal, cake whiteboard, tablecloth, knife.
So some of these are cake related, the cookbook has cupcake recipes, the towels are for displaying cupcakes, the tips, tip organizer, and knife are for decorating cupcakes, the vanilla is for baking cupcakes. Not pictured here are a new digital camera (for taking pictures of cupcakes), and a breadmaker (can't really use it to make cupcakes, but it is still culinary related).
The only gifts I received that really were not cupcake or culinary-related in any way were socks, slippers, a bag, and a bracelet. I mean, I could even relate another cookbook and a box of chocolates to the culinary field.
I also got a later present after this picture was taken of star cookie cutters - the kind that become increasingly bigger and you can stack the cookies and decorate them like a tree!
Thursday, January 02, 2014
A Cupcake Christmas
This year, I received quite a bit of stuff that was cupcake-related for Christmas. You see, my mother had decided she would go with a cupcake theme for the majority of my presents, as she sometimes likes to choose themes for the Christmas gifts she gives, depending on the recipient. It just so happened that completely coincidentally (or so she assures me) others who gave me presents also followed suit with this theme. It began with one of my Secret Santas, who gave me decorative twelve days of Christmas cupcake liners and a cupcake cookbook. Then I opened a present from the family of my boyfriend - also cupcake related. My other Secret Santa gave me a cupcake ornament. My parents and brothers gave me cupcake stuff. The pattern just kept continuing. Here is a picture of all of my cupcake Christmas gifts, minus a cupcake recipe magazine, which I seem to have forgotten to include (not that I didn't like it, but this was an early gift that I had already read and put away on my shelf. I'm a bit of an organization freak). I know some of these gifts may be a bit difficult to make out in this picture.
Presents going left to right, beginning in the back row, with the giver in brackets:
BACK - cupcake wall calendar (Mom and Dad), cupcake Christmas card (Mom and Dad), cupcake wrapping paper (Mom and Dad), cupcake cookbook (Secret Santa).
MIDDLE - cupcake oven mitts (boyfriend's sister), pink cupcake ornament (cousin), cupcake note pad (stocking), cupcake s'mores ornament (Mom and Dad), cupcake mug (brother), cupcake holder (brother), cupcake cake tester (boyfriend's sister), cupcake ornament (Secret Santa).
FRONT - cupcake liners (Secret Santa), pink cupcake ornament (cousin), cupcake tea towel (stocking), cupcake necklace (brother), chocolate cupcake ornament (cousin), cupcake socks (Saint Nicholas).

Wednesday, January 01, 2014
Happy 2014!
Another year has come and gone - 2013 is over already and 2014 has begun! In 2013, I yet again published a post everyday, so I have 365 posts that year. Of those, 34 posts are written in French, marking the first year I have posts published in a language other than English. This brings me to a grand total of 893 posts! Hopefully I will continue publishing a post every day in 2014 as well. Though I always foresee some roadblocks, I am sure I can work past them. Unless I happen to loose internet for several weeks (knock on wood). I am also looking forward to printing off another year's worth of my blog posts into a book format. I am a year behind, since I wanted to make sure the year was finished before printing, and also because I only discovered this idea last year. So I have my book of posts from 2011 already (which wasn't a full year of blogging) and I am going to work on getting my book from 2012 soon. I'll likely end up with the 2013 book next year.
I just wanted to take this time to say Happy New Year to everyone. Here's to new beginnings and a fresh start. Cherish the past, live in the present, and dream for the future. I may be giving this blog a fresh new look in the near future, maybe changing the format, layout, or colors of the page. If I can figure out the technical aspects of it and make it work. Anyways, I hope everyone had a great year in 2013, and all the best in the coming year!
 PHOTO CREDIT:"2014" http://www.dietsinreview.com/diet_column/12/our-top-food-trend-predictions-for-2014/. Diets In Review, n.d. Tuesday, December 31, 2013.
I just wanted to take this time to say Happy New Year to everyone. Here's to new beginnings and a fresh start. Cherish the past, live in the present, and dream for the future. I may be giving this blog a fresh new look in the near future, maybe changing the format, layout, or colors of the page. If I can figure out the technical aspects of it and make it work. Anyways, I hope everyone had a great year in 2013, and all the best in the coming year!

Subscribe to:
Posts (Atom)