Lately I have been presented with a slight challenge. A baking challenge of course. I have to make something unique, different, something I have never made before; and something a bit challenging. In addition, this item needs to be healthy, and needs to be able to be prepared within a short period of time, probably about an hour or so. Along with all this, it needs to follow the criteria of being colorful, beautifully presented, nutritious, and of course, tasty. I also need to make it on a budget, with a limited number of resources in a quick-paced atmosphere. The good news? I only need to present one serving for submission, and the item can be in any category: dessert, meal, snack, etc.
The problem here, is I am having a difficult time pinpointing an item that I have never made before and would be unique and new to me, but yet it cannot be something that takes loads of time, costs a lot, or requires fancy equipment. This rules out caviar and haggis. It also needs to be healthy, which rules out a three-tiered fondant cake, or a crystallized sugar structure. The issue is, being the avid baker that I am, I have already made so many different things: muffins, cakes, cookies, casseroles, quiches, pies, pastas, squares, fudge, cereal, etc. The thing is, most extravagant items I can think of that are not out of the question based on the supplies and ingredients I can access are not particularly nutritious. This is because most healthy foods are simple; fruits, vegetables, nuts, seeds, whole grains, eggs, dairy, etc. Hmmm, I sure seem to spend more time searching for recipes than I do making them sometimes. I warmly welcome any suggestions or ideas!
Friday, May 31, 2013
Thursday, May 30, 2013
Blueberry Pie Bars

Blueberry Pie Bars
CRUST
1 1/2 cups all-purpose (plain) flour
3/4 cup granulated (white) sugar
1/4 teaspoon salt
3/4 cup cold butter, cubed
FILLING
2 large eggs
1/2 cup plain low-fat yogurt or sour cream
1 cup granulated (white) sugar
1/3 cup all-purpose (plain) flour
1/8 teaspoon salt
1 teaspoon ground cinnamon
3 cups blueberries, fresh or frozen
Preheat oven to 325◦F (if using a glass pan) or 350◦F. Line an 8x11 inch rectangular baking pan with parchment paper.
CRUST: In a large bowl, mix the flour, sugar and salt. Cut in the butter until crumbly. Set aside 3/4 cup and press the rest firmly into the pan. Bake for 15 minutes.
FILLING: Meanwhile, beat the eggs, then beat in the yogurt, sugar, flour, salt, and cinnamon. Fold in the blueberries. Pour over prepared crust and sprinkle remaining crust mixture on top. Bake for 45-55 minutes, or slightly longer if using frozen blueberries, until just set. Let cool slightly before cutting. These store well in the fridge.
Wednesday, May 29, 2013
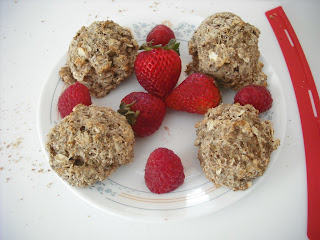
Almond Energy Bites
Almond Energy Bites
1 cup almond meal (leftover from almond milk)
1/3 cup almond butter
1/4 cup ground flaxseed
2 Tablespoons coconut oil
2 Tablespoons honey or molasses or maple syrup
Put all ingredients in a food processor and process until smooth. This should take less than a minute. Transfer mixture to a small bowl and place in the freezer for several hours until firm. Roll into balls. I got about 15, but it depends on how big you make them.
 I store these in the freezer, as they get quite soft. They can be eaten frozen, or can stand at room temperature for 10-20 minutes to soften. You can probably keep them in the fridge as well for short-term storage. I know they don't look that great, but they are nutritious, high-protein, and taste great!
This is a great way to use up the almond meal you have leftover from making almond milk! I make them right after I make the milk, and just leave the almonds in the food processor It is very convenient this way. Any combination of nuts and nut butters may be used in this recipe.
1 cup almond meal (leftover from almond milk)
1/3 cup almond butter
1/4 cup ground flaxseed
2 Tablespoons coconut oil
2 Tablespoons honey or molasses or maple syrup
Put all ingredients in a food processor and process until smooth. This should take less than a minute. Transfer mixture to a small bowl and place in the freezer for several hours until firm. Roll into balls. I got about 15, but it depends on how big you make them.

This is a great way to use up the almond meal you have leftover from making almond milk! I make them right after I make the milk, and just leave the almonds in the food processor It is very convenient this way. Any combination of nuts and nut butters may be used in this recipe.
Tuesday, May 28, 2013
Almond Milk
The other day I tried making my own almond milk. No, I am not vegan, allergic to milk, or severely lactose-intolerant, but I do get tired of cow's milk from time to time. I have also suffered from minor cases of lactose-intolerance in the past, provoked by drinking a greater than usual quantity of milk. I have tried soy milk before, but I wanted to try something different this time. I went with almond milk, and since I like to make as much as possible myself, and I now have a dandy new food processor, I chose to make my own almond milk instead of purchasing it. This is probably cheaper and has much less additives than store-bought versions, but keep in mind it won't have nay of the added vitamins or minerals, so if you are following a diet excluding milk products, you may be missing out on some key nutrients if you make your own almond milk.
Making almond milk is incredibly easy. Just soak the amount of almonds you will need in a bowl of water overnight. Drain them, then put them in the food processor along with fresh water - four times the amount of almonds (for example, one cup of almonds and four cups of water will make approximately four cups of almond milk). Then process until smooth, it should only take a few minutes. Drain well, as there will be little almond bits leftover. Then add any flavoring you would like - salt, sugar, vanilla, honey, cocoa, etc. Don't throw out the leftover almond meal though! It is extremely nutritious and great to use in baking. You can eat it as is, sprinkled in yogurt, or cereal, or you can add it to your favorite baked goods or recipes that call for ground nuts. Of course this almond meal will be quite wet, it will only keep in the fridge for a few days. To prolong storage, toast it in the oven at 350◦F for 10-15 minutes. It may also be frozen. The milk itself should keep in the fridge for about a week or so.

Making almond milk is incredibly easy. Just soak the amount of almonds you will need in a bowl of water overnight. Drain them, then put them in the food processor along with fresh water - four times the amount of almonds (for example, one cup of almonds and four cups of water will make approximately four cups of almond milk). Then process until smooth, it should only take a few minutes. Drain well, as there will be little almond bits leftover. Then add any flavoring you would like - salt, sugar, vanilla, honey, cocoa, etc. Don't throw out the leftover almond meal though! It is extremely nutritious and great to use in baking. You can eat it as is, sprinkled in yogurt, or cereal, or you can add it to your favorite baked goods or recipes that call for ground nuts. Of course this almond meal will be quite wet, it will only keep in the fridge for a few days. To prolong storage, toast it in the oven at 350◦F for 10-15 minutes. It may also be frozen. The milk itself should keep in the fridge for about a week or so.

Monday, May 27, 2013
Sun Butter
I have always wanted to try making my own nut butters, especially peanut butter and Nutella. I find that natural peanut butter often gets too hard in the fridge, and making smaller quantities of homemade would probably be more viable. Also, homemade versions of Nutella are much healthier, as the amount of sugar can be controlled. However, the first nut butter I tried making with my new food processor was actually sunflower seed butter. Because sunflower seeds are not as oily as nuts, it does require the addition of a little bit of oil, but I used heart-healthy olive oil, and I didn't add any salt or sugar. The process is quite easy, and you may make as much or as little as you like. Just toss the seeds in the food processor, and pulse on and off, allowing the seeds to release their natural oils. After a few minutes once the seeds begin to clump together, add in the oil and continue to process until completely smooth. Then store in the fridge for a few weeks or so. This doesn't become hard and the it does not separate as in some nut butters. It is great as a spread on bread or toast, or as a dip for vegetables.


Sunday, May 26, 2013
Baby Scallops With White Wine Reduction
The other day we had scallops for dinner. We usually bread scallops in bread crumbs and then bake them in the oven. This time though, we bought some regular scallops as well as some baby scallops to try. My father pan-fried the baby scallops. He began with some butter and oil, and browned it in the pan. then he gently seared the baby scallops. He added some white wine to make a reduction. I had never had baby scallops before, so it was a bit difficult to tell whether the white wine paired nicely with the scallops without having tasted them alone. I think this white wine was a little bit on the sweet side though it wasn't too bad. I would love to try seared baby scallops with another reduction sometime, perhaps a maple, balsamic, or lemon reduction. I bet it would be really good with caramelized onions as well. This is a really simple dish that cooks really quickly, but you could easily make it fancy by its presentation Place a few scallops on a plate, or on a bed of greens, rice, etc. Add a drizzle of extra reduction on the side, or oil, or balsamic vinegar. Add a lemon wedge, parsley or other garnish, and voila!


Saturday, May 25, 2013
Oat Batter Bread
Oat Batter Bread
3 1/2 cups whole wheat flour
2 packages instant yeast
1 Tablespoon granulated (white) sugar
1/4 teaspoon baking soda
1/2 teaspoon salt
1 1/2 cups warm water
1 cup warm milk
1 Tablespoon molasses or honey
1/2 cup oats
1/2 cup oat bran
1/2 cup ground flaxseed
In a large bowl, mix the first five dry ingredients. Add the water, milk, and molasses. Stir in the oats, oat bran, and flax. Divide batter among two greased 9x5 inch loaf pans. Allow to rise for 45-60 minutes. Bake at 400◦F for about 25 minutes.
 This is another no-knead batter bread, and is quicker than most as it only requires one shorter rising time, and the yeast does not need to be proofed beforehand.
3 1/2 cups whole wheat flour
2 packages instant yeast
1 Tablespoon granulated (white) sugar
1/4 teaspoon baking soda
1/2 teaspoon salt
1 1/2 cups warm water
1 cup warm milk
1 Tablespoon molasses or honey
1/2 cup oats
1/2 cup oat bran
1/2 cup ground flaxseed
In a large bowl, mix the first five dry ingredients. Add the water, milk, and molasses. Stir in the oats, oat bran, and flax. Divide batter among two greased 9x5 inch loaf pans. Allow to rise for 45-60 minutes. Bake at 400◦F for about 25 minutes.

Friday, May 24, 2013
Chocolate Streusel Cake
Looking for a slightly different cake recipe, one that is not too sweet and needs no icing? One that combines the best of both worlds: chocolate and vanilla, with a touch of cinnamon as well. This is it! Quick and easy, using simple ingredients found on hand. I highly recommend using real butter and vanilla in the cake batter, as it will make a difference in the batter. It is a light, fluffy, and delicious basic cake batter. The chocolate streusel is also delicious, and I would eat it by the spoonful. It is sweet from brown sugar, chocolaty from cocoa and a few chocolate chips, and has a nice kick of cinnamon. The nuts in it are optional. The recipe calls for baking at 375◦F, though we used a glass pan and has great success at 325◦F, though baking time is slightly longer. This is absolutely delicious warm from the oven. Don't even wait for it to cool a bit, it even cuts well when piping hot!
 Chocolate Streusel Cake
CAKE
1/2 cup butter, or hard margarine, softened
1 large egg
1/2 teaspoon vanilla extract
3/4 cup milk
3/4 cup granulated (white) sugar
1 1/2 cups all-purpose (plain) flour
2 teaspoons baking powder
1/2 teaspoon salt
STREUSEL TOPPING
2 Tablespoons butter or hard margarine, softened
1/3 cup packed brown sugar
1 1/2 Tablespoons all-purpose (plain) flour
1 Tablespoon unsweetened cocoa powder
1/2 teaspoon ground cinnamon
2 Tablespoons miniature semi-sweet chocolate chips
2 Tablespoons chopped walnuts, optional
Preheat oven to 375◦F. Grease a 9x9 inch baking pan.
CAKE: In a large bowl, place all of the cake ingredients and beat on low until just moistened. Beat on medium speed for two minutes, until smooth. Spread evenly in prepared pan.
STRESUEL: In a medium bowl, combine all streusel ingredients. Sprinkle over batter. Bake for about 30 minutes or until a toothpick inserted in the cake comes out clean.
My father has already made this cake twice. He came to me looking for a recipe to make for Mother's Day, as I was too busy. This immediately popped in my mind, and I promptly hunted it down in my Potluck Dishes cookbook in the "Company's Coming" series. It is funny how I have been meaning to make some items for awhile, and when they finally are made, they become a new family favorite! We may try doubling the recipe next time, one batch doesn't last nearly long enough at our house.
Paré, Jean. "Chocolate Streusel Cake." Recipe. Potluck Dishes, Edmonton Alberta: Company's Coming Publishing Limited, 2006. 148.
Thursday, May 23, 2013
Oat Drop Biscuits
Here is another quick biscuit recipe. This is like having your bowl of oatmeal in a convenient handheld biscuit form, as it is chock full of oats and oat bran. I used old-fashioned oats, but if you are looking for a smooth texture, use rolled or quick oats. You can also add flax, wheat germ, chia seeds, etc. for a different flavor.
 Oat Drop Biscuits
1 cup whole wheat flour
1/2 cup oats
1/4 oat bran
1/4 natural wheat bran
2 Tablespoons sugar, honey or molasses
1 Tablespoon baking powder
1/4 teaspoon salt
1/2 cup unsweetened applesauce
3/4 cup milk
Preheat oven to 450◦F. Line a baking sheet with parchment paper.
In a large bowl, combine the first seven dry ingredients. Cut in the applesauce then stir pour in the milk. Drop by tablespoons onto prepared baking sheet. Bake for about 12 minutes, until golden and firm.
Wednesday, May 22, 2013
Chocolate Center Chip Cookies
These are chocolate chip cookies stepped up a notch. An extra chocolate chunk in the middle, that oozes out when warm makes these an extra special treat. You can use any type of chocolate in the center - milk, dark, or semi-sweet to match the chocolate chips. You can also make these into jumbo soft cookies, or just regular sized. This recipe calls for a much larger quantity of brown sugar than white sugar, which gives them a nice caramel flavor.
Chocolate Center Chip Cookies
1 cup butter or hard margarine, softened
1 1/4 cups packed brown sugar
1/2 cup granulated (white) sugar
2 large eggs
1 teaspoon vanilla extract
3 cups all-purpose (plain) flour
1 teaspoon baking soda
1/4 teaspoon salt
1 cup semi-sweet chocolate chips
24 one inch (for big cookies)
or 48 half inch chocolate pieces (for small cookies)
 Preheat oven to 350◦F. Line baking sheets with parchment paper.
In a large bowl, beat the butter and sugars until light and fluffy. beat in the eggs and vanilla. Stir in the flour, baking soda, and salt. Stir in the chocolate chips.
For big cookies: Use 2 Tablespoons of dough. Place a one inch chocolate piece in the center, and roll dough into a ball, completely enclosing the chocolate. Place cookies two inches apart on prepared baking sheets. Bake for 16-18 minutes.
For small cookies: Use 1 Tablespoon of dough. Place a half inch chocolate piece in the center, and roll dough into a ball, completely enclosing the chocolate. Place cookies one inch apart on prepared baking sheets. Bake for 12-15 minutes.
Bake cookies until just set, do not overbake. Allow them to stand on the cookie sheet for a few minutes before removing them if they are too soft. These cookies are best enjoyed warm, so the chocolate middles can ooze out of them. They can be reheated gently in the microwave for the same effect, or they are good cold too!
Chocolate Center Chip Cookies
1 cup butter or hard margarine, softened
1 1/4 cups packed brown sugar
1/2 cup granulated (white) sugar
2 large eggs
1 teaspoon vanilla extract
3 cups all-purpose (plain) flour
1 teaspoon baking soda
1/4 teaspoon salt
1 cup semi-sweet chocolate chips
24 one inch (for big cookies)
or 48 half inch chocolate pieces (for small cookies)

In a large bowl, beat the butter and sugars until light and fluffy. beat in the eggs and vanilla. Stir in the flour, baking soda, and salt. Stir in the chocolate chips.
For big cookies: Use 2 Tablespoons of dough. Place a one inch chocolate piece in the center, and roll dough into a ball, completely enclosing the chocolate. Place cookies two inches apart on prepared baking sheets. Bake for 16-18 minutes.
For small cookies: Use 1 Tablespoon of dough. Place a half inch chocolate piece in the center, and roll dough into a ball, completely enclosing the chocolate. Place cookies one inch apart on prepared baking sheets. Bake for 12-15 minutes.
Bake cookies until just set, do not overbake. Allow them to stand on the cookie sheet for a few minutes before removing them if they are too soft. These cookies are best enjoyed warm, so the chocolate middles can ooze out of them. They can be reheated gently in the microwave for the same effect, or they are good cold too!
Tuesday, May 21, 2013
Enriched Whole Wheat Batter Bread
It has been a little while since I've made bread. I was down to the last two slices from my emergency stash when I made this bread. I decided to ease back into it with something simple - a batter bread. It has a nice, hearty mix of whole grains I love, and doesn't require kneading. This loaf slices very nicely.
Enriched Whole Wheat Batter Bread
1 1/4 cups warm water
1 teaspoon granulated (white) sugar
1 package instant yeast
1 cup warm milk
1 large egg, beaten
3 Tablespoons molasses
2 Tablespoons olive oil
1/4 cup oats
1/4 cup wheat germ
1/2 cup oat bran
1/2 cup ground flaxseed
1/2 cup natural wheat bran
3 1/4 cups whole wheat flour
In a large bowl, dissolve the sugar in the water. Sprinkle the yeast over top and let stand for ten minutes until frothy. Stir to dissolve yeast. Add remaining ingredients except for the flour. Stir in 1 1/2 of flour, then 3/4 cup more flour. Allow the bread to rise for an hour. Stir in the remaining one cup flour. Divide the batter among two greased 9x5 inch loaf pans. Allow to rise for another hour. Bake at 375◦F for about 30 minutes.

Can you tell I'm running out of ideas for photographing bread?
Monday, May 20, 2013
Zebra Feathered Icing
For my zebra cake featured yesterday, I decided to make a matching icing design. I could have just made black and white stripes, just like a zebra, but I wanted to go for a little something different. I decided to try a feathered design, which can be done on cakes, bars, cookies, cheesecakes, and other desserts. It is actually fairly simple, but looks quite impressive! So I covered the cake in chocolate glaze, then piped on white stripes. It looked pretty cool just like that, but I then made it into a feathered design. Still reminds me of a zebra! I was thinking of making a small batch of both chocolate and white icing, and marbling the icing. Then I would have had zebra cake with cow frosting. I'll save that for another time.

Step One: Cover the cake with chocolate frosting, icing, or glaze. You don't want it thin so that it runs down the sides, but thick enough to spread and soft enough to drag a design through it. I only bothered to frost the top, not the sides, but you can do both.
 Step Two: Pipe on stripes of white icing. Space them about an inch or so apart. You can make them closer or further, as long as it is consistent. I was actually impressed at how straight I piped these lines free-handed!
Step Three: Using a wooden toothpick or skewer, gently drag the toothpick in a straight line vertically through the horizontal stripes, down the cake, starting at the far left. Drag the toothpick from top to bottom, and don't stop along the way. Wipe the pick clean. About an inch or so from that line (again, it can be closer or further) drag the toothpick in the same way, this time going up the cake. Repeat this pattern, alternating up and down to get the pattern. You can choose to make all of the drags go in one direction as well, but I think it looks neater when they are alternating.

Sunday, May 19, 2013
Zebra Cake
This is an interesting cake idea I recently found online. It is a different take on a marble cake; instead of gently swirling the two batters together, rings are created, that bake into a cake resembling zebra stripes. It's fun, and actually not that difficult. Pretty impressive if you get it right too, and if not, it looks like a marble cake and still tastes very good! Any cake recipe can be used to make this, just divide white cake batter in half, and add some cocoa to one half.
A thinner batter works better with these types of cakes so it will spread out quickly. This batter was actually on the thicker side, and didn't spread as well, which is why I ended up making four separate rings, which surprisingly still worked out quite well. However, keep in mind that with a thinner batter, you will have to work quickly!
You can easily do a quick search of "zebra cake" for step-by-step videos showing the process of putting the batter in the pan.
This is what mine looked like before baking:
 Zebra Cake
1/2 cup butter, softened
1 cup granulated (white) sugar
2 large eggs
2 Tablespoons vanilla extract
1 1/2 teaspoons baking powder
1/2 teaspoon salt
2 cups all-purpose (plain) flour
1 1/3 cups evaporated milk
1/4 cup unsweetened cocoa powder
Preheat oven to 350◦F. Grease and flour an 8 or 9 inch round cake pan.
In a large bowl, cream the butter and sugar until light and fluffy. Beat in the eggs and vanilla. Add the baking powder, salt, and 1 cup of flour. Pour in the milk and remaining flour and mix well. Divide batter in half. Add cocoa to one half.
Now for the zebra effect. I used 1/8 cup measuring cups for this, as they are equal to 2 Tablespoons. You can also spoon the batter into two pastry bags or plastic bags and squeeze them out instead of scooping.
Place one scoop of vanilla batter in the center of the pan. Let it spread a bit. Put an equal scoop of chocolate in the center of the vanilla. Let it spread a bit. Keep alternating vanilla and chocolate batter allowing the batter to spread and fill the pan and create circles of vanilla and chocolate batter.
Bake for about 40 minutes in a 9 inch pan, or slightly longer for an 8 inch pan, as the batter will be deeper. Cool in the pan for ten minutes, then turn it to cool. Frost as desired.
And this is what it looked after baking:

A thinner batter works better with these types of cakes so it will spread out quickly. This batter was actually on the thicker side, and didn't spread as well, which is why I ended up making four separate rings, which surprisingly still worked out quite well. However, keep in mind that with a thinner batter, you will have to work quickly!
You can easily do a quick search of "zebra cake" for step-by-step videos showing the process of putting the batter in the pan.
This is what mine looked like before baking:

1/2 cup butter, softened
1 cup granulated (white) sugar
2 large eggs
2 Tablespoons vanilla extract
1 1/2 teaspoons baking powder
1/2 teaspoon salt
2 cups all-purpose (plain) flour
1 1/3 cups evaporated milk
1/4 cup unsweetened cocoa powder
Preheat oven to 350◦F. Grease and flour an 8 or 9 inch round cake pan.
In a large bowl, cream the butter and sugar until light and fluffy. Beat in the eggs and vanilla. Add the baking powder, salt, and 1 cup of flour. Pour in the milk and remaining flour and mix well. Divide batter in half. Add cocoa to one half.
Now for the zebra effect. I used 1/8 cup measuring cups for this, as they are equal to 2 Tablespoons. You can also spoon the batter into two pastry bags or plastic bags and squeeze them out instead of scooping.
Place one scoop of vanilla batter in the center of the pan. Let it spread a bit. Put an equal scoop of chocolate in the center of the vanilla. Let it spread a bit. Keep alternating vanilla and chocolate batter allowing the batter to spread and fill the pan and create circles of vanilla and chocolate batter.
Bake for about 40 minutes in a 9 inch pan, or slightly longer for an 8 inch pan, as the batter will be deeper. Cool in the pan for ten minutes, then turn it to cool. Frost as desired.
And this is what it looked after baking:

More about the icing technique tomorrow!
Saturday, May 18, 2013
A Graduation Feast
Today will conclude all of my posts from the gradation party. I know, finally! But it was a great party, with a lot of food, and I had to share the dishes. It actually worked out quite well, because I have been very busy the past few weeks and haven't been baking much anyway. We had of course leftovers to use up from the party, and I just did not have much time to bake new things either. But now I have baked a few new things, and I have featured all of my old things, and it is time to move on. But I did want to include this little closing post.
In the end, we ended up with plenty of food for everyone, and enough for some leftovers so we didn't have to cook for a few days, but not too much that any of it got wasted. I regret the fact that I did not manage to get a picture of the entire mealtime set-up. The kitchen looked quite nice, with a large warming, dish, two slow cookers, a rice cooker, several casserole dishes, and an assembly line going across it. I guess we were too anxious to eat. I am glad that I did manage to get a picture of each dish individually though. The one thing we did have too many of were dinner rolls. It is always nice to have dinner rolls, especially if some guests are limited on what they can eat, then at least they have something basic. But, when there are this many dishes and they are tasty, no one goes for plain old dinner rolls. We had white and whole wheat, and ended up with quite a few extra. Oh well, at least those are easy to freeze for another time!
So in total we had chips, crackers, salsa, fruit, vegetables, chocolates, mini quiches, stuffed mushrooms, sausage bites, egg rolls, spicy shrimp, dinner rolls, bean salad, macaroni salad, rice, sweet and sour meatballs, pineapple chicken, mushroom cheese rotini bake, vegetable quiche, chocolate cake, mini brownie bites, shortbread cookies, cherry coconut squares, and plenty of drinks. I don't think I am forgetting anything?
All in all, it was a great time with great food. But now it is time to move on.
Friday, May 17, 2013
Egg Rolls
This will be the last dish I feature from the graduation party. I don't want to say I saved the best for last, as choosing between all of them would be impossible, but this one is really good. I haven't had a lot of Chinese food, but I do know the Chinese food served in many restaurants around here, especially fast food joints, is not authentic Chinese food. Don't get me wrong, there are certainly a number of authentic Chinese restaurants out there as well, but a lot of Chinese food prepared, bought, and eaten around here is not like the authentic Chinese food you would find in China, or other Asian nations. Even if prepared at home, unless you are using an authentic Chinese recipe and ingredients bought from a Chinese specialty shop, it is likely to be quite different. Take chicken balls for example, are they really a Chinese food? I am quite certain egg rolls are. And when it comes to egg rolls, if it isn't the ones pictured below, you are missing out. Although the picture does not do them justice. Not that I have tasted a lot of different egg rolls, but I know these are very good. Arguably the best. Many people agree. Also they are quite authentic, as they are made by a close friend who grew up in China. They are good. I know they are also quite tedious and labor intensive to make, but they are always cooked to perfection. Crispy, with a delicious hot filling. I prefer them plain, but many enjoy them with a dab of plum sauce. They were a welcome addition to the buffet. We served them along with the main courses, but they could easily serve as an appetizer as well.
One thing I found particularly nice, was that a large platter of them was brought hot to the party. In addition, our friends brought us a smaller cold plate of them, for us to put in the fridge for ourselves, so it was guaranteed we would be able to enjoy some, at least the next day.

One thing I found particularly nice, was that a large platter of them was brought hot to the party. In addition, our friends brought us a smaller cold plate of them, for us to put in the fridge for ourselves, so it was guaranteed we would be able to enjoy some, at least the next day.

Thursday, May 16, 2013
Sausage Bites with Sauce
Another appetizer featured today, and quite an intriguing one. I did not make this one either so I don't know all of the work that went into making it, but it does seem relatively simple. Sometimes the most simple things are the best and tastiest though. I believe this is a type of spicy sausage, cooked and cut up, then arranged in a nice platter. Toothpicks were stuck into each piece to make it easy to pick up, and also easy to dip into the sauce in the middle. There was more to this dish though. In the bottom, along with the sausage, was a thick mixture of onions in another type of sauce or glaze, to add more flavor and make the dish even more special. the problem with being a hostess and food supervisor, is you don't get as much of a chance to socialize, so I didn't get to ask for an official name or composition of this dish, but I did happen to note that it was enjoyed by many guests!


Wednesday, May 15, 2013
Ceviche-Stuffed Mushrooms
Today I am featuring another dish brought to the party by a guest. This was one of the fancy appetizers, since we really only provided a few munchies. Stuffed mushrooms are a common dish, often baked and served hot, with filling such as bacon, spinach, dressings, and more. This is a different take on stuffed mushrooms. These are stuffed with ceviche, which is a mixture of raw fish and an acidic ingredient, such as vinegar or lemon juice. The fish is "cooked" by the acid. These stuffed mushrooms are not baked, but are meant to be served cold. I must say, the presentation on these is very well done, especially considering they had a bit of a bumpy ride on the way over.


Tuesday, May 14, 2013
Spicy Shrimp Sauté
This was one of the dishes a guest brought to the party, and one of my favorites. I have had this dish before, at another event attended by this guest, and I was happy to see this dish again. I call it a spicy shrimp sauté. It seems to consist of large pieces of tender, juicy shrimp coated in a batter and fried, along with some vegetables, such as green peppers, carrots, and onions. The entire dish is very heavily spiced. I am not sure exactly what spices are used, but just be wary and begin with a small amount of this dish, as it can be quite hot if you don't expect it. I like it as a main course, as it contains a lot of protein in the shrimp, but it also works as a side dish or an appetizer. It stays crisp and warm for awhile. It can even be refrigerated overnight and still enjoyed the next day, though it won't be quite as crisp of course. i must get the recipe for this!


Monday, May 13, 2013
Appetizer Selection
When planning a large meal, plus plenty of desserts, that will be ready to serve within an hour upon the arrival of guests, a fancy display of appetizers is not needed. Sit down appetizers, or fancy made hors-d'oeuvres are not needed, and are really just time-consuming and extra work. However, a few munchies are always nice to have, and of course drinks should always be available. Here is the appetizer selection we featured at the party. They are not made dishes, but boughten items prepared and put out for guests to munch on. Because most of these foods are also able to stand at room temperature, they can be left out during the meal, for dessert, and afterwards as well.
Here we have fresh fruit; red grapes, green grapes, and strawberries. We have chips, nacho chips, crackers, and salsa. We also have some mini chocolates Not a typical appetizer, but this was actually the only appetizer we ran out of (maybe not until dessert time, but still). This display was also joined by a vegetable tray with dip, and some mini quiches later on, both of which were brought by guests.

Here we have fresh fruit; red grapes, green grapes, and strawberries. We have chips, nacho chips, crackers, and salsa. We also have some mini chocolates Not a typical appetizer, but this was actually the only appetizer we ran out of (maybe not until dessert time, but still). This display was also joined by a vegetable tray with dip, and some mini quiches later on, both of which were brought by guests.

Sunday, May 12, 2013
Happy Mother's Day
Happy Mother's Day to all of the great mothers out there! Hopefully mothers everywhere are being treated to breakfast in bread, brunch, a nice supper, a great cake, or whatever their favorite foods are! I wanted to treat my mother to a great cake again, and perhaps some other sweet or even a meal she liked, but she is taking a raincheck for it. We have just gotten through all of our desserts (including cake) from last weekend, and it seemed like a bit too much too soon. Also, this is an extremely busy weekend for me. Luckily my mother was very understanding, and didn't seem upset in the least. I will make her a great dish another time, when I have the time and patience to make something really nice. My father did prepare my mother a nice meal though. He also wanted to bake her something, and asked me for suggestions. Luckily I had a perfect dish in mind, and I knew exactly where to find the recipe, as i often spend way too much time searching for things to make. It was a simple cake, not a cake that needs icing, but a quick chocolate streusel cake all baked in one that we enjoyed hot from the oven! I will feature that dish soon!
Happy Mother's Day!

PHOTO CREDIT:"Happy Mother's Day" http://www.desibucket.com/pictures/occasion/happy-mothers-day/page/9/ desibucket.com n.d. Sunday, May 12, 2013.
Happy Mother's Day!
PHOTO CREDIT:"Happy Mother's Day" http://www.desibucket.com/pictures/occasion/happy-mothers-day/page/9/ desibucket.com n.d. Sunday, May 12, 2013.
Saturday, May 11, 2013
Cherry Coconut Chews
Cherry Coconut Chews
CRUST
1 cup all-purpose (plain) flour
1 cup rolled oats
1 cup packed brown sugar
1 teaspoon baking powder
1/2 teaspoon salt
1/2 cup butter or hard margarine, cut into cubes
TOPPING
2 large eggs, beaten
1 cup packed brown sugar
1 teaspoon vanilla extract
1 cup unsweetened shredded coconut
2 tablespoons all-purpose (plain) flour
1 teaspoon baking powder
1/4 teaspoon salt
1 cup maraschino cherries, cut up
 CRUST: Preheat oven to 350◦F.
In a large bowl, mix together the dry crust ingredients. Cut in the butter until crumbly. Press into a 9x13 inch rectangular baking pan. Bake for ten minutes.
TOPPING: In a large bowl, add all ingredients in given order, stir. Spoon over crust. Bake for 25-30 minutes, until set.
You can put a butter frosting (made with cherry juice) on these squares once they are cool if you wish, but they really don't need it. It would also be difficult to do with the texture of the topping, which is quite pretty without being covered by icing. These squares are quick to make; throw all of the crust ingredients in a bowl and mix. While that is baking, throw all of the topping ingredients in a bowl and mix. These are not too sweet, and have a nice texture.
CRUST
1 cup all-purpose (plain) flour
1 cup rolled oats
1 cup packed brown sugar
1 teaspoon baking powder
1/2 teaspoon salt
1/2 cup butter or hard margarine, cut into cubes
TOPPING
2 large eggs, beaten
1 cup packed brown sugar
1 teaspoon vanilla extract
1 cup unsweetened shredded coconut
2 tablespoons all-purpose (plain) flour
1 teaspoon baking powder
1/4 teaspoon salt
1 cup maraschino cherries, cut up

In a large bowl, mix together the dry crust ingredients. Cut in the butter until crumbly. Press into a 9x13 inch rectangular baking pan. Bake for ten minutes.
TOPPING: In a large bowl, add all ingredients in given order, stir. Spoon over crust. Bake for 25-30 minutes, until set.
You can put a butter frosting (made with cherry juice) on these squares once they are cool if you wish, but they really don't need it. It would also be difficult to do with the texture of the topping, which is quite pretty without being covered by icing. These squares are quick to make; throw all of the crust ingredients in a bowl and mix. While that is baking, throw all of the topping ingredients in a bowl and mix. These are not too sweet, and have a nice texture.
Friday, May 10, 2013
Chicken With Pineapple Sauce
This was the second, perfected trial for Mom's pineapple chicken recipe, which may become a new family favorite. The first attempt at this recipe was featured on March 20th. A few tweaks were made, and we now have a yummy new chicken recipe. My mother doubled the amount of chicken (because she wanted to make more), but kept the sauce ingredients the same, as we found it was too sweet last time. She did however increase the amount of soya sauce in order to further counter the overwhelming sweetness, which was evident by the change in sauce color. She also used fresh chicken breasts, and cooked them and diced them the day before, but was sure not to overcook them and to cool them properly. One problem we still seem to have is the viscosity of the sauce. She tried to make it thicker this time by stirring in some cornstarch and boiling it, but it didn't seem to work. Maybe there was not enough cornstarch or maybe the mixture was not boiled long enough. Then she transferred the sauce to a slow cooker and added the chicken, then heated the chicken in the sauce, and kept it warm until it was time to eat. This did not help thicken the sauce either. So this dish was best served with a slotted spoon, but the chicken still absorbs enough of the sauce to be moist, flavorful, and sweet. The only problem now is a lot of leftover liquid. It is tasty over rice, I suppose!


Thursday, May 09, 2013
X Cookies

Wednesday, May 08, 2013
Crustless Mixed Vegetable Quiche
Crustless Mixed Vegetable Quiche
4 large eggs
3 cups milk
1/4 cup cornstarch
2 teaspoons baking powder
salt and pepper, to taste
2 Tablespoons grated Parmesan cheese
1 medium onion, chopped
1 bag (3 cups) frozen mixed vegetables, lightly steamed according to package directions
2 cups shredded cheese
Preheat oven to 350◦F. Grease or line one 9x13 inch rectangular baking pan or two 9-inch round deep-dish pie plates.
Beat the eggs in a large bowl. Whisk in the milk, cornstarch, baking powder, parsley, and spices. Stir in remaining ingredients. Pour mixture into prepared pan(s) and bake for 35-40 minutes, until a knife inserted in the center comes out clean.
 The vegetables, cheese, and seasonings can be varied to match your tastes. Leftover, fresh, or canned vegetables can all be used, as long as they are lightly cooked beforehand. Choose vegetables that are fairly small - I used a mixture of carrots, beans, peas, and corn. Not typical in a quiche, but it worked really well! This is a really easy recipe that requires no crust to fuss with. It is also vegetarian and gluten-free! It cooks very well, and can even be kept warm for a while without sacrificing quality. This dish really isn't anything special, but was the first to disappear and got raving reviews, so I guess it went over well.
4 large eggs
3 cups milk
1/4 cup cornstarch
2 teaspoons baking powder
salt and pepper, to taste
2 Tablespoons grated Parmesan cheese
1 medium onion, chopped
1 bag (3 cups) frozen mixed vegetables, lightly steamed according to package directions
2 cups shredded cheese
Preheat oven to 350◦F. Grease or line one 9x13 inch rectangular baking pan or two 9-inch round deep-dish pie plates.
Beat the eggs in a large bowl. Whisk in the milk, cornstarch, baking powder, parsley, and spices. Stir in remaining ingredients. Pour mixture into prepared pan(s) and bake for 35-40 minutes, until a knife inserted in the center comes out clean.

Tuesday, May 07, 2013
Brownie Graduation Hats

This year a quick internet search produced this idea. These are cute little brownie graduation hats. They are fairly simple to make, the most difficult part being the tassels. As I mentioned before, I used candy clay tinted royal blue to make these. The base is simply what is referred to as a "two-bite" brownie, a small round brownie. Yes I used store-bought, but for a few good reasons. #1 I can't make brownies that uniformly shaped like a hat, #2 I needed to make several other dishes and this would save me time and work, #3 I needed to prepare them in advance, #4 Two-Bite brownies are also sold in gluten-free packages, so I was able to have one dessert for a guest who can't have gluten.
I simply attached a square of dark chocolate to the brownie with a small dab of extra candy clay. I tried to choose a square that matched the brownie color as closely as possible, and ended up going with 70% cocoa content. Then I stuck the tassel on top and attached it with a candy-coated chocolate piece, I sorted through the bag and used only the brown and blue ones, to match the hats.
The original recipe called for coated the brownies first, either in a chocolate ganache or a chocolate candy coating. I was planning on doing this, but when testing it out, discovered that they looked really good without it, and it would just end up being more of a hassle and difficult to store. I think they may even look better without, and are less messy and just as tasty! However, if you want, you can coat the brownies with ganache if you want the brownies and chocolate to match in color exactly, or want a more "polished" look to the brownies. Finally, you can use any color candy clay you want, as long as you have food coloring, to match the colors of the actual graduation caps or school colors.
Monday, May 06, 2013
Cheesy Mushroom Rotini Bake
Mushroom Cheese Rotini Bake
hot, cooked rotini pasta, enough for 6 or so servings
1 cup diced fresh mushrooms
1 cup diced onion
4 cups shredded cheddar cheese
1 can (10 ounces/294mL) cream of mushroom soup
3/4 cup mayonnaise or mayonnaise-style dressing
Preheat oven to 350◦F. Return the pasta to cooking pot, and stir in remaining ingredients. Transfer into greased casserole dish(es) and bake, covered, for at least 30 minutes. This keeps warm in the oven well for a while longer, as long as it is covered so it doesn't dry out.

There isn't a whole lot to say about this dish except that it is very quick and easy to make, and forgiving as well. It can be made ahead, parts of it prepared in advance, kept hot for a while, and reheated. It makes a quick, meatless weeknight meal, with maybe a salad and some bread on the side. It can be varied to no end- different types of cheese, vegetables, pasta shapes, add meat, spices, sauces, bread crumbs, etc, etc. This was very, very good though, and one example of a recipe my mother made for company without testing it beforehand (*gasp*), but is simple, and easy so ended up being a hit!
Sunday, May 05, 2013
Christopher's Graduation Cake

Congratulations to Christopher and all graduates of 2013!
Saturday, May 04, 2013
Three Bean Salad
This is a quick and easy bean salad recipe that came from an old contributed recipes cookbook my mother has. It keeps for a while, is simple and quick to make, and can be made ahead of time, making it a perfect dish for a party. It is also a great vegetarian dish (and it's gluten-free too).
Three Bean Salad
1 can yellow wax beans
1 can green wax beans
1 can lima beans
1 can kidney beans
1 small onion, finely chopped
1/2 cup white vinegar
1/4 cup canola oil
3/4 cup granulated (white) sugar
salt and pepper, to taste
Note: All cans are approximately 14 ounces.
 Put all beans in a large bowl* with onion. In a separate bowl, whisk together the remaining ingredients, then mix into the beans.Store in the refrigerate. This will keep for awhile, and the longer it marinates the better it gets, so it is a great make-ahead dish.
*The recipe states not to drain the beans, but we found this made a very liquidy salad. If you want the extra juice for marinating and serve the salad with a slotted spoon or drain it just before serving, this is fine. If you want a less-liquidy salad, drain the beans but you may end up with less flavor.
Three Bean Salad
1 can yellow wax beans
1 can green wax beans
1 can lima beans
1 can kidney beans
1 small onion, finely chopped
1/2 cup white vinegar
1/4 cup canola oil
3/4 cup granulated (white) sugar
salt and pepper, to taste
Note: All cans are approximately 14 ounces.

*The recipe states not to drain the beans, but we found this made a very liquidy salad. If you want the extra juice for marinating and serve the salad with a slotted spoon or drain it just before serving, this is fine. If you want a less-liquidy salad, drain the beans but you may end up with less flavor.
Friday, May 03, 2013
Accommodations for Dietary Needs
As we prepare for this party, we are keeping the dietary needs and restrictions of other in mind. We are aiming to offer a wide variety of dishes, so there is almost sure to be something for everyone. we are offering a few complex dishes, as well as a few plain dishes for those who are not quite as experimental. And when in doubt, plain white rolls are always an option. We've got a variety of main courses covered, featuring beef, chicken, pork, and eggs. We have a different array of both vegetables and sweets. We have two vegetarian main courses, offering a bit of choice for those wishing to avoid meat. We also have a few gluten-free dishes. Two of the main courses were specifically designed to be gluten-free, for those who need it. We have two chocolate desserts, and two non-chocolate desserts, because believe it or not, not everyone is a chocolate lover. We also opted for several smaller desserts as well as one big one, so people can try a bit of everything. We even made a special version of one of the desserts, so that it is gluten-free as well.
Since we are offering a variety of different dishes, those wishing to avoid certain foods, or those with less common allergies will almost certainly find something. For example, several of our main courses contain eggs or dairy, but several of them do not. It is always nice to offer a variety of foods, so there is something for everyone, and more to choose from and sample. And whenever possible, if you know a guests has a certain dietary restriction that is not so difficult to cater to, you should try to provide them with at least one dish they can eat.
Since we are offering a variety of different dishes, those wishing to avoid certain foods, or those with less common allergies will almost certainly find something. For example, several of our main courses contain eggs or dairy, but several of them do not. It is always nice to offer a variety of foods, so there is something for everyone, and more to choose from and sample. And whenever possible, if you know a guests has a certain dietary restriction that is not so difficult to cater to, you should try to provide them with at least one dish they can eat.
Thursday, May 02, 2013
Premade For Parties
Premade for Parties. The longer version of this title would go something like this: If you are planning a large party, with a large number of people no where near what you are used to feeding on a daily basis, and you are working out of your home kitchen, which likely has limited oven, stove, and fridge space, you do not need to make everything from scratch. Potlucks are always a good option, or even if you just get a few contributed dishes or ask people to bring rolls, vegetable trays or chips. If potluck is not your style of choice, and you prefer to cook yourself, please follow this advice.
Do not try to make every single little thing from scratch yourself. You are likely working with a standard house-sized oven, stove, refrigerator, and freezer. You likely do not have an entire team of sous chefs at your service to help you, and if you did, you probably would not have enough room in your kitchen. You probably have other things to do to prepare for the party as well, such as cleaning, decorating, set-up, etc. You likely want to join the party, not spend the duration of it in your kitchen. And finally, you likely want to serve fresh food, not old stale food made too far in advance because you didn't have enough time to do everything the day of or day before. I am not against preparing in advance here, but you can only do so much early when it comes to food.
For our party, we are skipping homemade appetizers and focusing on main courses. This allows us to offer a wider variety of foods at the actual meal, and ensures guests will save room for the meal and dessert. We will be serving some chips, crackers, and fruit and vegetables. However, we are not wasting time making homemade crackers, when we need the time and oven space for the meatballs. Likewise, we are purchasing rolls, not making them. Usually I am all for homemade but you can only do so much yourself, and I admit part of one of the desserts begins with a purchased item. Also, do not bother with fancy silverware and plates - go paper or plastic! Maybe a little environmentally unfriendly, but buy biodegradable plates and napkins and save water by using plastic cutlery. It will save a lot of clean-up, as you'll likely have enough with all of the dishes to wash!
Wednesday, May 01, 2013
Candy Clay Tassels, Hat & Diploma
Today I began preparing food for the upcoming party. It is quite early to prepare many things, so today I just made the garnishes for one of the desserts. Well, actually my father did the majority of the work, as it turns out he is really good at working with candy clay, and has a lot of patience! So thank you dad! We simply made blue tassels, so I guess it is no surprise that they are for little edible graduation caps. However, I won't give any more than that away yet. I used a batch of candy clay I had made to make these (see June 3rd, 2012: Candy Clay). Candy clay is like edible clay, it is very easy and forgiving to work with, and comes in or can be dyed a variety of different colors. It has so many different uses and stores well, either in the fridge or at room temperature (or shellacked to keep). It is also completely edible, though it doesn't taste all that great, kind of like fondant; it looks pretty but doesn't taste as good.
I bought white candy melts and dyed most of the mixture blue. That way, I can achieve the exact shade of blue I want, to match the trim of the cake as well. Also I needed a little bit of white candy clay too. I also made a little diploma for a decoration for the cake. I made a larger graduation cap entirely from candy clay but it is not pictured here as it is hardening.

I bought white candy melts and dyed most of the mixture blue. That way, I can achieve the exact shade of blue I want, to match the trim of the cake as well. Also I needed a little bit of white candy clay too. I also made a little diploma for a decoration for the cake. I made a larger graduation cap entirely from candy clay but it is not pictured here as it is hardening.

Subscribe to:
Posts (Atom)