
Showing posts with label toppings. Show all posts
Showing posts with label toppings. Show all posts
Saturday, July 16, 2016
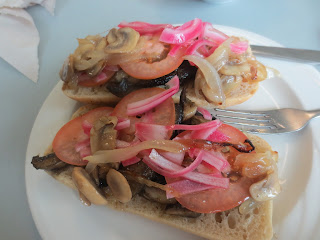
BYO Ciabattas
Sometimes I really love what I call, "dinner, some assembly required." I am referring to things such as sandwiches, burgers, and other things you get to add your own toppings to. Here we have warm ciabatta buns with tomato, sauteed mushrooms, pickled red onion among other toppings such as lettuce, pickled mustard seeds, pork belly, cheese, and more.

Thursday, May 05, 2016
Vegan Carrot Cake with Broiled Coconut Icing
Vegan Carrot Cake
2 cups grated carrot
1 cup unsweetened applesauce
2/3 cup oil
4 teaspoons apple cider vinegar
1 Tablespoon vanilla extract
1 cup granulated (white) sugar
3 cups all-purpose (plain) flour
1 teaspoon baking soda
1 teaspoon salt
spices, as desired 1-3 teaspoons: ground cinnamon, ginger, nutmeg
Topping
1 cup coconut butter
1 cup sweetener of choice
2 cups unsweetened shredded coconut
Preheat oven to 350°F. Line a 9x13-inch rectangular (or two 8 or 9 inch round or square pans) with parchment paper.
Mix together the carrot, applesauce, oil, vinegar, and vanilla. Stir in the sugar, then the remaining dry ingredients. Spread batter evenly in prepared pan(s).
Bake for 20-30 minutes until cake tests clean. No need to cool before topping.
Topping: Melt the butter in a small saucepan, stir in the sweetener. Spread evenly over the cake, sprinkle with coconut, and brown under the broiler until golden. Serve warm or cool.
 Substitution Notes:
Cake
- For a healthier cake, replace the oil with additional applesauce or other fruit or vegetable puree, or even a nut butter.
- Change the flour to a whole wheat, spelt, oat, nut, or gluten free flour. This should not affect the rising in this recipe.
- Replace the sugar with dates, maple syrup, or another natural sweetener. Or use coconut sugar to amp up the coconut flavor.
- Change up the flavors of the spices and vanilla extract.
- Stir in some dried fruit, chopped nuts, or chocolate chips as desired.
Topping
- The sweetener depends upon how sweet you would like the topping, and cake overall, to be. A granulated sugar will add a gritter texture than a liquid sugar.
- Try using coconut flakes instead, and use more or less as desired. Mix in some chopped nuts as well, if desired.
2 cups grated carrot
1 cup unsweetened applesauce
2/3 cup oil
4 teaspoons apple cider vinegar
1 Tablespoon vanilla extract
1 cup granulated (white) sugar
3 cups all-purpose (plain) flour
1 teaspoon baking soda
1 teaspoon salt
spices, as desired 1-3 teaspoons: ground cinnamon, ginger, nutmeg
Topping
1 cup coconut butter
1 cup sweetener of choice
2 cups unsweetened shredded coconut
Preheat oven to 350°F. Line a 9x13-inch rectangular (or two 8 or 9 inch round or square pans) with parchment paper.
Mix together the carrot, applesauce, oil, vinegar, and vanilla. Stir in the sugar, then the remaining dry ingredients. Spread batter evenly in prepared pan(s).
Bake for 20-30 minutes until cake tests clean. No need to cool before topping.
Topping: Melt the butter in a small saucepan, stir in the sweetener. Spread evenly over the cake, sprinkle with coconut, and brown under the broiler until golden. Serve warm or cool.

Cake
- For a healthier cake, replace the oil with additional applesauce or other fruit or vegetable puree, or even a nut butter.
- Change the flour to a whole wheat, spelt, oat, nut, or gluten free flour. This should not affect the rising in this recipe.
- Replace the sugar with dates, maple syrup, or another natural sweetener. Or use coconut sugar to amp up the coconut flavor.
- Change up the flavors of the spices and vanilla extract.
- Stir in some dried fruit, chopped nuts, or chocolate chips as desired.
Topping
- The sweetener depends upon how sweet you would like the topping, and cake overall, to be. A granulated sugar will add a gritter texture than a liquid sugar.
- Try using coconut flakes instead, and use more or less as desired. Mix in some chopped nuts as well, if desired.
Saturday, January 02, 2016
Wild Berry Tarts
A stunning, colorful, individual-sized wild berry tartlet featuring four juicy berry flavors, lemon, coconut, cream, and almonds!
This is a fruit tart I made as my first creation and my first lunch for the New Year. My boyfriend has been hinting at me for awhile about fruit tarts with lots of berries, and I was excited to finally make one. I will definitely make another version in the summer time when fresh berries are in season, but considering I used frozen berries, this fruit tart turned out pretty darn good. Despite being composed of 0% chocolate and 100% vegan ingredients. It's also chock-full of fruit and nuts, no-bake, gluten-free, and dare I say, healthy?

CRUST (almond cookie crust)
FILLING (lemon coconut cream filling)
TOPPING (four berry compote)
GARNISH (berries)
GLAZE (maple syrup)
Procedure
Prepare the crust and press into two four inch tart pans or miniature aluminum pie plates. Freeze to firm up while preparing filling.
Prepare the filling and pour over the crusts. You can now refrigerate this until firm or freeze it so it firms up within hours. I recommend freezing, especially if you just made the crust, because if the crust is not fully set, it will become too soft in the fridge. Freezing for longer does not seem to affect the texture of the coconut milk in the cream filling.
Prepare the berry compote. Ideally cool the compote completely and chill it first, but if you are short on time like me, you can spoon it straight over the partially set cream filling and smooth it out as best as possible. It may make the filling melt a little, but it will be fine once you pop it back in the freezer. Alternately, chill it in the fridge.
Take the pretty whole berries set aside from the compote and arrange them artistically on the tarts. You want to keep the berries frozen until ready to use because they are too soft to work with (without smushing them) when thawed. However, you don't want to serve a tart with frozen berries, so keep in mind this must be done a little before serving time to allow them to thaw. The tarts can also be placed back in the freezer after topping with the berries if they are being held longer.
Heat a little maple syrup in the microwave for thirty seconds or so and brush over the fruit on top to make it shine. The tarts can be frozen again if you want to hold them, held in the refrigerator briefly, or if you plan to serve them very soon, left at room temperature to warm up a bit before eating. If frozen for more than a few hours, gently place in a container or cover with plastic wrap.

Gently unmold the tarts from the pans and place on plates. I find this is really easy if you line the tart pans with plastic wrap before filling with the crust mixture - then the tarts simply lift straight out! You can add other garnishes such as lemon wedges, toasted coconut, chocolate sauce, or (coconut) whipped cream, but I like to let these fruit tarts shine on their own.
Planning these ahead and serving them can be slightly tricky. The crust can be made as far in advance as you wish, as long as you have your dates soaked - so I recommend doing this at least the day before to ensure a less soggy crust.
The coconut custard firms up much better in the freezer and causes the crust to become a bit soggy if left for too long at lower temperatures.
The berries place don top of the tart should be done as closely to serving as possible, still allowing enough time for them to thaw out, though I did have success with freezing the tart like this as well.
Glaze the berries last minute for optimum shine.
Ideally thaw frozen tarts only 6-14 hours before serving, and allow to come to room temperature to serve. Do not freeze for longer than a few days, and do not leave at room temperature. This will ensure optimum flavors and textures.
Friday, December 12, 2014
Cranberry Sparkle Muffins
Cranberry Sparkle Muffins
4 large eggs
1 cup milk
1/2 cup oil
2 cans wholeberry cranberry sauce
4 cups all-purpose (plain) flour
1 cup granulated (white) sugar
3 Tablespoons baking powder
1 teaspoon salt
softened butter, for spreading
granulated sugar, to sprinkle
Preheat oven to 400◦F. Grease or line muffin cups.
In a large bowl, beat the eggs until frothy. Beat in the milk, oil, and cranberry sauce.
Fold in the dry ingredients. Bake for about 20 minutes until a toothpick comes out clean. Spread each muffin with a little butter and sprinkle with sugar. Makes about 30 muffins.
 What do you do with that leftover cranberry sauce you have from the holidays? Well, you can use it up to make a tasty batch of muffins. Less labor intensive than using fresh or frozen cranberries, as they do not require chopping, draining, or defrosting. Since cranberry sauce is sweetened as well, this muffin contains less sugar in the formula, but is still plenty sweet to contrast those tart cranberries. You also get a ribbon of yummy cranberry filling throughout each bite of the muffin.
4 large eggs
1 cup milk
1/2 cup oil
2 cans wholeberry cranberry sauce
4 cups all-purpose (plain) flour
1 cup granulated (white) sugar
3 Tablespoons baking powder
1 teaspoon salt
softened butter, for spreading
granulated sugar, to sprinkle
Preheat oven to 400◦F. Grease or line muffin cups.
In a large bowl, beat the eggs until frothy. Beat in the milk, oil, and cranberry sauce.
Fold in the dry ingredients. Bake for about 20 minutes until a toothpick comes out clean. Spread each muffin with a little butter and sprinkle with sugar. Makes about 30 muffins.
Sunday, October 19, 2014
Grilled Pizza with Pear

Any type of pizza dough of your preference may be used, but I recommend rolling it relatively thinly - thick enough to hold up the toppings but no thicker. Grill the pizza crust; it is fine if the dough is neither a perfect circle nor a perfect rectangle - it won't matter. Then top the pizza in any fashion you wish, using rings of caramelized onion, thinly sliced pear, thinly sliced fresh mozzarella balls, some arugula leaves, and prosciutto. Then bake at 450◦F for about ten minutes until the crust is golden and the cheese is melted. Then cut into bite-sized squares and eat a bunch of them! Arranging them in a staggering pattern on the platter is easy to do but really upscales the presentation factor.
Friday, May 24, 2013
Chocolate Streusel Cake
Looking for a slightly different cake recipe, one that is not too sweet and needs no icing? One that combines the best of both worlds: chocolate and vanilla, with a touch of cinnamon as well. This is it! Quick and easy, using simple ingredients found on hand. I highly recommend using real butter and vanilla in the cake batter, as it will make a difference in the batter. It is a light, fluffy, and delicious basic cake batter. The chocolate streusel is also delicious, and I would eat it by the spoonful. It is sweet from brown sugar, chocolaty from cocoa and a few chocolate chips, and has a nice kick of cinnamon. The nuts in it are optional. The recipe calls for baking at 375◦F, though we used a glass pan and has great success at 325◦F, though baking time is slightly longer. This is absolutely delicious warm from the oven. Don't even wait for it to cool a bit, it even cuts well when piping hot!
 Chocolate Streusel Cake
CAKE
1/2 cup butter, or hard margarine, softened
1 large egg
1/2 teaspoon vanilla extract
3/4 cup milk
3/4 cup granulated (white) sugar
1 1/2 cups all-purpose (plain) flour
2 teaspoons baking powder
1/2 teaspoon salt
STREUSEL TOPPING
2 Tablespoons butter or hard margarine, softened
1/3 cup packed brown sugar
1 1/2 Tablespoons all-purpose (plain) flour
1 Tablespoon unsweetened cocoa powder
1/2 teaspoon ground cinnamon
2 Tablespoons miniature semi-sweet chocolate chips
2 Tablespoons chopped walnuts, optional
Preheat oven to 375◦F. Grease a 9x9 inch baking pan.
CAKE: In a large bowl, place all of the cake ingredients and beat on low until just moistened. Beat on medium speed for two minutes, until smooth. Spread evenly in prepared pan.
STRESUEL: In a medium bowl, combine all streusel ingredients. Sprinkle over batter. Bake for about 30 minutes or until a toothpick inserted in the cake comes out clean.
My father has already made this cake twice. He came to me looking for a recipe to make for Mother's Day, as I was too busy. This immediately popped in my mind, and I promptly hunted it down in my Potluck Dishes cookbook in the "Company's Coming" series. It is funny how I have been meaning to make some items for awhile, and when they finally are made, they become a new family favorite! We may try doubling the recipe next time, one batch doesn't last nearly long enough at our house.
Paré, Jean. "Chocolate Streusel Cake." Recipe. Potluck Dishes, Edmonton Alberta: Company's Coming Publishing Limited, 2006. 148.

CAKE
1/2 cup butter, or hard margarine, softened
1 large egg
1/2 teaspoon vanilla extract
3/4 cup milk
3/4 cup granulated (white) sugar
1 1/2 cups all-purpose (plain) flour
2 teaspoons baking powder
1/2 teaspoon salt
STREUSEL TOPPING
2 Tablespoons butter or hard margarine, softened
1/3 cup packed brown sugar
1 1/2 Tablespoons all-purpose (plain) flour
1 Tablespoon unsweetened cocoa powder
1/2 teaspoon ground cinnamon
2 Tablespoons miniature semi-sweet chocolate chips
2 Tablespoons chopped walnuts, optional
Preheat oven to 375◦F. Grease a 9x9 inch baking pan.
CAKE: In a large bowl, place all of the cake ingredients and beat on low until just moistened. Beat on medium speed for two minutes, until smooth. Spread evenly in prepared pan.
STRESUEL: In a medium bowl, combine all streusel ingredients. Sprinkle over batter. Bake for about 30 minutes or until a toothpick inserted in the cake comes out clean.
My father has already made this cake twice. He came to me looking for a recipe to make for Mother's Day, as I was too busy. This immediately popped in my mind, and I promptly hunted it down in my Potluck Dishes cookbook in the "Company's Coming" series. It is funny how I have been meaning to make some items for awhile, and when they finally are made, they become a new family favorite! We may try doubling the recipe next time, one batch doesn't last nearly long enough at our house.
Paré, Jean. "Chocolate Streusel Cake." Recipe. Potluck Dishes, Edmonton Alberta: Company's Coming Publishing Limited, 2006. 148.
Wednesday, November 14, 2012
Chocolate PB Polka Dot Bars

This recipe makes a big batch - a 9x13 inch pan - and the squares are also quite high. They are very rich too, so they have to be cut small. Therefore, you can get quite a few squares out of one pan, unless you have some real chocolate and peanut butter fans around. The peanut butter base, the crumble, the rich chocolate filling, and the chocolate peanut butter pieces all marry quite well together to make one delicious square. They cut fairly well, although they are a bit crumbly, and because I put some candies on top, they tend to fall off a bit. At least the chocolate filling doesn't ooze out at all. Overall, this is a really good square recipe and also one that is fun to make too!
Monday, October 22, 2012
Quick Lunch Pizza

As I probably said before, I tend to use the same pizza recipe every time I make pizza. However, I do have different recipes for panzerottis, pizza stromboli, and pizza rolls, all of which are excellent, trust-worthy recipes. My pizza dough recipe I actually got from cooking class in school years ago. because it is used by young students in an environment that isn't always ideal, it is quite a forgiving and no-fail recipe. I love this crust recipe, it is soft, fluffy, and tasty, and rises very high. It can be used for a thin crust pizza, but I prefer the rising thick crust. I usually use half whole wheat flour in the dough, for a more nutritious and hearty dough. This pizza I made here was a bit of a last minute decision, so I just made do with the topping ingredients I had on hand. Those were tomato sauce, chopped onion, green olives, sliced mushrooms, and mozzarella cheese. I didn't have any meat, which was fine with me since I prefer vegetarian pizzas, but it was not your typical veggie filled pizza either. Oh well, I thought it was quite good, and I had the one leftover piece for lunch today. This pizza also keeps and reheats well.
To make this pizza, I mixed up the dough early and put it in the oven, which had been preheated to 200◦F for 10 minutes to warm it. I left the dough there for two hours until I was ready to use it. By this time, the dough was nice and high, but a little sticky. This dough actually does not need any rising time, since it uses instant yeast and will rise in the oven, although it does well with some time to rest and rise. I made one round twelve inch pizza in my pizza pan, and made a small crust around the edges.
Monday, May 28, 2012
Parmesan Cheese Shortage
A magnitude six earthquake hit northern Italy last week. I know what you're thinking: isn't this a food blog? Well, the earthquake hit the area of Italy famous for producing the special Parmesan cheese Italians are so fond of. Some of the worst damage was done to Italy's agricultural areas where Parmesan cheese is produced. Many huge wheels of the special cheese were damaged and ruined in the shake. What does this mean? It means there is now a shortage of Parmesan cheese in Italy. Cheese that has been produced within the past little while is now ruined, and it may take a while for repairs to be made to the production sites before they are up and running again. Meanwhile, Parmesan cheese, a gourmet treat to begin with, will become even more pricey. It may even become a rare find in stores now. I am talking about the authentic Parmesan cheese imported from Italy. Imitation Parmesan just will not do (once you've had the real thing, anyway). I am not a huge fan of Parmesan cheese myself, but I do agree that it makes a nice addition to pasta dishes, soups, sauces, and pizzas. Many Italian families use Parmesan cheese as an addition to their pastas, pizzas, and salads everyday. My grandmother buys real good Parmesan cheese in bulk, and always gives a portion of it to our family. We keep it in the freezer and take it out as needed. It comes in a huge block, and we cut off pieces and finely grate it. Mostly we use it on pasta. I remember when I was younger, my grandmother always made sure we were extremely cautious around the bowl of Parmesan cheese because it was so expensive, and she did not want us to waste any of it. Because it was ingrained into our heads from a young age that the stuff was a real treat, we still use it quite gingerly. In fact, today she actually encourages us to use more. That might change now with the current situation.
 PHOTO CREDIT:"Parmesan-Cheese1.jpg"
http://howisitmade.org/how-is-parmesan-cheese-made/ . How Is It Made?, n.d. Monday, May 28, 2012.
PHOTO CREDIT:"Parmesan-Cheese1.jpg"
http://howisitmade.org/how-is-parmesan-cheese-made/ . How Is It Made?, n.d. Monday, May 28, 2012.
Saturday, May 26, 2012
Dad's Waffles
Just like we sometimes have pancakes for supper, we occasionally have waffles for supper (or lunch) as well. My mother seems to hold the title of pancake master while my father owns the title of waffle master. My father doesn't make waffles too often, maybe once or twice a month if we are lucky, but when he does, he really seems to take a lot of pride in making them. He carefully measures out the ingredients and gently mixes up the batter. Then he cooks the waffles - two at a time - in our standard waffle maker. It's just a simple one that makes two square waffles at once - not a fancy shape or Belgian waffle maker or anything. He also tailors the waffles to suit our own personal tastes - whether we like them extra crispy, or slightly soft, or fresh from the maker, or from the oven. And we all put whatever topping we like on our waffles - butter, syrup, yogurt, applesauce, peanut butter, honey, fresh fruit, cinnamon, etc. We like to enjoy these waffles with pan-fried ham and scrambled eggs, or sometimes a bowl of cereal, or sometimes just waffles alone!


Wednesday, March 21, 2012
Pizza Stromboli
For supper, I decided to try something a little different than the usual pizzas we make. I found a recipe for what was called "Family-Style Stromboli". It appeared to be a pizza in jelly-roll form. It seemed interesting and tasty enough, so I decided to give it a try. I just used the dough recipe for the crust, and chose fillings to please my family. The original recipe used more vegetables in their filling and less pizza meats than I did. The result was even better than I had expected! This is a very nice dough to work with - it is soft and easy to shape, doesn't tear easily, and when baked, is soft and fluffy. The toppings baked nicely into the crust (I recommend using lots of cheese), and the roll cut well. I would definitely make this again in place of pizza any day - it is quicker and actually easier, and I might just argue that it is tastier too!
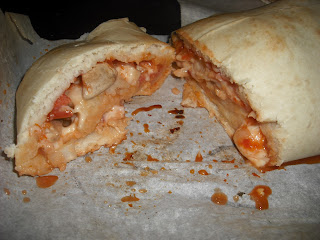 Pizza Stromboli
2 cups all-purpose flour, divided
1 package quick-rise yeast
1 1/2 teaspoons granulated sugar
1 teaspoon salt
2/3 cup warm water
3 Tablespoons oil
Preheat oven to 400◦F. Grease a baking sheet, or line with parchment paper.
In a large bowl, mix 1 cup flour with the yeast, sugar, and salt. Add water then oil, mix until well blended. Stir in 1/4 cup of the remaining flour at a time, working the flour in to make a soft dough. Spread dough into a large rectangle (about 16x9 inches) on the prepared baking sheet.
Spread dough with a modest amount of pizza sauce, and sprinkle with your favorite toppings (sliced meats, finely chopped vegetables, grated cheese, etc.) Go easy on the toppings, too many and they will just fall out and the roll will not roll properly.
Bake for about 20 minutes, or until crust is golden. Let the roll rest for 10 minutes (if you can) before slicing, it will make much neater slices instead of just falling apart.

2 cups all-purpose flour, divided
1 package quick-rise yeast
1 1/2 teaspoons granulated sugar
1 teaspoon salt
2/3 cup warm water
3 Tablespoons oil
Preheat oven to 400◦F. Grease a baking sheet, or line with parchment paper.
In a large bowl, mix 1 cup flour with the yeast, sugar, and salt. Add water then oil, mix until well blended. Stir in 1/4 cup of the remaining flour at a time, working the flour in to make a soft dough. Spread dough into a large rectangle (about 16x9 inches) on the prepared baking sheet.
Spread dough with a modest amount of pizza sauce, and sprinkle with your favorite toppings (sliced meats, finely chopped vegetables, grated cheese, etc.) Go easy on the toppings, too many and they will just fall out and the roll will not roll properly.
Bake for about 20 minutes, or until crust is golden. Let the roll rest for 10 minutes (if you can) before slicing, it will make much neater slices instead of just falling apart.
Monday, March 12, 2012
Enchiladas

Thursday, February 16, 2012
Heart Pizzas
This is another dish I made for Valentine's Day: heart-shaped pizzas. I just made a batch of regular pizza dough, rolled it out, and cut it into hearts with a cookie cutter. Then I did some fine-tuned trimming with a sharp knife. You have to be careful not to stretch the dough too much, or it will just spring back and not look like a heart at all. Also, after the pizzas are baked, the dough rises a bit, and the hearts aren't quite as uniform in shape, but they are still pretty. I spread some sauce on to within approximately 2 cm of the edge, to show the heart-shaped crust, and put on some toppings. I kept the sauce to a minimum to avoid the dough becoming soggy and overladen, and I also went light on the toppings. The pizza turned out crisp on the outside, and nice and fluffy on the inside.
You could also use heart shaped pans, if you have them, or make one big heart pizza. I opted to make miniature pizzas, which are more like pizza slices.

You could also use heart shaped pans, if you have them, or make one big heart pizza. I opted to make miniature pizzas, which are more like pizza slices.

Sunday, January 29, 2012
Master Sugar Cookie Recipe
Sugar cookies are suitable for any occasion. They can be plain and simple or decorative and fancy. They can be cut into virtually any size and shape imaginable. They may be decorated with icing, sprinkles, sugar, candies, glazes, or chocolate. They can be piled high with cream and fruit, or sandwiched together with a filling. They can also be jazzed up a little with the addition of spices, cocoa, or chocolate chips. Here is a basic recipe for simple sugar cookies. The recipe may easily be doubled or tripled.
Sugar Cookies
1 cup unsalted butter, softened
1 cup granulated (white) sugar
1 large egg
1 teaspoon vanilla extract
2 cups all-purpose flour
2 teaspoons cream of tartar
1 teaspoon baking soda
1 teaspoon salt
In a large bowl, beat the butter and sugar until light and fluffy. Add the egg and vanilla, mix well. Stir in the remaining ingredients until incorporated. Divide dough in half. Shape each half into a flattened disk and wrap well with plastic wrap. Refrigerate for at least one hour, or overnight. Remove from the fridge 15 minutes before rolling.
When ready to bake, preheat the oven to 325◦F. Grease or line baking sheets. Roll out the dough, one half at a time, into 1/4 inch thick rectangle. Cut out shapes with a cutter dipped lightly in all-purpose flour. Bake cookies 1-inch apart on baking sheets for 10-12 minutes, or until lightly browned, depending on size.
Cool cookies completely before frosting and decorating. Sprinkles and sugar decorations may be placed on before baking. Cookies may also be rolled into 1-inch balls if you don't have time to refrigerate, roll, and cut.
Here are some sugar cookies that were decorated to look like atoms for a chemistry class. The ratios of protons, neutrons and electrons may not be totally realistic, but they look pretty cute.

DECORATING IDEAS: Frost cookies with icing, melted chocolate, or a corn syrup glaze. Leave as is, or add candies: sprinkles, jelly beans, candy-coated chocolates, chocolate chips, nuts, coconut, marshmallows, etc. Sandwich cookies together with chocolate filling, peanut butter, jam, icing, cream cheese, etc. Pipe a swirl of whipped cream on each cookie and top with a fresh strawberry or other fruit.
Sugar Cookies
1 cup unsalted butter, softened
1 cup granulated (white) sugar
1 large egg
1 teaspoon vanilla extract
2 cups all-purpose flour
2 teaspoons cream of tartar
1 teaspoon baking soda
1 teaspoon salt
In a large bowl, beat the butter and sugar until light and fluffy. Add the egg and vanilla, mix well. Stir in the remaining ingredients until incorporated. Divide dough in half. Shape each half into a flattened disk and wrap well with plastic wrap. Refrigerate for at least one hour, or overnight. Remove from the fridge 15 minutes before rolling.
When ready to bake, preheat the oven to 325◦F. Grease or line baking sheets. Roll out the dough, one half at a time, into 1/4 inch thick rectangle. Cut out shapes with a cutter dipped lightly in all-purpose flour. Bake cookies 1-inch apart on baking sheets for 10-12 minutes, or until lightly browned, depending on size.
Cool cookies completely before frosting and decorating. Sprinkles and sugar decorations may be placed on before baking. Cookies may also be rolled into 1-inch balls if you don't have time to refrigerate, roll, and cut.
Here are some sugar cookies that were decorated to look like atoms for a chemistry class. The ratios of protons, neutrons and electrons may not be totally realistic, but they look pretty cute.

Friday, January 27, 2012
Hamburgers


Thursday, January 12, 2012
Pancake Supper
Pancakes for supper are a regular occurrence for my family. In fact, we rarely eat them for breakfast. We commonly enjoy waffles for supper too. Often these are served with pan-fried ham and scrambled eggs. Having breakfast-style meals for supper is quick, easy, and tasty. It also makes a very well-balanced meal that doesn't require a lot of preparation work and uses ingredients on hand. These are the pancakes that my mother has been making for as long as I can remember. Mom likes to make small pancakes, about four inches in diameter, instead of large plate-sized pancakes. That way we can eat a lot more, and they fit on the plate and in your mouth better. Everyone enjoys different toppings on their pancakes, common toppings in our house include butter, syrup, jam, peanut butter, and applesauce. Cooking pancakes on a griddle makes the work go a lot faster - we can fit up to ten pancakes on our griddle at the same time. That means a lot less batches, and a lot less cooking time. Griddles are also very easy to use and clean. Here are some pancakes that were cooked up for supper tonight!


Sunday, November 06, 2011
Calzones
Tonight for supper I made calzones, which are also known as pizza pockets and panzerottis. Basically you make pizza dough, divide it into individual servings, top half of it with pizza toppings, fold it over, enclose, and bake. I got the recipe from Betty Crocker's "Low-Fat Low-Cholesterol" cookbook. They were quite good, nice and crisp. I made two batches: one with all white flour and one with half whole wheat flour. They both turned out well. Here is the original recipe.
Whole Wheat Calzones
1 package regular or quick active dry yeast
3/4 cup warm water (105◦ to 115◦)
1 tablespoon sugar
3/4 teaspoon salt
1 tablespoon olive or vegetable oil
1 3/4 to 2 1/4 cups whole wheat flour
1 egg white, beaten
 Dissolve yeast in warm water in large bowl. Stir in sugar, salt, oil and 1 cup of the flour. Beat until smooth. Mix in enough remaining flour to make dough easy to handle. Turn dough onto lightly floured surface. Knead about 5 minutes or until smooth and elastic. Cover with bowl and let rest 5 minutes.
Heat oven to 375◦F. Spray cookies sheet with nonstick cooking spray. Divide dough into 4 equal pieces. Pat each piece into 8-inch circle on lightly floured surface, turning dough over occasionally to coat with flour. Top half of each circle with toppings. Fold dough over toppings; fold up and pinch securely to seal. Place on cookie sheet. Brush with egg white. Bake about 25 minutes or until golden brown.
Toppings for calzones can be just about anything, not just traditional pizza toppings. Calzones are known to be made with more vegetable fillings too, such as ratatouille or other vegetable blends. The key to successful calzones is not to over fill them: place the filling only over half of the circle, leaving a 1/2 inch border all around. Don't pile toppings on too high either. One of the reasons vegetable and stir-fry mixtures are often used in calzones is because they don't use sauces, which leak out and burn easily if piled on too high.
Crocker, Betty. "Whole Wheat Calzones." Recipe. Low-Fat Low-Cholesterol, New York: MacMillan, 1991. 120.
Whole Wheat Calzones
1 package regular or quick active dry yeast
3/4 cup warm water (105◦ to 115◦)
1 tablespoon sugar
3/4 teaspoon salt
1 tablespoon olive or vegetable oil
1 3/4 to 2 1/4 cups whole wheat flour
1 egg white, beaten

Heat oven to 375◦F. Spray cookies sheet with nonstick cooking spray. Divide dough into 4 equal pieces. Pat each piece into 8-inch circle on lightly floured surface, turning dough over occasionally to coat with flour. Top half of each circle with toppings. Fold dough over toppings; fold up and pinch securely to seal. Place on cookie sheet. Brush with egg white. Bake about 25 minutes or until golden brown.
Toppings for calzones can be just about anything, not just traditional pizza toppings. Calzones are known to be made with more vegetable fillings too, such as ratatouille or other vegetable blends. The key to successful calzones is not to over fill them: place the filling only over half of the circle, leaving a 1/2 inch border all around. Don't pile toppings on too high either. One of the reasons vegetable and stir-fry mixtures are often used in calzones is because they don't use sauces, which leak out and burn easily if piled on too high.
Crocker, Betty. "Whole Wheat Calzones." Recipe. Low-Fat Low-Cholesterol, New York: MacMillan, 1991. 120.
Thursday, November 03, 2011
Pancakes
Since I haven't posted a recipe on here for awhile, I am going to share with you my master recipe for pancakes. These are simple, unflavoured pancakes, but both chocolate chips and blueberries can successfully be added to the batter. In our house we like to make our pancakes small, about the size of a standard cookie, and we can fit up to six in our frying pan at once. That way we can eat a bunch of pancakes instead of just one that takes up the entire plate. We often eat pancakes for supper with pan-fried ham and scrambled eggs. In our house, I hold the record for trying the most different toppings on these pancakes. I have tried butter, pancake syrup, pure male syrup, peanut butter, molasses, corn syrup, icing sugar, brown sugar, yogurt, Nutella, cinnamon, applesauce, jam, cinnamon sugar, honey, and several combinations of those. They are all quite good.
Pancakes
1 1/2 cups all-purpose flour
1 Tbsp. granulateed sugar
1 Tbsp. baking powder
1/2 tsp. salt
1 egg, beaten
2 Tbsp. cooking oil
1 1/2 cups milk
Combine flour, sugar, baking powder and salt in a medium size bowl.
Beat egg slightly in small bowl. Mix in oil and milk. Add to dry ingredients. Stir. A few small lumps in batter are preferable. Add more or less milk to have thicker or thinner pancakes. Pan is ready when drops of water bounce all over it. Drop batter by spoonful onto lightly greased hot pan 380◦F. When bubbles appear and edges begin to dry, turn to brown other side.
Paré, Jean. "Pancakes." Recipe. Muffins and More, Edmonton Alberta: Company's Coming Publishing Limited, 1988. 133.
Pancakes
1 1/2 cups all-purpose flour
1 Tbsp. granulateed sugar
1 Tbsp. baking powder
1/2 tsp. salt
1 egg, beaten
2 Tbsp. cooking oil
1 1/2 cups milk
Combine flour, sugar, baking powder and salt in a medium size bowl.
Beat egg slightly in small bowl. Mix in oil and milk. Add to dry ingredients. Stir. A few small lumps in batter are preferable. Add more or less milk to have thicker or thinner pancakes. Pan is ready when drops of water bounce all over it. Drop batter by spoonful onto lightly greased hot pan 380◦F. When bubbles appear and edges begin to dry, turn to brown other side.
Paré, Jean. "Pancakes." Recipe. Muffins and More, Edmonton Alberta: Company's Coming Publishing Limited, 1988. 133.
Monday, September 26, 2011
Pizza on the Grill

Yesterday, we decided to try cooking pizza on the barbecue. There are many different ways and methods of doing this. Toppings: are they put on before, after, or during cooking? Cooking temperature: high, low, blazing hot, or indirect heat? Cooking method: directly on the grill or on a pan, rotated, flipped, or left alone? Recipe: thick crust, rising crust, or thin crust?
Well, here is what we chose: a thin crust pizza, pre-topped, cooked at a high temperature on a pan, rotated at half time. This ended up working quite well for us. The crust was thin and very crispy and the pizza cooked to perfection in a reasonable amount of time. One problem we had was parts of the crust got a little bit burnt, but we figured if we used a double layer of pans next time, this would solve the problem. We cooked two pizzas at once, so the baking pans (just regular cookie sheets, greased and floured) jutted out of the barbecue just a tad. We simply rotated them half way through so both ends of the pizzas would cook evenly, and they did.
I used my regular, trusted pizza dough recipe, but made only half as much as the usual (and by the usual, I mean a double batch) so it could be stretched into a thin crust for a little something different. I really enjoyed the crispiness of the crust and the slightly smokey barbecue flavour. Next, I topped the dough with pizza sauce to within an inch of all the edges, and each family member decorated their own piece with their favourite toppings. The toppings we had on hand were: onion, green pepper, mushrooms, broccoli florets, sliced fresh tomatoes, ham, pepperoni, salami, and of course, grated mozzarella cheese! Then my father, the barbecue master, grilled them for about 20 minutes, at a temperature hovering around 425F. Delicious!
Subscribe to:
Posts (Atom)