
Showing posts with label meat. Show all posts
Showing posts with label meat. Show all posts
Friday, April 29, 2016
Caul Fat Terrine
What is caul fat, you say? That is an excellent question. To be honest, I had heard of it before but I had to look it up myself. Caul fat is also known as lace fat, mesentery, crépine or fat netting, and is the thin membrane which surrounds the stomach internal organs of some animals, such as cows, sheep, and pigs. It honestly looks just like lace, and is used to wrap items such as pork tenderloin and such, to add moisture. It is used much like barding, and a really common dish is called crepinettes, which are sausage patties wrapped in caul fat.
 I had caul fat as a black box ingredient for a recent competition, and I had never worked with it before. I did a few quick experiments with it beforehand. I didn't want to take the easy way out and just use it to wrap something, I wanted to use it in a terrine. I tried wrapping it around the terrine to see what happened, but I didn't like to outcome. Although the lace was visible in some areas, it melted away in others leaving a greasy layer. Frying caul fat caused it to melt away as well. I decided to use it inside the terrine along with the ground chicken to replace the pork fat that would normally be used. This worked quite successfully!
Thursday, April 28, 2016
Head Cheese
Head cheese is not a dairy cheese at all, but rather a terrine made of animal flesh (traditionally the head) set it aspic. It is a cold cut that originated in Europe. The process to make it isn't difficult, although it may be a bit of a turn off for some people. Head cheese is also incredibly cheap to make, because when you think about it - no one wants to buy pigs heads. It's not a prime cut at all.
 To make head cheese, you take a whole pig head and use a blow torch to burn off any extra hair or fur that may still be attached to the skin. This smells REALLY BAD but you also do not want a hairy terrine. Next the pig head is boiled in a pot of water, vegetables, and aromatics, much like a stock, for six hours until it is tender. The stock is strained (and reserved) and the meat is taken from the head and chopped roughly. You can use as much or as little meat as you wish depending on how much head cheese you want. Pork cheeks and ears have many other great uses, and you may wish to omit the brain and eyes. Also try to trim off as much of the fat as possible, which can be used for something else. Be sure to remove the teeth as well!
The meat is then mixed with some chopped fresh herbs, seasonings of choice, and aspic to bind it, then set into terrine molds and chilled. It is sliced to serve, and it great with some crusty bread.


The meat is then mixed with some chopped fresh herbs, seasonings of choice, and aspic to bind it, then set into terrine molds and chilled. It is sliced to serve, and it great with some crusty bread.

Wednesday, April 27, 2016
Around The World Charcuterie Tasting
Recently I participated in a world wide charcuterie tasting. There were twelve different countries involved, with two items from each country. There was a variety of different foods, including sausages, cheeses, pates, smoked meats, and more.
 Most of the items were presented with or accompanied by other components such as breads, vegetables, fruits, preserves, and more.
 Some of the dishes included: many different types of sausages, provolone cheese, quark cheese, ricotta cheese, goat's cheese, liverwurst pate, head cheese, meat pie, pita bread, rye bread, and lots more!


Tuesday, April 26, 2016
Wild Game Tasting
The other week I went to a wild game tasting where several different types of wild game meats I have never seen, cooked, or eaten before (as well as a few I have) were cooked in varying techniques with varying accompaniments. Some of the game meats included:

- Quail
- Patridge
- Pheasant
- Magret (goose breast from a goose used for foie gras production)
- Ostrich
- Kangaroo
- Wild Boar
- Foie Gras
- Horse
- Bison
- Elk

The various cooking techniques included: searing, sauteeing, roasting, sous-viding, baking, poaching, and braising.
Some methods of preparation included: burgers, soups, stews, hash, terrine.
Some accompaniments included: rice, mashed potatoes, gnocchi, bread, vegetables, chutneys, and sauces.
Sunday, April 10, 2016
Pate de Campagne
In English, country pate. Which is a forcemeat pressed into a terrine mold and baked in a waterbath. It gets in name from its coarse texture, which is acheived from grinding the meat only once through a medium plate. It usually contains a small amount of liver, some fat, a panada, pate spice, and meats of choice. Inlays (such as seared meats or vegetables), outlays (such as blanched cabbage or bacon strips), and stir-ins (such as sauteed mushrooms, chopped nuts, or dried fruits) are also possibilities to enhance flavor, texture, and appearance (if you ask me, it could certainly use it!). Like I said before, meat terrines are not my cup of tea - both flavor and texture-wise. But I can appreciate the art of making them and the applications they have on menus.


Thursday, March 17, 2016
Rôtisseur

 |
| beef plate |
 |
| duck plate |
The chicken is seared then roasted, the duck is slow roasted, the lamb is seared ten baked, the halibut is steamed, the salmon is grilled, and the beef is butter-basted.
The duck, lamb, and beef could be asked for anything from rare, medium rare, medium, medium well, or well done.
Sometimes the halibut or salmon are asked to be lightly cooked or well done.
I find it stressful enough cooking meats, as I don't often cook them and it is the main focus of the meal. There is no time on a busy night to probe meats, or compare a steak to a certain place on your palm to check the doneness. But somehow I learned along the way, and the other night I successfully cooked 54 covers, including a ten-top. Just check out those crosshatch grill marks.
Monday, January 25, 2016
Vegan Shepherd's Pie
Once upon a time at a camp I attended in the summer, I opted for the vegetarian option and it was a vegetarian version of shepherd's pie, or what the French refer to as, 'Paté Chinoise'. The regular entrée wasn't even shepherd's pie, is was something completely different and I am guessing not great looking. But the shepherd's pie looked interesting and certainly intrigued me. It turned out to be a version I liked even better than the traditional.
Shepherd's pie is traditional meat-laden (usually ground lamb or beef), filled with chopped hard-boiled eggs, mixed with vegetables in a creamy sauce, and topped with creamy, butter mashed potatoes and sometimes cheese.
There are three vegetarian/vegan versions you could make. The first one would be as traditional as possible, just subbing the closest ingredient options (simulated ground beef crumbles, coconut cream sauce, mashed potatoes with vegan margarine). The second one, which is what I made, is not nearly as traditional, but actually much healthier. I used lentils (brown are a good option for looks, but I only had red on hand). I threw in whatever veggies I had and used lots of spice, and some oil and just a splash of cream for the sauce. Then I topped it with mashed sweet potato because I love them and they go so well with lentils, both taste-wise and nutritionally. A sprinkle of paprika, and dinner is served!!!

Wednesday, April 22, 2015
Homestyle Meatloaf
I certainly don't claim to be a meatloaf expert in any way. I didn't even really like meatloaf. But apparently I can make a good, tasty homestyle meatloaf. I just threw in what I thought would be good based on my culinary knowledge. I really didn't bother to measure anything, you just sort of need to know how much liquid you need, how much seasoning, and how much binding ingredients you need based on how much meat you have and so on. This recipe makes a flavorful and moist meatloaf, even if you happen to overcook it.
Homestyle Meatloaf
3 lbs ground pork
2 onions, finely chopped
garlic powder
onion soup mix
ground black pepper
rolled oats
milk
ketchup
Preheat oven to 325◦F. Mix all ingredients together in a bowl with your hands until just combined- do not over mix or you will create a tough product. Add more liquid, dry, or seasoning as needed (to check for seasoning, you can form a small patty and fry it in a little oil and taste it). Pack into a large rectangular pan, cover to seal, and bake for two hours.

I used a sweet and sour sauce, for which I will share the recipe tomorrow!
Homestyle Meatloaf
3 lbs ground pork
2 onions, finely chopped
garlic powder
onion soup mix
ground black pepper
rolled oats
milk
ketchup
Preheat oven to 325◦F. Mix all ingredients together in a bowl with your hands until just combined- do not over mix or you will create a tough product. Add more liquid, dry, or seasoning as needed (to check for seasoning, you can form a small patty and fry it in a little oil and taste it). Pack into a large rectangular pan, cover to seal, and bake for two hours.
Remove meatloaf from oven. If you used fatty ground pork, it will have shrunk considerably and be surrounded by grease. This does mean your meatloaf will be smaller, but hopefully you accounted for shrinkage in the amount of meat you used. It also means the meatloaf will be very moist. Cut it into four equal pieces, and carefully transfer them to a clean, smaller pan, trying not to crumble the pieces. Place the pieces close together, but not touching. Then pour sauce over the top, allowing it to drizzle into the spaces between the pieces. Use a good amount of sauce for a thick coating, as some sauce will dry out as well. Cover and bake at 300◦F for until the sauce is warmed through, or up to an hour. The sauce will prevent the meat from drying out. If you want a slightly crisp top, leave the meatloaf uncovered while baking.
I used a sweet and sour sauce, for which I will share the recipe tomorrow!
Friday, January 23, 2015
Mushroom Black Bean 'Meat'loaf
In my cooking adventures, I like to try healthier options and vegan and vegetarian options. I also like to try to pass these creations off as 'normal', so I can receive unbiased comments and people will actually try them. This is a 'meat'loaf recipe I developed that has no meat, yet the color and appearance is just like meatloaf. The texture may be slightly softer, depending on what type of meatloaf you are use to. The mushrooms provide the dark color and meaty texture and the beans provide the protein. The other vegetables and sauce are added for extra nutrition, flavor, and moistness, and the oats are used as a binder and for texture. The result? This meatloaf is anything but dry, but may be a bit too moist for meat lovers. The flavor is good too, but doesn't exactly mimic beef. In the end, it is a good, healthy meatloaf alternative.
Mushroom Black Bean 'Meat'loaf
1 small carrot, very finely diced or shredded
1 small onion, very finely diced or shredded
2 packages (250grams/8ounces each) white button mushrooms
2 cloves garlic, minced
1 can (590mL) black beans, well-drained
1/3 cup old-fashioned oats
2 large egg whites (or substitute flax eggs or extra sauce for a vegan version)
1 cup tomato sauce of choice
salt and pepper, to taste
Heat a little oil in a large frying pan over medium heat. Sauté the carrot, onion, mushrooms, and garlic until just tender, about ten minutes or so. The vegetables can be finely chopped in a food processor (or by hand) either before or after cooking - they will cook much faster if chopped first.
Transfer vegetables to a food processor and chop if needed, then add the beans and process until well combined. Add the oats and egg whites just until mixture comes together. Then stir in 1/2 cup tomato sauce and seasonings by hand.
Preheat oven to 375◦F. Line an 8x8-inch square pan with parchment paper.
Spread the mixture evenly in prepared pan, it may seem wet but will firm up in the oven. Bake for about an hour, broiling for the last few minutes if a crispy top crust is desired. Heat the remaining 1/2 cup sauce and pour over top. Serve as you would meatloaf!
 I forgot to get a picture of an individual slice of it before we dug in...
Mushroom Black Bean 'Meat'loaf
1 small carrot, very finely diced or shredded
1 small onion, very finely diced or shredded
2 packages (250grams/8ounces each) white button mushrooms
2 cloves garlic, minced
1 can (590mL) black beans, well-drained
1/3 cup old-fashioned oats
2 large egg whites (or substitute flax eggs or extra sauce for a vegan version)
1 cup tomato sauce of choice
salt and pepper, to taste
Heat a little oil in a large frying pan over medium heat. Sauté the carrot, onion, mushrooms, and garlic until just tender, about ten minutes or so. The vegetables can be finely chopped in a food processor (or by hand) either before or after cooking - they will cook much faster if chopped first.
Transfer vegetables to a food processor and chop if needed, then add the beans and process until well combined. Add the oats and egg whites just until mixture comes together. Then stir in 1/2 cup tomato sauce and seasonings by hand.
Preheat oven to 375◦F. Line an 8x8-inch square pan with parchment paper.
Spread the mixture evenly in prepared pan, it may seem wet but will firm up in the oven. Bake for about an hour, broiling for the last few minutes if a crispy top crust is desired. Heat the remaining 1/2 cup sauce and pour over top. Serve as you would meatloaf!
Sunday, November 30, 2014
Big Batch Lasagna
I grew up helping my father make lasagna. Whenever we had lasagna at our house, we always made two 9x13 inch panfulls and ate it for a few days, or froze extras. It was also a favorite dish to have when company came over. If you are going to go through all that trouble, you may as well make two big lasagnas and get more than one meal out of it. Also, the lasagna noodles fit larger pans better and one container of cottage cheese was always enough for us to make two lasagnas. We always made one meat lasagna and one vegetarian - I did the meatless and my father handled the meat. We would work side by side, I preparing the cheese and sauce, and eating the broken noodle pieces, and my father cooking up the meat. At work recently, I made one really big lasagna in a much bigger pan. It was definitely a different recipe than my father and I always made together, but the techniques were the same and it certainly brought back memories, especially since I didn't have a helper and was making this all by myself.
This lasagna consists of a spicy meat tomato and pepper sauce, four layers of noodles, a layer of cottage cheese mixed with spinach, and a top layer of shredded mozzarella cheese. I like how lasagna can be prepared in advance, stuck in the fridge, and baked shortly before serving. Pictured here is the unbaked version. I also love the layering process and don't find it to be tedious at all, as long as you have all your mise en place in order beforehand.

This lasagna consists of a spicy meat tomato and pepper sauce, four layers of noodles, a layer of cottage cheese mixed with spinach, and a top layer of shredded mozzarella cheese. I like how lasagna can be prepared in advance, stuck in the fridge, and baked shortly before serving. Pictured here is the unbaked version. I also love the layering process and don't find it to be tedious at all, as long as you have all your mise en place in order beforehand.
Friday, September 05, 2014
Turkey Roll With Stuffing
This is a little something different, a recipe I came across in a low-fat cookbook that looked yummy and intriguing. The outside is just like a meatloaf, but made with ground turkey instead. The inside is just like stuffing, and together they are like a savory jelly-roll. You could use white wine in place of the water in both the pan juice and to make the sauce if you prefer.
 Turkey Roll With Stuffing
1 teaspoon oil or margarine
1 cup chopped white onion
1 cup grated carrot
1 cup fine dry bread crumbs
1 chicken bouillon cube
3/4 cup boiling water
herbs and spices, as desired, if breads crumbs are not seasoned
1 pound lean ground turkey
1 large egg
1/4 cup fine dry bread crumbs
salt, pepper, and garlic to taste
1 cup water
In a large frying pan over medium heat sauté the onion and carrot in the oil for about ten minutes until softened. Remove from heat and stir in bread crumbs. Dissolve the bouillon in the water and add along with seasoning.
In a large bowl, combine the remaining ingredients except water. Spread out this mixture evenly onto a large sheet of waxed paper to a rectangle 10x14 inches, with no gaps. Cover this meat with the stuffing mixture. Roll up tightly from a short side, removing the waxed paper as it is rolled. Place roll in a greased roasting pan.
Cover and bake at 350◦F for an hour. Pour the water into the pan and bake for an additional 30 minutes, basting twice with juices. Remove to a platter and let stand briefly, tented with foil.
 To make a sauce or gravy: use the pan drippings, extra chicken broth, and cornstarch to whisk together to form a gravy while the loaf is resting.
1 teaspoon oil or margarine
1 cup chopped white onion
1 cup grated carrot
1 cup fine dry bread crumbs
1 chicken bouillon cube
3/4 cup boiling water
herbs and spices, as desired, if breads crumbs are not seasoned
1 pound lean ground turkey
1 large egg
1/4 cup fine dry bread crumbs
salt, pepper, and garlic to taste
1 cup water
In a large frying pan over medium heat sauté the onion and carrot in the oil for about ten minutes until softened. Remove from heat and stir in bread crumbs. Dissolve the bouillon in the water and add along with seasoning.
In a large bowl, combine the remaining ingredients except water. Spread out this mixture evenly onto a large sheet of waxed paper to a rectangle 10x14 inches, with no gaps. Cover this meat with the stuffing mixture. Roll up tightly from a short side, removing the waxed paper as it is rolled. Place roll in a greased roasting pan.
Cover and bake at 350◦F for an hour. Pour the water into the pan and bake for an additional 30 minutes, basting twice with juices. Remove to a platter and let stand briefly, tented with foil.
Monday, November 18, 2013
Sweet and Sour Sauced Chicken Breasts
This is a chicken dish my mother made for supper the other night, to change it up from the typical bread-crumb coated chicken. There are many different sweet and sour sauce recipes out there, and this was a new one for our family. I liked it, it was more on the sweet and not so much on the tangy side. The sauce seemed to be thick to begin with, however when poured over the chicken and baked, the sauce thinned out significantly, and became more like a chicken basting liquid to cook in. This made the chicken incredibly moist and flavorful, the downside was there was no thick sauce on the chicken or extra to pour over pasta or rice. Therefore my recommendation for next time would be to cook the chicken first, then drain it, as it is likely the fat or water from the chicken is what diluted the sauce. Then, when the chicken is nearly completed baking, pour the sauce over and bake to heat it. Or, cook the chicken in half the amount of sauce so it is moist and injects into the chicken, but save some sauce to heat and serve with the chicken on the side.
Sweet and Sour Sauced Chicken Breasts
1 cup water
1 cup packed light brown sugar
1/2 cup white vinegar
2 Tablespoons ketchup
1 Tablespoon soy sauce
3 Tablespoons cornstarch
2 Tablespoons water
 In a medium saucepan over medium heat, stir together the water, sugar, vinegar, ketchup, and soy sauce. In a small bowl, whisk together the cornstarch and water until smooth. Whisk into remaining ingredients. Bring it to a boil, boiling and stirring until thickened. This can now be poured over chicken as desired, or served as is. It would be great for other meats to, or as a simple sweet and sour sauce for pasta, rice, or dipping.
Adapted from Company's Coming "Main Courses".
Sweet and Sour Sauced Chicken Breasts
1 cup water
1 cup packed light brown sugar
1/2 cup white vinegar
2 Tablespoons ketchup
1 Tablespoon soy sauce
3 Tablespoons cornstarch
2 Tablespoons water

Adapted from Company's Coming "Main Courses".
Tuesday, September 03, 2013
Liver & Onions
Liver tends to get a bad rap. It always seemed like a threat at our house, "What's for supper?" 'Liver and onions if you don't behave!' Nevertheless, liver isn't exactly a gourmet, expensive meal. It is actually incredibly cheap. You can still find liver and onions on the menu at restaurants, though it isn't usually a highly popular choice. I'll be honest, I am not a beef fan, or even much of a meat fan at all. However, I have been wanting to try liver for quite some time now. This is the first time I have tried it. My grandmother cooked a batch of fresh beef liver up for me with some onions. Apparently calf liver is the most tender, but there was none at the store at the time. However, this piece of liver she cooked was incredibly tender. It just melted in your mouth, and you could cut it with a fork. Liver is really the only form of beef I enjoy eating. I mean, steak and roast beef are two of my least favorite foods, yet I enjoyed the liver. Which is a good thing, because liver is incredibly nutritious. Liver is very high in protein, iron, and zinc, while relatively low in fat and calories. It is also very affordable and easy to prepare. We bought 4-5 portions for under $2. Here's how my grandmother made it:
Heat some oil in a large frying pan. Saute onions, in large rings or slices, over high heat for about a half hour or so. You don't want them to brown or caramelize, just release their flavor and soften. Transfer to a dish and keep warm. Place the beef liver, cut into small slices, in the frying pan and cook for about 10 minutes. Add the onions back in and cook for at least five minutes more, until cooked. Do not overcook, you want the liver to be tender.

Heat some oil in a large frying pan. Saute onions, in large rings or slices, over high heat for about a half hour or so. You don't want them to brown or caramelize, just release their flavor and soften. Transfer to a dish and keep warm. Place the beef liver, cut into small slices, in the frying pan and cook for about 10 minutes. Add the onions back in and cook for at least five minutes more, until cooked. Do not overcook, you want the liver to be tender.

Saturday, April 06, 2013
Pepper Steak
Pepper Steak is one of my father's favorite dishes that my mother apparently does not make nearly often enough. I am not a huge fan of it, as I am not a fan of steak or even red meat in general, but this is about the only way I will tolerate steak, so it must be pretty good. It is also the only way my mother will tolerate peppers. The recipe comes form one of my mother's old recipe books, and she began making it ages ago.
The recipe basically begins with sauteeing some green pepper, onion, and mushrooms until soft. To this tomato sauce, soy sauce, water, flavor, and spices are added. This mixture is poured over strips of steak placed in a casserole dish. Then the entire dish is baked for about an hour until very tender. This results in tender chunks of steak cooked in a thick, spicy sauce that is perfect served over a bed of rice, or with pasta or noodles if you prefer. You can also use different color peppers for more color and flavor. here, you can see some of the big chunks of pepper along with the steak in the thick sauce, served over a bed pf rice you can hardly see.

The recipe basically begins with sauteeing some green pepper, onion, and mushrooms until soft. To this tomato sauce, soy sauce, water, flavor, and spices are added. This mixture is poured over strips of steak placed in a casserole dish. Then the entire dish is baked for about an hour until very tender. This results in tender chunks of steak cooked in a thick, spicy sauce that is perfect served over a bed of rice, or with pasta or noodles if you prefer. You can also use different color peppers for more color and flavor. here, you can see some of the big chunks of pepper along with the steak in the thick sauce, served over a bed pf rice you can hardly see.

Tuesday, September 18, 2012
Last Barbecue Of The Season?
The other day we had a big barbecue. I am beginning to think this could possibly be our last barbecue of the season. As the sun sets earlier, and the days get colder, and life gets busier, it may be time to pack up the barbecue for the season. I am certainly hoping we will have another one, and knowing my family, we probably will. My mother will kindly ask my father to barbecue a quick batch of hamburgers, and my father will definitely agree. Or maybe steak or salmon will go on sale for an amazing price, and we will have to send my father out to barbecue, even if it pours rain (or so help me, snows). My father is the grill master here, and we certainly appreciate every time he ventures out to barbecue for us. We may help prepare foods, or suggest foods, but he is always the one who cooks them, and does a great job. Pictured here, clockwise, are salmon fillets (back right), steak, pork chops, and sausages. My favorite is the salmon, followed by the pork. I don't really like steak or sausage, but others in the house certainly do. This selection is a bit different from our usual barbecue choice, often we do burgers and/or chicken. Sometimes ribs too. We usually stick to meat and fish on the barbecue, although we could easily through some vegetable on there too. I have made a cake and a few other odd things on the barbecue too. I guess we like to have plenty of room for our meat on the barbecue, and we prepare the vegetables separately. We rarely barbecue just for one night, we almost always purposely cook extras for leftovers. Sometimes we freeze barbecue too, that way, when barbecue season really is over, we will have some for the dead of winter.


Sunday, July 22, 2012
Meat-za Pie
Meat-za Pie
2 Tablespoons oil
one pound (454 grams) extra-lean ground beef
ground black pepper
1/2 cup dry seasoned breadcrumbs (or use your own seasonings)
2/3 cup milk
1/3 cup ketchup (or tomato paste or tomato sauce)
1 cup sliced fresh button mushrooms (or one 10 ounce/284 mL can, drained)
1 cup grated mozzarella cheese (or cheddar, or add some Parmesan too)
In a large frying pan over medium heat, heat the oil. Add the beef and scramble-fry until fully cooked. Transfer to a pan/pans. Season with pepper and breadcrumbs, and moisten with milk. Add ketchup, and stir it all up with the meat in the pan. Spread the meat evenly in the bottom of the pan, then top with the mushrooms, then sprinkle with the cheese. Cover with foil and bake at 375◦F for about 30 minutes, or until cheese is melted and entire dish is hot. Serve with potatoes, pasta, or rice.
 This is a quick, tasty family meal and a good way to use ground beef (I'm sure it would work with other meats too though). It is also incredibly versatile - if you don't like mushrooms, use another vegetable. Use any cheese you like. Add more spice, chopped peppers, different cheeses, whatever. Also the dish is quite forgiving, the oven temperature and baking time may be varied, and it may be baked with other dishes too. The breadcrumbs really give the dish a lot of flavor, so you don't even need to add salt to the meat. The ketchup also adds a hint of sweetness to the dish, and has more flavor than tomato paste and most sauces, so I would recommend using this. I used slightly more than a pound of beef, so I also increased the amounts of the other ingredients, and divided it all into two 8-inch round pans. The original recipe suggest a 9x9 inch pan. Just use whatever works for you!
2 Tablespoons oil
one pound (454 grams) extra-lean ground beef
ground black pepper
1/2 cup dry seasoned breadcrumbs (or use your own seasonings)
2/3 cup milk
1/3 cup ketchup (or tomato paste or tomato sauce)
1 cup sliced fresh button mushrooms (or one 10 ounce/284 mL can, drained)
1 cup grated mozzarella cheese (or cheddar, or add some Parmesan too)
In a large frying pan over medium heat, heat the oil. Add the beef and scramble-fry until fully cooked. Transfer to a pan/pans. Season with pepper and breadcrumbs, and moisten with milk. Add ketchup, and stir it all up with the meat in the pan. Spread the meat evenly in the bottom of the pan, then top with the mushrooms, then sprinkle with the cheese. Cover with foil and bake at 375◦F for about 30 minutes, or until cheese is melted and entire dish is hot. Serve with potatoes, pasta, or rice.

Tuesday, July 17, 2012
Barbecue Feast


Saturday, July 14, 2012
Hotdogs & Hamburgers
It is still summertime, thank goodness. Let the warm weather and sunshine last! Summer also means a lot of barbecues, and here is an example of another barbecue we had. Of course, my father manned the grill, as always. This time we kept it fairly simple, which makes it much easier to feed a larger crowd. We simply barbecued hotdogs and hamburgers. The burgers were my father's standard delicious burger recipe, and the hotdogs were, well, hotdogs. All you need is hamburger buns and hotdog buns, and lots of condiments and toppings, and you are all set. Side dishes, although nice, are optional. But of course, since we all have sweet tooths here, there was plenty for dessert! I am not really a fan of hotdogs at all, but I do enjoy hamburgers. Actually, I'm not a huge meat lover at all, but who doesn't like a homemade burger fresh from the barbie? A simply brush of barbecue sauce and a slice of tomato is all I need. Sure, there are plenty of fancy burger recipes out there, and there are even tons of "gourmet" hotdog recipes, but generally simpler is better for hot summer days with friends and family. Maybe next time, we'll try a double bacon cheeseburger, or a peanut butter burger, or a chili dog, or Monte Cristo hotdog, but for now, let's just enjoy the summer!


Tuesday, April 03, 2012
Sweet & Sour Meatballs
Sweet and Sour Meatballs are one of my mother's signature dishes. She has been making them ever since I can remember, and I have loved eating them ever since I can remember! Although I have eaten meatballs elsewhere, Mom's meatballs have always been the best, and the true definition of "real meatballs" to me. Of course her meatballs would never be complete without the sweet and sour sauce to go with them. Actually, I have never even tried the meatballs without the sauce, it just wouldn't be right. My mom starts out with a basic meatball recipe using ground beef, chopped onion, egg, dry breadcrumbs, and ground black pepper; nothing fancy. She browns them first, then makes up the sweet and sour sauce and bakes the meatballs with the sauce. She always makes a great big batch of them, enough for leftovers. We like to have meatballs with spaghetti and rice of course, but sometimes we also pair them with potatoes. They also make a good meatball sandwich!
 I have helped my mother make these meatballs before, usually I mostly handle the sauce, as I don't like touching raw meat. I have even made the sauce on my own before and used it in other recipes. It works well as a basic sweet and sour sauce for some things, but I like it best on my mom's meatballs. I always look forward to meatball night at our house!

Wednesday, March 21, 2012
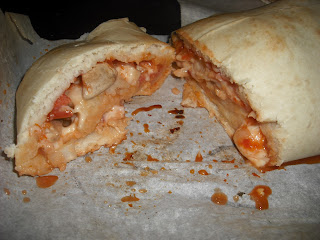
Pizza Stromboli
For supper, I decided to try something a little different than the usual pizzas we make. I found a recipe for what was called "Family-Style Stromboli". It appeared to be a pizza in jelly-roll form. It seemed interesting and tasty enough, so I decided to give it a try. I just used the dough recipe for the crust, and chose fillings to please my family. The original recipe used more vegetables in their filling and less pizza meats than I did. The result was even better than I had expected! This is a very nice dough to work with - it is soft and easy to shape, doesn't tear easily, and when baked, is soft and fluffy. The toppings baked nicely into the crust (I recommend using lots of cheese), and the roll cut well. I would definitely make this again in place of pizza any day - it is quicker and actually easier, and I might just argue that it is tastier too!
 Pizza Stromboli
2 cups all-purpose flour, divided
1 package quick-rise yeast
1 1/2 teaspoons granulated sugar
1 teaspoon salt
2/3 cup warm water
3 Tablespoons oil
Preheat oven to 400◦F. Grease a baking sheet, or line with parchment paper.
In a large bowl, mix 1 cup flour with the yeast, sugar, and salt. Add water then oil, mix until well blended. Stir in 1/4 cup of the remaining flour at a time, working the flour in to make a soft dough. Spread dough into a large rectangle (about 16x9 inches) on the prepared baking sheet.
Spread dough with a modest amount of pizza sauce, and sprinkle with your favorite toppings (sliced meats, finely chopped vegetables, grated cheese, etc.) Go easy on the toppings, too many and they will just fall out and the roll will not roll properly.
Bake for about 20 minutes, or until crust is golden. Let the roll rest for 10 minutes (if you can) before slicing, it will make much neater slices instead of just falling apart.
Subscribe to:
Posts (Atom)