
Monday, April 30, 2012
Ham Dinner
Sunday, April 29, 2012
Start Planting Now
Spring weather is starting to appear, and before we know it, it will be time to start our vegetable gardens outdoors. For now though, while there is still frost and the ground is too frozen to dig up, vegetable gardens can be started indoors. By beginning planting now, your vegetable plants will already have a great head start and produce vegetables sooner after they have been transplanted outdoors. You can begin your indoor planting in small pots or wooden boxes, but containers work very well too. Water, pop, and juice bottles that have been cleaned and cut open actually work very well for beginning plants. Empty yogurt, butter, cottage cheese, and other similar containers also work well, as do jars and even tin cans. When I was young, I planted a few bean seeds in a pile of dirt in a clean two-liter pop bottle with the top cut off, and a small door cut into the back. I couldn't believe how quickly the plant grew, and how large it got. It quickly outgrew that pop bottle, and its stalks were spilling out the small door and out of the top. It was an easy plant to care for as well, it could easily be placed in sunlight, and was easy to water. It was also easily transportable. I think I even took it on a trip to my grandparent's house a few hours car ride away, and it still survived well.
Indoor plants that are started with seeds will need a nice amount of soft dirt, lots of light, from sunlight or lamps, and water. They will also require some temperature control, room temperature is fine, but ensure that it is not too warm or too cold or drafty. Dedicate a spot in your house where the plants won't be disturbed by temperature changes, won't be accidentally knocked over, and can access light and water easily.
Herbs are always good plants to have indoors. Aside from those, here is a list of plants that are commonly started indoors before the springtime, and they benefit from this quite a bit.
- Cucumbers, Peppers, Tomatoes, Lettuces, Carrots, Broccoli, Eggplant, Celery
These vegetable are suggested as starting indoors either because they require longer growing periods, grow better when transplanted outdoors as a plant instead of a seed. or require a bit more TLC.
 PHOTO CREDIT:"p1000812"
http://containergardening.wordpress.com/2007/08/14/gardening-ideas/ . Container Gardening, n.d. Sunday, April 29, 2012.
PHOTO CREDIT:"p1000812"
http://containergardening.wordpress.com/2007/08/14/gardening-ideas/ . Container Gardening, n.d. Sunday, April 29, 2012.

Saturday, April 28, 2012
Mississippi Mud Pie


Friday, April 27, 2012
Whole Wheat Yeast Bread
Today I made some whole wheat bread again, a different recipe I have never tried before of course. Although the bread did not rise as much as I had hoped it would, it still turned out very well. The lack of rise may be due to the little mini crisis situation I had. I had already started mixing up the bread dough when I realized that there was absolutely no yeast left in the house. Oops, poor planning and inventory checks, and especially unfortunate because a trip to the grocery store had been made earlier today. Oh well, good thing the store isn't too far away, so a quick trip was made. Meanwhile, I hoped the warm water wasn't getting too cold. The closest store only carried traditional yeast, not rapid rise yeast like I usually use, but I din't think that would be a problem, as I have used traditional yeast before. It wasn't until after I had arrived home and added the yeast to my now only lukewarm water that I realized the bread recipe actually called for instant yeast. To my knowledge, the only difference between traditional yeast and instant yeast is that instant yeast does not require a separate proofing and can just be added to the dry ingredients. Since the recipe called for the yeast to be added to the warm water anyway, I simply let it sit for 10 minutes to activate. After 10 minutes, the mixture seemed to be quite bubbly, so I continued on with the recipe. After the first rising of the dough, the dough seemed to be quite high, so I figured it would all work out. After the second rising, the dough was not quite as high as it probably should have been, and it did not rise much in the oven. Oh well, still tasty. However, take a few lessons from this fiasco: always check to make sure you have the ingredients you need, preferably before you go out, but definitely before you begin your baking. Also read the recipe carefully before beginning. Luckily this bread recipe is fairly forgiving.
 Now, to the actual bread recipe. It is fairly simple, with not many ingredients. Just water, sugar, salt, yeast, butter, and flour. Of course I spruced it up a little to suit my liking. I added some ground flax seed and some sunflower seeds and used all whole wheat flour to make the bread more hearty and nutritious. The recipe simply calls for one large amount of all-purpose flour, but this could easily be varied with any variety of grains to suit your tastes. As I mentioned before, this is a very forgiving and versatile recipe. It is also fairly basic, and could probably be changed up by the addition of molasses, honey or brown sugar, and eggs and milk. The amounts of sugar, butter, and salt could also be varied to suit personal tastes.

Thursday, April 26, 2012
Pizza Roll Ups
This is my new favorite supper alternative to regular pizza: Pizza Stromboli. These are faster, easier, less work, and in my opinion, tastier, than making my usual homemade pizza. Basically these pizza strombolis are simply an easier, softer, and fluffier version of pizza dough. The dough is rolled out into a thin rectangle, spread with sauce and sprinkled sparingly with toppings (so they won't fall out), and finished off with lots of shredded pizza mozzarella. Then it is rolled up, jelly roll style, sealed, and placed on a baking sheet. It is actually a lot easier and less elaborate than it sounds. The strombolis are then baked in the oven for 15-20 minutes, and they are ready to serve (although it helps to let them rest for a few minutes before cutting them, as they will be a lot neater, but this isn't necessary and is sometimes difficult).
The first time I tried out this new recipe was about mid March, and it worked out beautifully. This time I made two separate strombolis at the same time. Doubling the recipe and then dividing the dough in half would have also worked, however I wanted to try making one of the strombolis whole wheat. I really like whole wheat pizza crust, but I do find it can be a bit dry and a tad too wheaty. I did not find this at all with the whole wheat stromboli, even though I used all whole wheat flour, and not half whole wheat and half white flour. The whole wheat stromboli tasted very good and had a pleasant texture.
I will probably be making this again in place of the usual pizza, although I will turn to the trusty old pizza recipe again from time to time. This stromboli can use any of the same toppings that would normally be used for pizza, and can be varied to suit your personal taste. As you can see in the picture, the dough is quite forgiving and rises very well. If the dough tears in places, it can easily be patched up with the ends. You might also find that some of the filling may try to escape, but it's not a big deal. You can even sprinkle some extra toppings on the outside of the dough for more flavor. Be sure to line your baking sheet with parchment paper for a much easier clean up!

Wednesday, April 25, 2012
Maple Apple Oatmeal Muffins
Since it is still maple syrup season and maple products are still in abundance at the supermarkets, I decide to make another baked good with maple. I recently came across this recipe in a newspaper, and it looked good so I decided to try it. Maple and apple sounded like a good combination to me, especially with the addition of hearty oats for texture. The recipe uses a modest 1/2 cup of maple syrup, which is why only 1/3 cup of sugar is needed, as maple syrup actually has a higher concentration of sweetness than sugar (it varies also depending on the grade of maple syrup you choose). The muffins are brushed with some extra maple syrup while still warm, adding some extra maple flavor and a hint of stickiness to them.
 Maple Apple Oatmeal Muffins
1 1/4 cups quick-cooking rolled oats
1 1/2 cups milk
1 large egg
1/2 cup pure maple syrup
1/3 cup granulated (white) sugar
1/4 cup butter or hard margarine, melted
1 teaspoon vanilla extract
2 cups all-purpose (plain) flour
1 Tablespoon baking powder
1/2 teaspoon salt
2 cups finely diced cooking apples (peeled or unpeeled)
2 Tablespoons pure maple syrup, for brushing the tops
Preheat oven to 400◦F. Lightly grease or line a muffin tin with paper liners.
In a large bowl, combine the oats and milk, set aside and let sit for at least five minutes.
In a separate medium bowl, mix the next five ingredients. Add to oat mixture, mix well. Add flour, baking powder, and salt, stir until just moistened. Gently fold in apples.
Divide among muffin cups, filling about 3/4 full. Bake for about 25 minutes or until a wooden toothpick inserted into the center comes out clean and the tops are firm to the touch. Brush the tops of the muffins with some extra maple syrup while still warm.
Tuesday, April 24, 2012
Quick Homemade Biscuits
Here are the biscuits we served with our soup yesterday, and today for that matter, since we had leftover soup, and both the soup and the biscuits keep and reheat well. These are called crunchy drop biscuits, because of the way they are made. They start with a standard biscuit dough, flour, sugar, salt, baking powder, egg, butter, and milk, but instead of being kneaded, rolled out, and cut, the dough is simply dropped from a tablespoon. This makes these biscuits a lot quicker and easier than standard biscuit. The best part of all is, they are just as good, if not better! They are crunchy on the outside, and soft and fluffy on the insides. They have a rich, buttery flavor. They can be made as big or as small as you would like, and as crispy or as soft as you like, depending on how close together you space them on the baking sheet. If you are really short on time, you can even just form the dough into one large mass and place it on the baking sheet to bake, then break off pieces to eat it.
 There is nothing like hot biscuits straight from the oven, spread with a little butter or dipped into hot soup. These biscuits keep for about a week in an air-tight container at room temperature, and they also freeze well. I have enjoyed these biscuits in a variety of ways, including spread with butter, peanut butter, chocolate hazelnut spread, strawberry cream cheese, garlic butter and with cheese. They are nice reheated, but also fine at room temperature. My mother has been making these biscuits for a long time, and she taught me how to make them. I am sure we will both continue to make them for many years to come.

Monday, April 23, 2012
Turkey Noodle Soup
Even though the weather is starting to get a bit warmer, and there are no longer snowy, cold days, it is still nice to have soup. Today was actually a pretty good day for soup, as it was miserable and rainy outside, with a slight chill and some dampness in the air. We also made this soup to use up the leftover turkey from Easter that we had in the freezer. This soup is basically just a standard chicken noodle soup recipe, but we used turkey because that is what was on hand. The soup contains chicken broth, ground black pepper, chopped onion, sliced carrots, potato, peas, turkey pieces, and spaghetti noodles. It is a nice, classic soup, hearty, but not too heavy, and is a great treatment for colds and the flu. This soup could be served with any hearty bread, biscuit, sandwich, or crackers, weather homemade or store-bought. Basically all you need is a little something for dipping and enjoying on the side, which could be anything from pita bread, to a croissant, to cheese crackers, to a grilled cheese sandwich. When we have the time, we like to serve our homemade soup with homemade biscuits, which I will feature tomorrow.


Sunday, April 22, 2012
Candy Bar Squares
These are probably one of the quickest and easiest square recipes I have ever made. Only nine simple ingredients that are all mixed together and then pressed into a pan. Then they bake for 25 minutes, and are cut into squares while still warm. They cut very easily, and are quite neat bars that stay together well and hold up well at room temperature. They can be ready to serve in less than an hour. They also have a nice variety of flavors, that could easily be switched up, and are reminiscent of a candy bar. Try using a different type of chocolate chips or a different type of nuts. Instead of using butterscotch chips, I used miniature candy-coated chocolates, because that is what I had on hand. This seemed to have worked well. This recipe is from Company's Coming "Sweet Cravings", and I am sure it could easily be doubled to fit a 9x13 inch pan if this small pan just isn't enough. If you want to dress the bars up a little, a drizzle of melted chocolate or simple vanilla glaze would add a touch of decadence, although the bars don't really need anything.
 Candy Bar Squares
1/4 cup hard margarine or butter, softened
1 cup packed brown sugar
1 large egg
1 teaspoon vanilla extract
1 cup all-purpose flour
1/2 teaspoon baking powder
1/2 cup semi-sweet chocolate chips
1/2 cup butterscotch chips
1/2 cup coarsely chopped peanuts
Preheat oven to 350◦F. Grease or line an 8x8 inch square pan.
In a medium bowl, mix first four ingredients. Add remaining ingredients, mix well. Press into prepared pan. Bake for about 25 minutes or until lightly golden. Cut while still warm.
Paré, Jean. "Candy Bar Squares." Recipe. Sweet Cravings, Edmonton Alberta: Company's Coming Publishing Limited, 2002. 147.
Saturday, April 21, 2012
Mathematical Cupcakes

Friday, April 20, 2012
Quickest Chocolate Cupcakes
Here is a really easy and quick recipe to use when you need just a small batch of cupcakes. The recipe calls for a yield of 14 cupcakes, although I only got 11, and I thought they were small at that. Keep in mind though, that these cupcakes do rise quite high. Also take note that this recipe is egg-free and dairy-free, so it is good for allergies.
Quickest Chocolate Cupcakes
1 1/2 cups all-purpose (plain) flour
3/4 cup granulated sugar
1/4 cup unsweetened cocoa powder
1 teaspoon baking soda
1/2 teaspoon salt
1 cup water
1/4 cup oil
1 Tablespoon white vinegar
1 teaspoon vanilla extract
 Preheat oven to 375◦F. Line a muffin tin with paper liners.
In a large bowl, mix the first five ingredients. Add remaining ingredients, mix just until combined and batter is smooth. Fill muffin cups 2/3 full. Bake for 16 to 18 minutes or until a wooden toothpick inserted into the center of a muffin comes out clean.
West Side Publishing. "Quick Chocolate Cupcakes." Recipe. Hershey's Classic Recipes, Lincolnwood Illinois: Publications International, Limited, 2009. 126.
Quickest Chocolate Cupcakes
1 1/2 cups all-purpose (plain) flour
3/4 cup granulated sugar
1/4 cup unsweetened cocoa powder
1 teaspoon baking soda
1/2 teaspoon salt
1 cup water
1/4 cup oil
1 Tablespoon white vinegar
1 teaspoon vanilla extract

In a large bowl, mix the first five ingredients. Add remaining ingredients, mix just until combined and batter is smooth. Fill muffin cups 2/3 full. Bake for 16 to 18 minutes or until a wooden toothpick inserted into the center of a muffin comes out clean.
West Side Publishing. "Quick Chocolate Cupcakes." Recipe. Hershey's Classic Recipes, Lincolnwood Illinois: Publications International, Limited, 2009. 126.
Thursday, April 19, 2012
Beef And Broccoli Stir-Fry

Wednesday, April 18, 2012
30 Minute Chocolate Cake
This afternoon I whipped up a small batch of cake and was enjoying it within thirty minutes. I think this is the quickest chocolate cake recipe ever, although having a helper might have helped speed things up a little. Nevertheless, this cake recipe is very fast. It's great for when you need to whip up a cake on very short notice, get the sudden craving for cake, or just want a quick and easy recipe. Typically cakes are not eaten warm, but this cake is delicious straight from the oven. It can also be dressed up any way you want. We added chocolate chips to the batter, but you could also add chopped nuts, coconut, chopped fruit, or even mashed banana. We also served our cake with warm caramel sauce, but again, you could serve it with hot fudge sauce, chocolate sauce, ice cream, whipped cream, cherry sauce, glaze, or icing. You could also use cherries, toasted nuts, chocolate pieces, or sprinkles as garnishes. The possibilities are endless, and all of them work whether you serve the cake warm or cold. If you want something really quick, just sprinkle the top of the cake with some chocolate chips before baking, and when the cake comes out of the oven, spread the chocolate chips in an even layer with a knife for an instant icing.
 Chocolate Snack Cake
2 Tablespoons butter or hard margarine, softened
1/2 cup granulated sugar
1 large egg
1/3 cup milk
1/2 teaspoon vanilla extract
2/3 cup all-purpose flour
2 Tablespoons unsweetened cocoa powder
1/2 teaspoon baking powder
1/2 teaspoon baking soda
1/2 teaspoon salt
Preheat oven to 350◦F. Grease a 9x9 inch pan.
In a medium mixing bowl, beat the first five ingredients. Add remaining ingredients and beat until smooth. Pour into prepared pan and bake for about 14 minutes, or until a wooden toothpick inserted into the center of the cake comes out clean.
Notes: I used chocolate milk in the cake, which seemed to work really well. I also added 1/2 cup semi-sweet chocolate chips to the batter. I used an 8x8 inch square pan instead of a 9x9 inch, which made the cake higher, but increased the baking time by about 4 minutes or so. The cake actually cuts quite neatly, even when piping hot. The recipes comes from Company's Coming "Sweet Cravings".
Paré, Jean. "Chocolate Snack Cake." Recipe. Sweet Cravings, Edmonton Alberta: Company's Coming Publishing Limited, 2002. 22.
Tuesday, April 17, 2012
Difficult D
Here is another one of my alphabet posts, where I list as many different foods as I can think of that start with a certain letter. I am now on the fourth letter, D. Again, these are coming strictly from my head, I won't include any brand names, and I won't list every individual type. For example, a cookie is a cookie, I will not then proceed to list chocolate chip cookie, coconut cookie, cream-filled cookie, etc. I can't think of very many foods beginning with the letter D off the top of my head, so I have a feeling this will be a difficult one. All of the foods will probably come to mind after I finish this post. I think E might even be easier than D!
- Doughnut, Danish, Dressing, Drink, Divan, Dessert, Dinner, Dragonfruit
- Deli Meat, Dates, Dill, Dip, Dumplings, Drumsticks, Duck, Donairs
That's about all I can think of for now.......any more?
 PHOTO CREDIT:"gold-letter-D" http://www.freeclipartnow.com/d/39952-1/gold-letter-D.jpg. Free Clip Art, n.d. Tuesday, April 17, 2012.

Monday, April 16, 2012
Maple Planked Salmon

Sunday, April 15, 2012
Banana Chocolate Chip Snacking Cake
Here is the cake I made today for my family to snack on. It is something similar to the usually banana chocolate chip oat cake we often have around our house, but slightly different for a bit of a change. I took a recipe for a basic banana cake and changed it up to suit my family's tastes. The cake is fairly moist, sweet from the streusel, and contains just the right amount of chocolate. It is also quite quick to make, it would be a faster dish to make in place of banana chip muffins if you are pressed for time.
 Banana Chocolate Chip Snacking Cake
STREUSEL
1/2 cup light brown sugar, packed
2 Tablespoons all-purpose flour
1 teaspoon ground cinnamon
2 Tablespoons butter or hard margarine, melted
CAKE
2 large eggs
1/2 cup oil
1/2 cup granulated (white) sugar
1/2 cup light brown sugar, packed
1 cup overripe mashed bananas (about three large)
1 1/2 cups all-purpose (plain) flour
1 teaspoon baking powder
1/2 teaspoon baking soda
1/2 teaspoon salt
1/2 cup miniature semi-sweet chocolate chips
Preheat oven to 350◦F. Spray a 9-inch square baking pan with cooking spray.
STREUSEL: Mix all ingredients together until crumbly. Set aside.
CAKE: In a large bowl, beat the first four ingredients. Add the banana, mix well. Add remaining ingredients, mix until fully incorporated.
Pour batter into prepared pan. Sprinkle evenly with streusel.
Bake for 35 to 40 minutes, or until a toothpick inserted into the center of the cake comes out clean.
Saturday, April 14, 2012
Blueberry Coffee Cake

Friday, April 13, 2012
Vegetable Bean Soup
This is the delicious soup that only my grandmother can make, which we enjoyed for supper tonight. It is a vegetable bean soup with noodles. We have a name for it, which I can think of numerous spellings for, none of which are correct. It is pronounced "fa-zoo-ey", but I have no idea where that name came from. Although she has not divulged the exact secret recipe, and the soup is always a little different each time it is made, here is the basis of it. It starts with chicken broth and a lot of fresh vegetables, along with some canned vegetables and canned beans. The vegetables always include carrots, celery, and sweet potatoes, but often other vegetables are added as well. The vegetables are simmered in the chicken broth until tender. The mixture is then pureed into a smooth, thick vegetable soup. This is when seasonings, such as ground black pepper and parsley, are added, along with spaghetti noodles. Then the mixture is cooked again just until the pasta is tender. This soup is a bit difficult to describe, and it seems pretty simple, but it is so so good! It would be a nice starter vegetable soup without the pasta, but the pasta makes it a bit more substantial and good for a meal. The amount of pasta can easily be adjusted, as can the type of pasta. This soup is great with a slice of thick, homestyle bread. The soup also freezes quite well. My grandmother tends to make a batch of this soup for us every time we visit her or she visits us. She also brings some other delicious baked goodies with her too. I always look forward to my grandmother's delicious cooking!


Thursday, April 12, 2012
Natural Or Organic?
Did you know that there is actually quite a significant difference between foods labeled “natural” and foods labeled “organic”? Organic is the option you want to choose as much as possible, because it is actually a lot safer than natural products. Here is the lowdown:
Any natural product, just simply means it contains only ingredients that are found in nature, or that exist freely on earth. Natural applies to anything that is not artificially or chemically produced, or in other words, synthetically prepared or man-made. This means that natural products may include: pesticides, herbicides, metals, PCBs, BPA, and other harmful substances. There are no regulations, restrictions, rules, or definitions for the label claim of “natural.”
Organic products must meet strict regulations put into place by the Food and Drug Administration (FDA), and they must comply with all of the criteria in order to be deemed “organic”. Organic products must be free of hormones, antibiotics, pesticides, and herbicides, and may not be genetically engineered. Therefore, the term organic is strictly regulated by an honorable organization and must comply with certain criteria, while products labeled natural do not. This is not to say that all natural products are bad, or that natural products cannot be organic and organic products cannot be natural. Read your food labels very carefully, every time.

PHOTO CREDIT:"organic-better-chemical1" http://www.myessentia.com/blog/blog/tag/organic-produce/ .Fresh Fuzz, n.d. Sunday, March 18, 2012.
Wednesday, April 11, 2012
Easter Treats
I am sure many of us have put quite the significant dent into our collection of chocolates and candy from Easter. Personally, I have not, but that's only because I have been eating all of the baked goods I made for Easter. The Easter Bunny certainly brought a fair share of chocolate to our house. Easter is one of the occasions where chocolate sales are at a dramatic increase. There are also a few popular candies associated with Easter, such as jellybeans and marshmallow peeps, but mostly it is chocolate. Popular Easter chocolates include miniature chocolate Easter eggs, chocolate cream eggs, chocolate bunnies, and other little chocolates. And who can forget about those delicious candy-coated chocolate mini eggs? Also popular are chocolate shapes, either hollow or even better, solid. These chocolates can be huge, and are most often shaped like a bunny, but also chicks, cats, dogs, and even cartoon characters. My brothers and I used to get one of these every year, but now we prefer smaller, more expensive chocolates. Here is a sample of the Easter treats at out house:


Tuesday, April 10, 2012
Chocolate Challah Egg Bread
Here is another baked good I made for the Easter season. It is a challah bread, which is basically a rich, four-strand braided egg bread. It is something like a braided Easter egg bread, which is often pictured with colored hard-boiled eggs tucked into the pockets of it braids. I made traditional Easter egg bread last year, so this year I decided to make something a little different.
 This braided challah bread is made just like traditional challah and Easter egg bread, but this version contains chopped chocolate. This bread dough is made from yeast, flour, eggs, plus the addition of two extra egg yolks for richness. It also contains honey in place of regular sugar, and oil instead of butter. The dough is made, kneaded for about 10 minutes, then placed in a bowl to rise for an hour. Then it is punched down, the chocolate is added, and it is divided into four long ropes. Then it is braided, and allowed to rise for another hour, before it is finally baked for about 30 minutes. It is very important with this recipe to oil the dough, just lightly enough to coat it, so that it won't stick and it will be a lot easier to work with.
I used chopped dark chocolate, but my taste-testers thought the recommended semi-sweet chocolate would have been a better match. This bread is a sweet bread, but it is still bread, so it is not overly sweet. Semi-sweet chocolate would have added a hint of sweetness and probably would have worked better, although I did like the dark chocolate, as I am a big fan of dark chocolate. I have never braided anything using four strands before, so bread was probably not the best place to start. However, I did practice using strings beforehand, but my braiding still din't turn out the best. I also found it a bit difficult to make the end where the strands start into a nice braid. Maybe I should stick to three strands. Looks aside, the bread turned out to be quite tasty. It was light and fluffy, but had a nice, crisp exterior. It was tender and soft, and makes a good snack or breakfast. It would be excellent spread with chocolate hazelnut spread.

I used chopped dark chocolate, but my taste-testers thought the recommended semi-sweet chocolate would have been a better match. This bread is a sweet bread, but it is still bread, so it is not overly sweet. Semi-sweet chocolate would have added a hint of sweetness and probably would have worked better, although I did like the dark chocolate, as I am a big fan of dark chocolate. I have never braided anything using four strands before, so bread was probably not the best place to start. However, I did practice using strings beforehand, but my braiding still din't turn out the best. I also found it a bit difficult to make the end where the strands start into a nice braid. Maybe I should stick to three strands. Looks aside, the bread turned out to be quite tasty. It was light and fluffy, but had a nice, crisp exterior. It was tender and soft, and makes a good snack or breakfast. It would be excellent spread with chocolate hazelnut spread.
Monday, April 09, 2012
Chocolate Oat Nests

I made these simple no-bake cookies for Easter to look like little nests. After I dropped them onto the cookie sheet, I put three candy-coated chocolate mini eggs in each nest. This idea would also work well with coconut cookies, macaroons, or meringues.
Even though the recipe called to use waxed paper, I found the cookies stuck a little bit to it, although they didn't leave bits of waxed paper on them, so it worked out okay. Next time though, I would use parchment paper.
These cookies are so quick and easy, but very tasty.
No-Bake Chocolate Oat Drop Cookies
1/2 cup (1 stick) butter or hard margarine2 cups granulated (white) sugar
3 Tablespoons unsweetened cocoa powder
1/2 cup milk
3 cups minute oats
1 teaspoon vanilla extract
In a large saucepan over medium heat, melt the butter. Add the sugar, cocoa, and milk. Stir occasionally until mixture comes to a boil, boil and stir for three minutes. Remove from heat and stir in vanilla. Quickly mix in the oats.
Working quickly before the mixture has time to harden, drop the mixture by spoonfuls onto a cookie sheet lined with waxed paper. Refrigerate at least one hour, or until firm.
Sunday, April 08, 2012
Easter Chick Cake

Here is the cake I made for Easter. We always seem to have a cake for Easter, and every year it is different. We used to always make a bunny cake, the classic bunny head where you bake two round layer cakes, use one for the head, and cut the other into two ears and a bow tie. This makes a very cute cake, that can be decorated in many different ways: icing, chocolate, candies, jelly beans, licorice, coconut, etc. We have been making these bunny cakes, and I have helped decorate them for as long as I can remember. Even though every time you make this cake it is different, I was still getting a bit tired of making the same old shape. So two years ago, I decided to make a different bunny cake. For this bunny cake, I made the entire bunny instead of just the head. Again, I baked two round layers. I cut one in half, and stood the two halves together with some icing to hold them, to form the bunny's body. Then I cut a head, a tail, four feet, and two ears from the other layer cake. I made this cake my signature chocolate and used chocolate fudge icing to make a brown bunny.
Last year, I decided to step away from the bunny theme completely. I made an Easter basket cake. I used two round layers, from a cake recipe that rose very high, which made a nice tall basket. From one of the layers, I scooped out a shallow, round area, leaving a two-inch border around the cake. I stacked them together like most plain birthday cakes. I dirty-iced it in chocolate frosting, then piped more chocolate frosting all over the sides of the cake in a basket-weave design. I added a purple rope border on the bottom, and a yellow on the top. The day before, I had made some sugar cookie dough, and had cut two basket handle shapes for the cake (one was for back-up in case the first broke).I iced these in chocolate icing. With the extra dough, I also baked some bunny shapes and egg shapes. I decorated them with purple and yellow icing and sprinkles. I placed the handle on the cake, and placed the bunny and egg cookies into the shallow opening in the cake. This cake was very fun to make, and I think it turned out really well for my first attempt at anything like this.
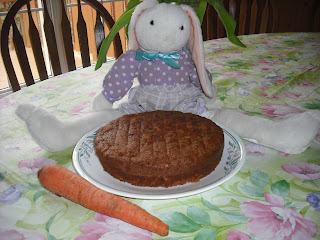
This year, I wanted to stay away from the bunny theme again, but I still wanted to do something different from a basket cake. I decided to make a chick cake. I wasn't completely sure how I could go about doing this, so I looked it up online. I found a really easy template for a chick cake, using two round layer cakes, so I followed that. From one cake layer, simply cut a jagged pattern about 3/4 of the way down the cake to make the two pieces of shell. From the other cake layer, cut a straight line about 3/4 or a little more of the way down the cake, then cut that piece in half. This forms the chick body and the arms. I frosted it with cream cheese icing (since I used carrot cake): white for the shell, and yellow for the chick. Then I added some piping, made the face, wrote Happy Easter, and put on some candy-coated chocolates for decoration. You could also use coconut for both the egg and the chick if you like coconut, just color it yellow for the chick. Then you can still decorate it with candies and more icing. This cake was actually pretty easy and surprisingly quick, or maybe I am just getting better at cakes with practice.
Happy Easter!
Saturday, April 07, 2012
Carrot Cake
Easter is tomorrow, so I made carrot cake, which I will decorate in an Easter theme for tomorrow. I will frost it in cream cheese icing of course, because that goes best with carrot cake. Carrot cake is difficult to define. Everyone has their own definition of "true" carrot cake and what it should contain. Generally speaking, I think most people would agree that carrot cake should be moist with a fine crumb, and contain just the right amounts of sugar, oil, and carrots. Now here is where things really start to vary. Some insist carrot cake must contain pineapple and grated apple or applesauce. Others have to have toasted walnuts, shredded coconut, and golden raisins. Chocolate carrot cake is also an option. I wanted a really moist carrot cake without too much added things to stir in, so I used crushed pineapple and applesauce, and no nuts, coconut, or raisins. Here is my recipe, which I came up with from looking at a lot of recipes for carrot cake and adapting them. This cake recipe makes a large batch, three cakes. I will use the two rounds for my Easter cake, and freeze the square for later use. It could also be baked in one tube or bundt cake (10 inch or 3 liter capacity) for a longer period of time.
Carrot Cake
2 cups all-purpose (plain) flour
2 teaspoons baking powder
1 teaspoon baking soda
1/2 teaspoon salt
1 Tablespoon cinnamon
1/2 teaspoon ground ginger
1/4 teaspoon ground cloves
4 large eggs, at room temperature
1 cup cooking oil
1/2 cup unsweetened applesauce
2 cups granulated (white) sugar
1 can (14 ounces/ 384 mL) crushed pineapple (or buy pineapple rings and crush them in a blender)
2 large carrots, grated
Preheat oven to 350◦F. Grease and flour two 8-inch round and one 8-inch square cake pan.
In a large bowl, mix the first seven dry ingredients.
In a separate medium bowl, beat the eggs and oil. Gradually beat in the sugar.
Add the liquid ingredients to the dry, add the pineapple and carrots. Mix until well incorporated. Divide evenly among the three pans. Bake for about 30 minutes, or until a toothpick inserted into the center comes out clean.
An electric mixer is not necessary for this recipe, but it does make mixing easier.

Friday, April 06, 2012
Hot Cross Muffins
Since today is Good Friday, I made Hot Cross Muffins. Hot Cross Buns are a traditional bread to serve on Good Friday, but I opted for a quicker yet equally as tasty version, hot cross muffins. I have made two different types of hot cross buns in the past, regular and chocolate. The regular were okay, and the chocolate were very tasty, however I found both versions were quite dry. They were also time-consuming and required more work to make, not that I am opposed to that, but I wanted something quicker to make today. These are delicious warm from the oven. and a lot moister than hot cross buns. A simple icing for the crosses completes them. The recipe comes from Company's Coming "Mostly Muffins".
 Hot Cross Muffins
2 cups all-purpose (plain) flour
1/2 cup granulated (white) sugar
1 Tablespoon baking powder
1/2 teaspoon ground cinnamon
1/2 teaspoon salt
1/8 teaspoon ground nutmeg
1/8 teaspoon ground allspice
1 large egg
1 cup milk
1/3 cup cooking oil
1/2 cup currants or raisins
1/2 cup chopped mixed glazed fruit
Preheat oven to 375◦F. Grease or line twelve muffin cups with paper liners.
In a large bowl, mix the first seven dry ingredients. Make a well in the center.
In a separate small bowl, beat the egg, milk, and oil. Add to well. Stir until just moistened. Add fruit and stir. Fill muffin cups 3/4 full. Bake for 18 to 20 minutes or until a toothpick inserted into the center of a muffin comes out clean.
To make the crosses: mix a little icing sugar, water, and vanilla extract in a bowl, spoon into a sandwich bag, and pipe crosses on the muffins.
I varied the spice types and amounts to match my tastes and what I found in the cupboard. I also did not have chopped glazed fruit, so I doubled the amount of raisins. I also coated the raisins in a little bit of the flour to prevent them from sinking in the batter. Not sure if this was necessary, but it certainly did not hurt.
Paré, Jean. "Hot Cross Muffins." Recipe. Mostly Muffins, Edmonton Alberta: Company's Coming Publishing Limited, 2007. 20.
Thursday, April 05, 2012
Easter Menu
This weekend is Easter weekend, which means treats left by the Easter Bunny and a delicious Easter feast. The most typical Easter dinner seems to be ham, often glazed with honey or maple syrup, to match the sweetness of all the other Easter treats around. Turkey, chicken, and lamb are also popular for Easter dinner. Lamb certainly seems to be the most elaborate, it can range from a simple leg or chop to an impressive rack of lamb or crown of lamb. Fresh lamb is most common around this time - the beginning of spring. Common side dishes for Easter dinner seem to revolve around fresh spring vegetables. Asparagus, peas, carrots, beans, and potatoes are popular choices. Of course if you are going with the turkey option, you will likely have a complete turkey dinner, similar to Thanksgiving or Christmas. However, usually Easter dinners are a bit lighter and more in tune to the springtime, and so it is not necessary to have all of the trimmings.
Many different sweet breads are also associated with Easter. Hot Cross Buns are traditionally eaten on Good Friday (the crosses represent the crucifixion). Easter egg bread and braided Easter breads are also popular, and are often flavored with a little citrus and raisins or currants. Easter egg bread is often decorated with hard-boiled eggs tucked into the pockets of the bread I love to color eggs to picture with my bread, or just alone in an Easter basket. They are great for breakfasts or sandwiches for the next few days.
There are also so many different desserts associated with Easter. I am sure we have all seen the popular bunny head cake, cut out of two round layer cakes. Easter basket and chick cakes are also cute, as are cupcakes. Decorated sugar cookies in the shapes of bunnies, chicks, eggs, and baskets are always welcome. Little nests made from coconut meringue cookies, chocolate coconut cookies, chocolate oat cookies, or haystack cookies can be filled with candy-coated chocolate eggs or milk chocolate eggs.
And of course everyone looks forward to the chocolate bunnies, whether hollow or solid, that the Easter Bunny brings, along with mini candy eggs, cream eggs, jelly beans, and milk chocolate eggs.
Have a great Easter weekend!
 PHOTO CREDIT:Happy Easter.jpg" http://quiltandstitchkingston.blogspot.ca/2010_04_01_archive.html.Quilt & Stitch, n.d. Thursday, April 5, 2012.
Many different sweet breads are also associated with Easter. Hot Cross Buns are traditionally eaten on Good Friday (the crosses represent the crucifixion). Easter egg bread and braided Easter breads are also popular, and are often flavored with a little citrus and raisins or currants. Easter egg bread is often decorated with hard-boiled eggs tucked into the pockets of the bread I love to color eggs to picture with my bread, or just alone in an Easter basket. They are great for breakfasts or sandwiches for the next few days.
There are also so many different desserts associated with Easter. I am sure we have all seen the popular bunny head cake, cut out of two round layer cakes. Easter basket and chick cakes are also cute, as are cupcakes. Decorated sugar cookies in the shapes of bunnies, chicks, eggs, and baskets are always welcome. Little nests made from coconut meringue cookies, chocolate coconut cookies, chocolate oat cookies, or haystack cookies can be filled with candy-coated chocolate eggs or milk chocolate eggs.
And of course everyone looks forward to the chocolate bunnies, whether hollow or solid, that the Easter Bunny brings, along with mini candy eggs, cream eggs, jelly beans, and milk chocolate eggs.
Have a great Easter weekend!

Wednesday, April 04, 2012
Maple Syrup
Maple syrup season is upon us! I love maple syrup. I have previously done a research project and presentation on the sweet stuff before, so I will share some of my knowledge with you.
What is it?
Maple syrup comes from maple trees: classic Canadian icons. Small holes are tapped into the trees, and sap (liquid from the trees consisting mostly of water) is collected. The water is then boiled off the sap, and sweet, sticky maple syrup is left.
Maple syrup is considered one of the many wonders of the world. It is a viscous amber liquid with a characteristic earthy sweet taste. Boiling the sap helps to concentrate its low sugar content to more than 60%. This process also creates the characteristic flavor and deep color of the syrup.
How is it made?
Sap is collected from maple trees around March and April, when the days are warm and the nights are freezing, causing the sap to flow.
The trees are tapped with holes and fitted with tubes connected to buckets, where the sap runs through to be collected.The sap is then boiled at about 104 degrees C on the same day it is gathered, usually boiling overnight in specific conditions to ensure the proper viscosity and taste of the final product.
The Traditional Native Way
The Native Americans were the first discoverers of sap of the maple trees.
They made small slits in the trees and used reeds or bark to collect the sap.
The sap was concentrated either by contact with hot stones or leaving it overnight.
The sap was boiled in clay pots hanging by tree branches over simple fires.
The Modern European Way
European colonies learned the custom of tapping maple trees for syrup from the Natives.
They used newer, advanced equipment. Sugarshacks - small, outdoor, wooden building where the sap was boiled - were created.
Maple syrup and other maple products, sugars, and candies were produced.
Which trees are used?
The main type of tree used is the Sugar Maple (also known as Hard Maple or acer saccarum).
Other trees used are: Red Maple (Swamp Maple, or acer rubrum), Silver Maple (Soft Maple), Ash Leafed Maple.
Trees should be at least 40 years old to tap (young trees are not big enough), but may be over 150 years old.
Trees must be at least 25 cm in trunk diameter.
Depending on the tree’s diameter, it may be fitted with up to 3 taps.
Prudent tapping does not harm the trees.
How is it used?
The most common use for maple syrup is to drown hot, fluffy pancakes with it.
However, maple syrup is commonly used in many other food dishes; such as sweets, candies, and drinks.
Maple is also gaining popularity as a flavoring for savoury dishes as well; such as maple smoked bacon,
maple braised pork, and maple vinagrettes.
Other Maple Products
Aside from maple syrup, the sap from maple trees is also used to make many other delicious products.
Types of Maple Syrup
Grade A Light Amber Syrup is made from early season sap when the sugar content is highest (2.2 – 3%) so the least amount of boiling time is required to obtain syrup density. It is the lightest syrup and has a slightly maple, delicate flavor.
Grade A Medium Amber Syrup is made with average sugar content sap through midseason. This syrup is golden in color and has characteristic maple flavor.
Grade A Dark Amber Syrup is made from sap that has low sugar content, (1.2-1.6% )It is dark amber and has a more pronounced maple flavor.
Grade B Syrup is made at the end of the season with sap of very low sugar content. It is very dark in color and very strong in flavor.
Storing Maple Syrup
Maple syrup can last an extensive period of time if unopened.
Once open, maple syrup should be stored in the refrigerator or frozen.
Maple sugar and maple candies also last quite a while, and do not need to be refrigerated.
Nutrition
Maple syrup is a completely natural sweetener. It can be used in place of sugar in many recipes, although maple syrup is sweeter, so less is required.
Maple syrup has more health benefits than sugar, including antioxidants, zinc, manganese, calcium, iron, and potassium.
Interesting Facts

What is it?
Maple syrup comes from maple trees: classic Canadian icons. Small holes are tapped into the trees, and sap (liquid from the trees consisting mostly of water) is collected. The water is then boiled off the sap, and sweet, sticky maple syrup is left.
Maple syrup is considered one of the many wonders of the world. It is a viscous amber liquid with a characteristic earthy sweet taste. Boiling the sap helps to concentrate its low sugar content to more than 60%. This process also creates the characteristic flavor and deep color of the syrup.
How is it made?
Sap is collected from maple trees around March and April, when the days are warm and the nights are freezing, causing the sap to flow.
The trees are tapped with holes and fitted with tubes connected to buckets, where the sap runs through to be collected.The sap is then boiled at about 104 degrees C on the same day it is gathered, usually boiling overnight in specific conditions to ensure the proper viscosity and taste of the final product.
The Traditional Native Way
The Native Americans were the first discoverers of sap of the maple trees.
They made small slits in the trees and used reeds or bark to collect the sap.
The sap was concentrated either by contact with hot stones or leaving it overnight.
The sap was boiled in clay pots hanging by tree branches over simple fires.
The Modern European Way
European colonies learned the custom of tapping maple trees for syrup from the Natives.
They used newer, advanced equipment. Sugarshacks - small, outdoor, wooden building where the sap was boiled - were created.
Maple syrup and other maple products, sugars, and candies were produced.
Which trees are used?
The main type of tree used is the Sugar Maple (also known as Hard Maple or acer saccarum).
Other trees used are: Red Maple (Swamp Maple, or acer rubrum), Silver Maple (Soft Maple), Ash Leafed Maple.
Trees should be at least 40 years old to tap (young trees are not big enough), but may be over 150 years old.
Trees must be at least 25 cm in trunk diameter.
Depending on the tree’s diameter, it may be fitted with up to 3 taps.
Prudent tapping does not harm the trees.
How is it used?
The most common use for maple syrup is to drown hot, fluffy pancakes with it.
However, maple syrup is commonly used in many other food dishes; such as sweets, candies, and drinks.
Maple is also gaining popularity as a flavoring for savoury dishes as well; such as maple smoked bacon,
maple braised pork, and maple vinagrettes.
Other Maple Products
Aside from maple syrup, the sap from maple trees is also used to make many other delicious products.
- Maple sugar
- Maple butter
- Maple cream
- Maple candies
- Maple coated nuts
Types of Maple Syrup
Grade A Light Amber Syrup is made from early season sap when the sugar content is highest (2.2 – 3%) so the least amount of boiling time is required to obtain syrup density. It is the lightest syrup and has a slightly maple, delicate flavor.
Grade A Medium Amber Syrup is made with average sugar content sap through midseason. This syrup is golden in color and has characteristic maple flavor.
Grade A Dark Amber Syrup is made from sap that has low sugar content, (1.2-1.6% )It is dark amber and has a more pronounced maple flavor.
Grade B Syrup is made at the end of the season with sap of very low sugar content. It is very dark in color and very strong in flavor.
Storing Maple Syrup
Maple syrup can last an extensive period of time if unopened.
Once open, maple syrup should be stored in the refrigerator or frozen.
Maple sugar and maple candies also last quite a while, and do not need to be refrigerated.
Nutrition
Maple syrup is a completely natural sweetener. It can be used in place of sugar in many recipes, although maple syrup is sweeter, so less is required.
Maple syrup has more health benefits than sugar, including antioxidants, zinc, manganese, calcium, iron, and potassium.
Interesting Facts
- High volumes of sap flows are called “runs”.
- It takes 50 liters of sap to make 1 litre of syrup.
- The sugar content of sap is 2.5%, syrup is 65%.
- There are 9 festivals held every year in Canada dedicated to maple syrup.
- Canada produces 80% of the world’s maple syrup.

Subscribe to:
Posts (Atom)