Wednesday, May 31, 2017

Opening Ceremonies

Today in the morning we did some set up and tours of the project area and set up seven feet posters of ourselves with little descriptions to present us as the alumni and offer to answer anyone's questions. In the afternoon there was some free time so I got to go shopping and explore the little market by the river, the river walk, and some surrounding shops.

The evening was very exciting with the opening ceremonies - beginning with a VIP welcome reception with drinks and hors d'oeuvres (smoked salmon blinis, spanokopita, terriyaki chicken on rice, fried shrimp, mini ceasars, chicken skewers), an opening reception with a huge buffet of food (vegetable tray and hummus, fruit tray, macaroni and cheese, pork, beef, and chicken sliders, condiments, coleslaw, greek salad, garden salad,pierogies, and dessert squares, pop, and juice) and then the huge, extremely loud opening ceremonies with the rallies of all the teams, entertainment, presentations, and speeches. 
chocolate truffles at the market

city view

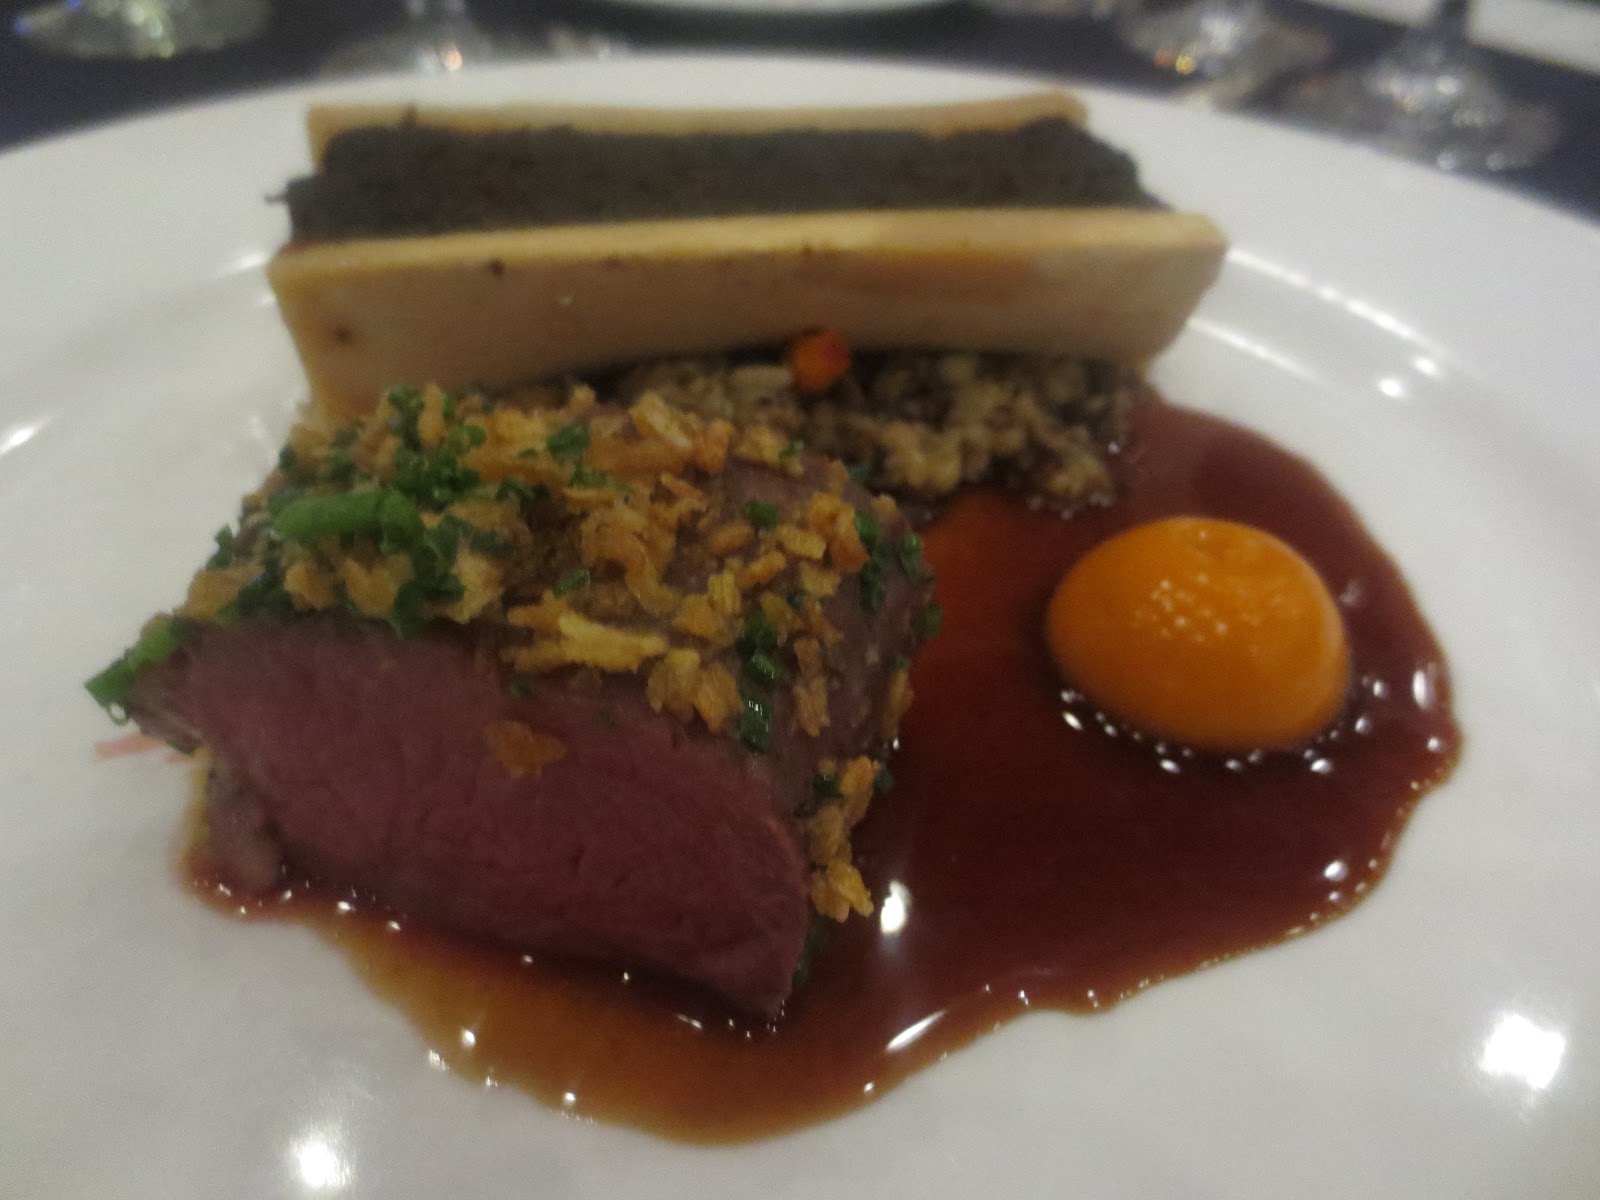
welcome reception buffet

the crowd beginning to arrive

Tuesday, May 30, 2017

Orientation

  1. Finally sleeping in
  2. Getting so much free swag
  3. Orientation meeting
  4. Tour of the event grounds
  5. Exploring the city
  6. Dinner out at a pizzeria
view of the city

free swag

col bridge on the river

inside a mall

Monday, May 29, 2017

Stop Number Two

Today I travel from my amazing adventures at the culinary conference to my next adventure as an alumni ambassador at a national trades competition. I'm not totally sure what is in store for me here but I know some of my duties will include assisting with things such as set up and take down, opening and closing ceremonies, try a trade booths, and sharing stories. I also know I will have the opportunity to interview a tv star guest chef. Here't to more fun adventures and exploring another corner of the country! 


Sunday, May 28, 2017

The Gala


Pictures from the gala dinner.
  1. Tempering chocolate workshop
  2. Annual group photo
  3. Lunch
  4. Gala
Today looks like a short day but it's only because there were some breaks within the day and the majority of the day was spend on the big gala which entails a cocktail reception, five course dinner, entertainment, presentations, awards, announcements, and finally dancing. It is the highlight of the conference for sure.
Asparagus and potato vichssoisse with spot
prawns, goat cream, and canola oil

Sturgeon, caviar, fermented potato, buttermilk, seaweed

Smoked lemongrass duck, charred
scallions, pineapple curry emulsion

Beef ternderloin and brisket

Honeyberry and pistachio, white chocolate
creameaux, pistachio feuilletine, sorbet, raspberry jus

Saturday, May 27, 2017

Photography and Trip Out

1. Breakfast some assembly required 
2. Food photography tips
3. Building your own brand seminar
4. Headshots
5. Lunch some assembly required
6. Getting off the roller coaster presentation
7. Goat cheese and beer pairings tasting
8. Block party

Today was more informational seminars of course, more good food, and more socializing. 


Friday, May 26, 2017

Product Showcase, Tower, and Dining Out

cupcakes at the product showcase
mountains
Today's agenda seems to have less activities than yesterday, but that's just because the activities lasted longer and were more self-guided activities; along with a little extra free time. The product showcase was a great opportunity to connect with food service companies, try free samples, collect freebies, network, read information pamphlets, and chat with others.

buildings from the top of a tower
The "Dine Out" event was a super cool new event where approximately a dozen or so restaurants across the city participated. Each member had two certificates and could use one per restaurant to make a reservation there and dine; either choosing a few small items or one large, supplementing extra cash as required/desired. You could dine in big groups, small groups, all appetizers, apps and desserts, space your reservations close together or far apart, visit restaurants downtown or across the city.

For example, I chose one restaurant downtown and enjoyed a couple of small plates, then ninety minutes later I went across the city along the river front to another place and enjoyed a few desserts.


Soy Garlic Caramel Roasted Eggplant, marinated
local green bean, Szechuan pepper

river

DANDELION HONEY CAKE 
Fallentimber Mead Sorbet, Blueberries, Vital Organic Yogurt


  1. Cafe style breakfast
  2. Mind body and food presentation
  3. Junior annual general meeting
  4. Senior competition
  5. Product Showcase
  6. To compete or not compete presentation 
  7. Climb to the top of the tower
  8. Dine out

Thursday, May 25, 2017

Seminars and Freebies

Here is what the first day of the conference looked like for me! Lots of time to connect with old friends and create some new networks. And as always many great discussion, freebies, demos, and food.

  1. Navigating the city to the convention center
  2. Navigating the convention center
  3. Registration (free bag of goodies!)
  4. Huge complimentary buffet breakfast (hot, cold, table service, to go items)
  5. Seeing and greeting some familiar faces
  6. Welcome reception
  7. Flavor Forecast information session and taste tests
  8. Coffee and cookie break and chatting with old friends
  9. Food Fraud Presentation
  10. Sustainability round table discussion
  11. Cafe style-lunch
  12. Diner Behavior and Game Changing Technology presentation
  13. The ABC's of Pasta Quality presentation and demo
  14. Versatility in Flavorful, Speed Scratch Recipes discussion and demo
  15. Helping set up for tomorrow's competition
  16. Ice Breaker Event with live action food stations
  17. Versatility in Flavorful, Speed Scratch Recipes:
    Roasted Carrot Hummus with Blood Orange
  18. Mingling

Lunch

Matcha Green Tea Cheesecake
Flavor Forecast


Wednesday, May 24, 2017

National Culinary Convention

Today I am headed to an annual national culinary convention! I attended the same conference last year, however I was provided a spot at the conference as a competitor in the national junior culinary challenge that takes place at the conference (see: http://bexysbakingblog.blogspot.ca/2016/05/national-cheese-competition.html). Having had my chance at competing last year, I will not be competing this year. Rather, I can relax and enjoy all that the conference has to offer. 

The conference entails a plethora of interesting seminars, day trips to visit food facilities such as manufacturing plants and green houses, outings to local restaurants, competition, a gala, workshops, meetings, a product showcase, networking with other chefs, and of course, plenty of delicious food!!!

This year's program explores topics such as:

  • flavor forecasts
  • combating food fraud
  • sustainability
  • diner behavior
  • exploring cuisines of the world
  • cooking from scratch
  • pasta quality
  • enhancing chefs' health and happiness
  • evolution of culinary teaching and learning
  • to compete or not to compete
  • salami
  • national wines
  • branding
  • goat cheese
  • sturgeon and caviar
  • nutrition and fat metabolism
  • chocolate tempering

Tuesday, May 23, 2017

Pineapple, Peanuts, Chocolate, Ice Cream & Kirsch

Sometimes I like to take a few random ingredients from around the house and make a concoction out of it. This time I chose fresh pineapple pieces, honey cinnamon roasted peanuts, milk chocolate candies, vanilla ice cream and kirsch cherry liquor. To tie all these ingredients together, I flambeed the pineapple in a little butter, brown sugar, and kirsch. I added the peanuts to some butter, honey, and oats to make a granola. I melted down the ice cream and melted some chocolate into half and made a quick caramel to add to the other half to make creme anglaise. So to compose the dish I had milk chocolate cinnamon and salted caramel creme anglaise with warm kirsch flambeed pineapple, and roasted peanut granola.

Monday, May 22, 2017

Onion Rings

Onion Ring Batter
125 grams all-purpose (plain) flour
550 grams cornstarch
7.5 grams baking powder
8 grams salt
water, as needed
Whisk the dry ingredients together, then gradually whisk in water until it forms a smooth, thick batter. If I had to estimate, I'd say begin with 1/4 cup of water and go from there. For the consistency, you want the batter to be thick but just thin enough that it can easily coat something that is dipped in it, and the batter clings to it.

For onion rings: Peel one large onion and slice into rounds about 1/4 inch thick. Separate the individual slices into rings, discarded the cores. This batch of batter is the perfect amount for one large onion, but can easily be multiplied up to make more batter.

To fry: I find the easiest way to do this is to dip the rings one by one, coating them fully and allowing the excess batter to drip back into the bowl. Then carefully drop into the fryer. You can also throw a few at a time in the bowl of batter and place them one by one in the fryer, cooking in batches. The batter will likely drip a bit so plan your workspace accordingly and prepare for snackers to be eating the little crispy bits of batter that will end up in he fryer. Fry at 375F until golden, flipping rings halfway so they cook evenly on both sides.

To serve: A little sprinkling of salt and these are ready to serve immediately. If they are to be served later, they can be reheated in the oven. An even better method is to fry them in advance, until light in color, then refry them later until golden and crisp and serve.

Sunday, May 21, 2017

Tartar Sauce

Tartar Sauce
mayonnaise
hard boiled egg, finely chopped or grated
sweet green relish
pickle juice
garlic powder
paprika
pepper
salt
Tartar sauce is that thick, white, slightly chunky mayonnaise-based sauce that accompanies fish, usually deep-fried such as fish and chips. Sounds appealing, right? But somehow it pairs with the fish surprisingly well. It is basically just a mayonnaise mixed with some spices and a few other ingredients., The spices vary, as do the add-ins but most tartar sauces contain hard-boiled egg, pickles or relish, and capers or another acidic product. Above is my version if a quick tartar sauce.

Saturday, May 20, 2017

Chocolate Pudding Glaze

An alternative to a ganache, this glaze is very easy to make and quite tasty as well. You could make a quick glaze for any cake, cupcakes, or loaves using any flavor pudding mix.

Empty one box/packet of pudding mix (the instant, no-cook, 4-serving size) into a bowl.
Pour in one cup of milk (I used fat-free).
Beat with a whisk until smooth.
Whisk in one cup sifted icing sugar.
Add a teaspoon of vanilla extract if desired.
Ready to use immediately. May be stored in the fridge for later use.

Friday, May 19, 2017

Chocolate Jelly Roll Cake

Chocolate Jelly Roll Cake
4 large eggs
2/3 cup granulated (white) sugar
1/2 teaspoon vanilla extract
1/3 cup unsweetened cocoa powder
3/4 cup all-purpose (plain) flour
4 teaspoons water

Preheat oven to 400F. Line a 10x15 inch jelly-roll pan with parchment paper.
Beat eggs and sugar until thick and pale. Beat in vanilla.
Sift in the cocoa and flour and fold in with the water.
Spread batter evenly in prepared pan.
Bake about 12 miunutes until a toothpick inserted in the center of the cake comes out clean.

Immediately invert cake onto a clean tea towel dusted with sifted icing sugar. Peel off parchment. Dust top of cake with icing sugar. Roll up hot cake in tea towel from short end and leave to cool.

Once cool, unroll cake, spread with filling, reroll, and garnish as desired.

Thursday, May 18, 2017

Pudding Frostings

Using a package of instant pudding mix is an easy way to make a different frosting. This frosting will be sweet, but not rich and fatty like buttercream, not still like royal icing, and not fluffy like a whipped cream frosting.

Start with one box/package (the instant, no-cook, 4-serving size kind) in a bowl.
Whisk in one cup of milk.
Whisk in icing sugar until desired consistency is reached.
Add in any flavoring (such as vanilla, almond, rum) as desired.

For a thicker frosting, whipping cream or evaporated milk may be used.
For a fluffier frosting, add in a package of instant whipped topping or some prepared whipped topping or freshly whipped cream.

Wednesday, May 17, 2017

Soft Potato Cakes

These potato cakes have an almost biscuit-like texture. Feel free to jazz them up with some spiced. Great served with sour cream or aioli.

Soft Potato Cakes
1 cup hot mashed potatoes
1/4 cup melted butter
1 cup grated raw potato
1 cup all-purpose (plain) flour
2 teaspoons baking powder
salt and pepper, to taste

Mix all ingredients together in a bowl until well combined (you may need to knead the mixture with your hands).
Form the mixture into small balls about the size of golf balls. Flatten into patties. 
Fry in hot oil until golden on both sides.

Tuesday, May 16, 2017

Lemon Tarragon Cream Sauce

Lemon Tarragon Cream Sauce
1/4 cup butter
1/4 cup all-purpose (plain) flour
1 cup milk
2 cups whipping cream (35%)
1 onion, chopped
1 Tablespoon garlic, minced
2 Tablespoons chopped tarragon
zest of one lemon
1/4 cup Parmesan cheese
salt, to taste
pepper, to taste
1/4 cup butter, cold and cubed

In a medium saucepan over medium heat, melt the butter. Add the flour and whisk until smooth. Gradually whisk in the milk until smooth. Whisk in the cream. Stir in the onion, garlic, tarragon, and zest and bring mixture to a boil. Stir in the cheese, then season to taste. Gradually whisk in the butter, cube by cube. 

This sauce is a basic cream sauce recipe started with a thick bechamel sauce. It is extremely forgiving and versatile. Here are some variations on preparation for basically the same sauce with slightly different tastes or textures.

1) After the flour is mixed in continue cooking, whisking occasionally until the butter flour mixture turns light brown. This forms a brown roux which will give the sauce a richer flavor and darker color. Then add the milk and proceed as directed.
2) Add the onion and garlic initially with the butter to give them more color and texture. Cook them to the desired degree of caramelization just be careful not to burn the garlic.
3) Add the onion and garlic only with the cream then strain out after the mixture boils. This will add their flavor but eliminate the texture of them. Then add the tarragon and lemon and proceed.
4) Puree the sauce at any point for a smoother texture. 
5) Bring the mixture to a boil after adding the milk or boil it with the cream longer for a thicker sauce.
6) Add more milk for a thinner sauce. 

Monday, May 15, 2017

Lobster Ravioli

Basically for the lobster ravioli I made I used the same recipe as for the ricotta ravioli but simply added finely chopped lobster to the mix along with a little bit of paprika. I used about fifty percent lobster ad fifty percent ricotta mix and used frozen pre-cooked lobster claw, then adjusted the seasoning. I used the square mold for the lobster ravioli so it would be easy to distinguish from the ricotta ravioli.
I served the lobster ravioli with some butter-poached lobster tail, a tarragon lemon cream sauce, tarragon-infused oil, fresh tarragon, grated Parmesan cheese, and paprika. I found the lobster ravioli held together better and cooked more evenly than the plain ricotta ravioli without any filling escaping!

Sunday, May 14, 2017

Chocolate Chocolate Chocolate Roll

This is the chocolate cake I made for my mom for Mothers' Day this year.She requested a simple plain chocolate cake, and since we didn't need a large cake, I decided to make a jelly roll. The cake is just a basic chocolate jelly roll cake recipe. The filling/frosting and glaze on top I made using an instant chocolate pudding mix we had on hand, some milk, icing sugar, and vanilla extract. I used the frosting to spread on the cake then rolled it up, poured it with chocolate glaze, and piped on some additional chocolate frosting. Simple, tasty, and easy to do.
Happy Mothers' Day!!!

Saturday, May 13, 2017

Ricotta Ravioli

As mentioned in yesterday's post, I made homemade pasta dough and with it a couple batches of ravioli. Following is the recipe for the ricotta filling I used in the triangular-shaped vegetarian ravioli. 

Herbed Lemon Ricotta Filling
1 container (475 grams)
1 Tablespoon chopped tarragon
zest of one lemon
1 teaspoon minced garlic
1 Tablespoon grated Parmesan cheese
cracked black pepper
salt

Mix all ingredients together. This is just a base recipe - any desired combination of herbs and spices may be used. I used lemon and tarragon as flavors to pair with the lobster ravioli I also made.
Ricotta Ravioli
Roll pasta dough into sheets using the thinnest setting, keeping sheets covered when not in use. If you have a handy ravioli tray, then the process will be easier. If not, you will need cutters of desired shape and size to cut the individual raviolis out by hand.

Drape one sheet over the ravioli tray, and gently press a small spoonful of filling in each cavity. I'm not sure exactly but I think I used about one teaspoon filling for each ravioli. Brush all the edges of dough with egg yolk or water. I just used water for this and used my finger and found no problems with the dough not sticking or the seal breaking. Gently drape another sheet over, then unmold the raviolis as directed. Place on a baking sheet dusted with flour. Repeat until either all the filling or all the pasta has been used up.

Ravioli can be cooked immediately, chilled for awhile before cooking, or alternatively frozen and cooked from frozen as required. Cook in boiling salted water for a few minutes until dough is cooked through, 

Friday, May 12, 2017

Eggless Pasta Dough

fettucini to be dried
As requested, I finally got around to making homemade ravioli. Making homemade pasta is always a but of a procedure; it's a lot more work than cooking a box of dried pasta. Ravioli especially involves a filling and more rolling and cutting. But homemade pasta in the end is always worth it.Sadly I do not have my own, so I had to borrow a pasta roller and ravioli cutters - thanks again!! I made a big batch of eggless pasta dough and ended up making 60 ricotta-filled ravioli, 42 lobster-filled ravioli, and with the extra dough I made some fettucini and spaghetti to have on hand.

spaghetti to be dried
Easy Homemade Eggless Pasta Dough
4 cups all-purpose (plain) flour
1/2 cup olive oil
approx. 3/4 cup water (room temperature or warm water is preferred over cold)
salt, optional (usually salt is just added to the water when boiling pasta, but feel free to add some to the dough if preferred)

Place the flour in a large bowl and make a well in the center. Pour the oil and water into the well, then bring the mixture together with your hands, kneading it together until it forms a nearly smooth ball. More water or flour may be required, but don't add more until the dough had been kneaded at least five minutes, as pasta dough usually requires a bit of muscle.

Wrap the dough ball well, and set aside on the counter to rest for about an hour before rolling. Roll out, cook, and dry as needed! This makes a big batch, so some dough can be saved in the fridge or freezer for rolling out later, or simply cut out a lot of pasta and freeze it or dry it.

Thursday, May 11, 2017

Chocolate Soufflés

The lavish chocolate soufflé. I've made "cheater" versions of soufflés (it's amazing how you can achieve that 'fluffy' texture without actually doing a proper soufflé technique) and I've made soufflés on the job, but never at home have I made a proper soufflé. My parents asked for them, chocolate of course, so here we are. Soufflés don't deserve their reputation of being exceedingly difficult; they simply require a little extra care and attention and the real challenge is the timing as a good soufflé only has a couple minutes from oven to table before it collapses. It will still taste great, in fact you can even enjoy a soufflé the next day either cold or reheated in the microwave (what a sin). But if you want all the 'impressiveness' of a soufflé in all its glory, you'd better have your guests seated the minute the soufflés are popped in the oven! 

Chocolate Soufflés
6 large whole eggs, cold
250 grams 70% cocoa good-quality chocolate
unsalted butter, as needed
1/2 teaspoon cream of tartar
pinch salt
3/4 cup granulated (white) sugar, plus extra for dusting
1 teaspoon vanilla extract

Separate the egg yolks and whites into different bowls while the eggs are cold. Set aside to come to room temperature.

Meanwhile, melt the chocolate in a bowl over simmering water, stirring until smooth. Set aside to cool slightly, but do not allow it to harden.

Prepare the ramekins. You will need six, one-cup ramekins. Use a pastry brush to coat the insides entirely with butter - coat the bottoms first then use the brush to swipe the butter upwards. Swiping the butter up the sides of the ramekin in straight lines encourages the soufflés to rise upwards. Sprinkle the ramekins with a small amount of granulated sugar, shaking to coat evenly. If you can find superfine sugar that is best for coating so you don't get any of that 'crunch' later but it is not necessary. Place the ramekins on a flat baking tray.

Preheat oven to 400F.
Add the cream of tartar and salt to the bowl of egg whites and whip to soft peaks. Gradually whip in 1/4 cup sugar and continue beating just until glossy, stiff peaks form. Set aside.

Beat the yolks with the remaining 1/2 cup of sugar and vanilla until the mixture is pale ad almost white in color, and fluffy and airy. It isn't just the whipped whites that bring volume to soufflés, the yolks do too. Fold in the melted chocolate until smooth.

Fold 1/4 of the whites into the chocolate mixture to lighten it. Then fold in the remaining whites. Carefully scoop the mixture among the six ramekins, taking care not to deflate the mixture. Do not smooth the tops, but run a finger around the rim of each soufflé to make an indentation.

Bake the soufflés for 10-12 minutes until puffed and risen. Quickly dust each ramekin with some icing sugar, place on a plate, and serve immediately!

Wednesday, May 10, 2017

Maple Leaf Cookies

These cookies are actually super good. They keep well and travel well. They have a subtle sweet maple flavor and a buttery flavor. They aren't difficult to make, but to get them shaped nicely, first you must track down a maple leaf cookie cutter (easier said than done), then chill them as instructed. Of course, you could forgo the maple leaf shape and cut circles or rectangles. I'll bet you can even skip the rolling and cutting all together and simply roll the dough into balls to get the same flavor with less work.

Maple Leaf Cookies
1 cup unsalted butter, softened
1/2 cup granulated (white) sugar
1/2 cup packed light brown sugar
1 egg yolk
1/2 cup maple syrup, plus extra for brushing
3 cups all-purpose (plain) flour
sprinkles, as desired

Cream the butter well, then beat in the sugars until light and fluffy. Blend in egg, then syrup. Gradually stir in the flour.
Wrap dough well and chill overnight.

Allow dough to come to room temperature, then roll on lightly floured surface to 1/8-inch thickness. Then freeze the sheets of dough for at least 15 minutes until firm.

Preheat oven to 350°F. Line baking sheets with parchment paper. Use a 2-1/2-inch maple leaf-shaped cookie cutter to cut out dough. Carefully transfer to prepared baking sheets. There is no need to space these cookies far apart. 
Gently brush each cookie with maple syrup. Then sprinkle with sprinkles as desired.
Bake about 10 or until edges are lightly browned but centers are still slightly soft. Allow to stand on baking sheets for a minute before transferring to cool completely. 

Tuesday, May 09, 2017

Mushroom Fake Cream Sauce

You don't actually need loads of heavy cream to make a rich, creamy sauce. Skim milk, with the help of a little butter and flour, and many other flavoring ingredients makes a thick, satisfying sauce.

Mushroom Fake Cream Sauce
button mushrooms, sliced
onions, minced
garlic, minced
butter
flour
skim milk
mustard
paprika
salt
pepper
chili powder
cayenne pepper
honey

Saute the mushrooms, onion, and garlic in a liberal amount of butter until soft and beginning to brown. Coat with flour. Stir in milk until thick. Stir in more milk for a thin sauce, Season with remaining ingredients and reduce to desired consistency.

Monday, May 08, 2017

Sweet Potato Gnocchi

I absolutely love gnocchi but I may love sweet potato gnocchi even more. So sweet and tender, and versatile!

Sweet Potato Gnocchi

2 large sweet potatoes, peeled and cubed
1 egg
salt and pepper, to taste
1/2 teaspoon ground cinnamon
1/4 teaspoon ground cloves
2 1/4 cups all-purpose (plain) flour
Roast the potatoes in a 425F oven until tender, then continue cooking until it starts to become caramelized. Puree until smooth.
Allow to cool slightly before mixing in the egg and spices, then gradually stir in the flour until it forms a soft dough.
Divide dough into 4 pieces, and roll each out into a long, thin rope on a lightly floured surface.
Cut into 1/2 inch pieces.
Cook the gnocchi in boiling salted water until tender.

Cooking options:
#1 Serve as is, simply boiled
#2 Pan-fry gnocchi in butter or oil until crisp and evenly browned
#3 Toss the gnocchi in melted butter or oil in a pan and place under the broiler, flipping often until crisp

Serving options:
A) Serve plain - they are delicious as is!
B) Serve with a simple garnish such as a little melted butter, grated parmesan cheese, or fresh herbs
C) Serve with a sauce - mushroom sauce, cream sauce, or pesto