
Saturday, March 31, 2012
Hamburgers or Cupcakes?
Since tomorrow is April Fools' Day, I thought I would share with you the treat I made for the occasion last year. Of course, I have something planned for this year too, but I will share that tomorrow. Last year I made cupcakes disguised to look like hamburgers. They weren't completely realistic looking (no one actually bit into one thinking they were eating dinner), but they did look a bit like hamburgers nonetheless. You could also make one cake to look like a giant hamburger, which works very well too. You can find many pictures like this over the internet if you search. For my hamburger cupcakes, I started with a basic vanilla cupcake recipe (plain muffins work too), and sprinkled the tops with a few rolled oats for sesame seeds before baking (if you have actual sesame seeds, even better). I cut the cupcakes in half once cool. Meanwhile, I lined muffin cups with paper liners, and spread some melted semi-sweet chocolate chips into the bottom of each cup, to make a thin patty. I spread some yellow icing on the bottom half of each cupcake for cheese, topped with a patty, topped with some piped green icing for lettuce, and then put on the top of the cupcake. Simple and cute.

Friday, March 30, 2012
Easter Cupcakes

Thursday, March 29, 2012
Jambuster Muffins
These are Jambuster muffins. They are firm oatmeal muffins with a spoonful of jam in the middle. They are quite good, with a nice burst of fruit flavor from the middle, although they are a bit dry overall. I like the idea of a hidden filling, but perhaps adding something else to the entire batter would give these muffins a little more flavor and moistness. Be sure to cover the jam completely with batter, it doesn't look as nice but it saves the jam from burning or bubbling over onto your pan.
Because I like to experiment, and because not everyone likes jam, I put a chocolate kiss into the center of some of my muffins instead of jam. A spoonful of chocolate chips would probably work too, although they tend to hold their shape in the oven and not melt into the muffin. Caramel chocolate kisses were especially good.

2 cups all-purpose flour
1 cup quick-cooking rolled oats
1/2 cup brown sugar, packed
1 Tablespoon baking powder
1/2 teaspoon ground cinnamon
1/2 teaspoon salt
2 large eggs
1 cup milk
1/4 cup cooking oil
Measure first 6 ingredients into large bowl. Stir. Make a well in center.
Combine next 3 ingredients in medium bowl. Add to well. Stir until just moistened. Fill 12 greased muffin cups 1/2 full.
Make small dent in batter with back of spoon. Spoon 2 teaspoons jam into each dent. Spoon remaining batter over top. Bake in 375◦F oven for 18 to 20 minutes until firm to touch. Let stand in pan for 5 minutes before removing to wire rack to cool. Makes 12 muffins.
From Company's Coming "Mostly Muffins".
Paré, Jean. "Jambuster Muffins." Recipe. Mostly Muffins, Edmonton Alberta: Company's Coming Publishing Limited, 2007. 37.
Wednesday, March 28, 2012
Chocolate Chocolate Chip Muffins
These are Chocolate Chocolate Chip Muffins, or you could also call them Double Chocolate Chip Muffins. They are delicious and very chocolatey. They are especially good straight from the oven. They are also fairly quick and easy to make, and it makes a batch slightly larger than usual.
 Chocolate Chocolate Chip Muffins
2 cups all-purpose (plain) flour
2/3 cup unsweetened cocoa powder
1 teaspoon baking powder
1 teaspoon baking soda
1 1/2 cups buttermilk (or soured milk) or plain yogurt
1 cup brown sugar, packed
1/3 cup canola oil
2 large eggs
2 teaspoons vanilla extract

2 cups all-purpose (plain) flour
2/3 cup unsweetened cocoa powder
1 teaspoon baking powder
1 teaspoon baking soda
1 1/2 cups buttermilk (or soured milk) or plain yogurt
1 cup brown sugar, packed
1/3 cup canola oil
2 large eggs
2 teaspoons vanilla extract
1 cup semi-sweet chocolate chips
1. Preheat oven to 375◦F. Grease or line 18 muffin cups with paper liners.
2. In a large bowl, combine flour, cocoa powder, baking powder, and baking soda.
3. In a separate bowl, whisk buttermilk, sugar, oil, eggs and vanilla. Add to dry ingredients.
4. Stir just until batter is combined. Add chocolate chips and gently mix into batter. Be careful not to over mix the muffin batter. Place batter into prepared pans.
5. Bake in preheated oven 18-20 minutes or until a toothpick inserted in centre of muffin comes out clean. Cool for 5 minutes before removing from pans. Cool completely on wire rack.
From: http://www.robinhood.ca/Recipe-details.aspx?rid=4972
Tuesday, March 27, 2012
Maple Glazed Ham
Remember all of that extra sauce I had from the Maple Pudding Cake I made on Sunday? The cake was excellent, but the sauce was a bit too liquidy, and there was a lot more of it than there was to serve with the cake. Well, I couldn't let that sauce go to waste, so I used it to serve a maple-glazed ham. To do this, it is really simple, just buy a whole or half ham, pierce the skin all over, and drizzle the maple sauce over top, allowing it to go into the ham. Bake the ham as usual, and serve extra sauce over individual slices. Even with the maple glazed ham, there was still some leftover sauce, which we poured on our homemade waffles we served with the ham. Luckily, the sauce had thickened a bit compared to when it was first baked, as a result of being refrigerated. Some of the cake broke down into the sauce, so you got a few cake crumbs in with your sauce, but it wasn't very noticeable on the waffles. Since the sauce was composed of only sugar, water, maple syrup, and a spoonful of flour, it kept well in the fridge, and would probably be good for another week or two. It is very similar to using just plain maple syrup.


Monday, March 26, 2012
Dad's Chocolate Fudge

This fudge did not turn out perfectly. First of all, my father wasn't quite sure how long to boil it, so he used his best judgement. It wasn't thickening well upon cooling, so he reboiled it, which actually worked out pretty well in the end, although the fudge still turned out a bit softer than he had wanted it to. I also found the fudge a bit too sickly sweet, and almost as if the sugar didn't quite dissolve completely. The recipe called for a bit of brown sugar along with a lot of granulated sugar, which gave it a nice flavor, but made it a bit gritty. I also think the fudge could have contained more cocoa powder, as the chocolate flavor did not come through as much as I would have liked. Maybe a higher proportion of milk and butter too. I tasted a spoonful of hot fudge 'sauce' straight from the pot, and it was delicious, but a bit sugary. Overall though, not a terribly bad fudge, a pretty good consistency, and with a few minor changes, this fudge has the potential to be perfect!
There does not seem to be very much luck with fudge making in our house. I myself have attempted to make four different kinds of fudge (all chocolate), and all of them had there hits and misses. One of my recipes turned out way too soft to even cut; one turned out good, but a consistency that was not at all reminiscent of fudge; another turned out pretty well, but not quite worth the time and effort it took to make; and a final one turned out the best, although it certainly was not a traditional fudge recipe.
We will just have to practice, practice, practice, and try, try again!
Sunday, March 25, 2012
Maple Pudding Cake

To make this dish, maple syrup is boiled along with water, brown sugar, and a little bit of flour. This sauce is poured into a deep baking pan. Then a simple cake batter is whipped up and poured over top of the sauce in the pan. The dish is then baked for 30-40 minutes at 375◦F. The dish bakes up nicely into three layers: the sweet sauce, the risen cake on top, and a middle layer, where the liquid sauce causes the cake to bake into a pudding. This made a very nice dish, the cake rose nice and high, was a beautiful golden color, and had an excellent, moist, flavor and texture. The only issue I had with this dish was the sauce. I turned out very liquidy. The recipe instructions stated to heat it in a pot until it came to a boil, I did, and then I even let it boil for a few minutes to thicken a bit, but I guess it was not long enough. There also seemed to be an excess of sauce as compared to cake. The next time I make this dish, I will halve the sauce recipe, and maybe add a little more flour or substitute cornstarch to make it thicker, and boil it for a bit longer. Other than that though, this was a really nice dessert. And having some extra maple sauce around isn't necessarily a bad thing. We enjoyed this dish straight from the oven, refrigerated the leftovers, and enjoyed them cold. It is delicious both ways! It also stored well - especially the sauce. Maybe I will find a way to use that sauce sometime soon......

Saturday, March 24, 2012
Chocolate Pretzel Cookies

If you are looking for a good cookie recipe that is a bit different than others, here is one to try! These are Chocolate Pretzel Cookies, and they contain quite a few not so typical ingredients. They are certainly unique, but very good! Pretzel pieces actually work very well in cookies, especially when you add some chocolate to the mix!
Chocolate Pretzel Cookies
1 cup butter
3/4 cup packed brown sugar
1/2 cup granulated (white) sugar
1 large egg
1 teaspoon vanilla extract
1 1/2 cups all-purpose (plain) flour
1 cup unsweetened shredded coconut
1/2 cup oats
1 teaspoon baking soda
1/8 teaspoon salt
1 cup mini pretzels, broken up
1/2 cup crisp rice cereal
1/2 cup semi-sweet chocolate chips and chunks
Preheat oven to 375◦F. Line cookie sheets with parchment paper.
In a large bowl, cream the butter and sugars together until light and fluffy. Add the egg and vanilla.
In a separate medium bowl, combine the flour, coconut, oats, baking soda, and salt. Add to the butter mixture. Stir in the pretzels, cereal, and chocolate.
Drop spoonfuls of cookie dough about 2 inches apart on prepared cookie sheets. Bake for about 10 minutes, or until just set. Allow to cool on the cookie sheet for 5 minutes before removing.
I found this recipe in a magazine. The only change I made was I added in some chopped mini milk chocolate bars, because I only had chocolate chips and not chocolate chips and chunks. You could use just chocolate chips, but adding the chocolate bar filled the cookies with two types of chocolate and added a little more variety. Also, I found the recipe made 40 cookies, although the yield was 30 cookies, and I thought I was making my cookies big at that. They also spread out and flattened quite a bit, which made them nice and crisp.
Friday, March 23, 2012
Double Chocolate Brownie Bars
I made these Double Chocolate Brownie Bars yesterday and they are delicious!!! They are rich, fudgey, and have plenty of chocolate. They are also so simple and quick to make. This recipe makes a nice big pan, although it could easily be halved for a smaller batch. I got 32 brownies out of my 9x13 inch pan, but these brownies could definitely be made bigger. I wouldn't recommend cutting them any smaller than that, because then everyone will want to eat at least two of them. These brownies are so rich, they don't even need an icing, although you could always add them for more chocolate! They would also make an excellent base for ice cream and chocolate sauce, or whipped cream and chopped nuts. Whatever way you serve them, they sure won't be around for long!
 Double Chocolate Brownie Bars
1/2 cup (1 stick) butter or hard margarine
2 cups (one 12-ounce package) semi-sweet chocolate chips, divided
1 1/2 cups granulated (white) sugar
1 1/4 cups all-purpose (plain) flour
3 large eggs
1 teaspoon vanilla extract
1/2 teaspoon baking powder
1/2 teaspoon salt
1 cup coarsely chopped walnuts (optional)
Preheat oven to 350◦F. Grease a 9x13 inch baking pan, or line with parchment paper for easy removal and cutting.
Place butter and 1 cup of chocolate chips into a large microwave-safe bowl. Microwave on HIGH (100% power) for 1 to 1 1/2 minutes, or until chips are melted and mixture is smooth when stirred.
Add remaining ingredients except for nuts and chocolate chips, stir until smooth. Stir in remaining 1 cup of chocolate chips. Spread batter into prepared pan, sprinkle walnuts over top, if desired.
Bake for 30 minutes, or until center is set. Cool completely in pan on wire rack. Cut into bars, and store tightly covered at room temperature.
This recipe is from my Hershey's Classic Recipes cookbook. I didn't bother putting the nuts on top, the brownies are definitely delicious without them, but if you like nuts, feel free to add them. I found these bars a lot easier to cut if they were put into the refrigerator for just a few hours after they cooled. I just lifted the entire pan of squares out by the parchment paper and placed them on a cutting board. Then when I was ready to cut them, I took the parchment paper off and cut them into bars. They were really easy to cut and not messy at all.
Publications International Limited. "Double Chocolate Brownie Bars." Recipe. Hershey's Classic Recipes, Lincolnwood Illinois: Publications International, Limited, 2000. 47.
Thursday, March 22, 2012
100% Whole Wheat Bread
I have tried yet another whole wheat bread recipe. This one came from Company's Coming "Breads". It turned out tasty and soft. It certainly isn't a quick recipe, as it requires the regular kneading and rising times, plus extra beating time, but the result is a tasty, hearty, and nutritious bread that is sturdy and easy to cut. This recipe may easily be doubled, in this case, double the amount of yeast called for as well.
100% Whole Wheat Bread
2 cups whole wheat flour
1 package (8 grams) active dry yeast
1 2/3 cup milk
1/4 cup packed brown sugar
2 Tablespoons milk molasses
2 Tablespoons butter or hard margarine
1 teaspoon salt
2 1/4 cups whole wheat flour
 In a medium saucepan over medium heat, heat the milk, sugar, molasses, butter, and salt until warm. Meanwhile, in a large bowl, stir together 2 cups of flour and the yeast. Add the milk mixture to the bowl, beat on low just to moisten then on high for three minutes.
Work in enough remaining flour until the dough pulls away from the sides of the bowl. Knead for 8 to 10 minutes until smooth and elastic. Place in greased bowl, turning once to grease the top. Cover with tea towel and let rise until doubled in bulk, about one hour.
Punch dough down, transfer to a greased 9x5 inch loaf pan, and let rise until doubled in bulk, 30 to 40 minutes. Bake in 375◦F oven for about 35 minutes.
Paré, Jean. "100% Whole Wheat Bread." Recipe. Breads, Edmonton Alberta: Company's Coming Publishing Limited, 1996. 146.
100% Whole Wheat Bread
2 cups whole wheat flour
1 package (8 grams) active dry yeast
1 2/3 cup milk
1/4 cup packed brown sugar
2 Tablespoons milk molasses
2 Tablespoons butter or hard margarine
1 teaspoon salt
2 1/4 cups whole wheat flour

Work in enough remaining flour until the dough pulls away from the sides of the bowl. Knead for 8 to 10 minutes until smooth and elastic. Place in greased bowl, turning once to grease the top. Cover with tea towel and let rise until doubled in bulk, about one hour.
Punch dough down, transfer to a greased 9x5 inch loaf pan, and let rise until doubled in bulk, 30 to 40 minutes. Bake in 375◦F oven for about 35 minutes.
Paré, Jean. "100% Whole Wheat Bread." Recipe. Breads, Edmonton Alberta: Company's Coming Publishing Limited, 1996. 146.
Wednesday, March 21, 2012
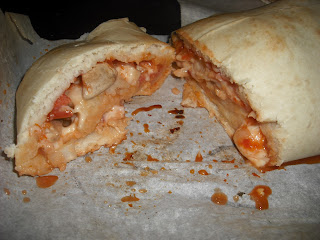
Pizza Stromboli
For supper, I decided to try something a little different than the usual pizzas we make. I found a recipe for what was called "Family-Style Stromboli". It appeared to be a pizza in jelly-roll form. It seemed interesting and tasty enough, so I decided to give it a try. I just used the dough recipe for the crust, and chose fillings to please my family. The original recipe used more vegetables in their filling and less pizza meats than I did. The result was even better than I had expected! This is a very nice dough to work with - it is soft and easy to shape, doesn't tear easily, and when baked, is soft and fluffy. The toppings baked nicely into the crust (I recommend using lots of cheese), and the roll cut well. I would definitely make this again in place of pizza any day - it is quicker and actually easier, and I might just argue that it is tastier too!
 Pizza Stromboli
2 cups all-purpose flour, divided
1 package quick-rise yeast
1 1/2 teaspoons granulated sugar
1 teaspoon salt
2/3 cup warm water
3 Tablespoons oil
Preheat oven to 400◦F. Grease a baking sheet, or line with parchment paper.
In a large bowl, mix 1 cup flour with the yeast, sugar, and salt. Add water then oil, mix until well blended. Stir in 1/4 cup of the remaining flour at a time, working the flour in to make a soft dough. Spread dough into a large rectangle (about 16x9 inches) on the prepared baking sheet.
Spread dough with a modest amount of pizza sauce, and sprinkle with your favorite toppings (sliced meats, finely chopped vegetables, grated cheese, etc.) Go easy on the toppings, too many and they will just fall out and the roll will not roll properly.
Bake for about 20 minutes, or until crust is golden. Let the roll rest for 10 minutes (if you can) before slicing, it will make much neater slices instead of just falling apart.
Tuesday, March 20, 2012
Double Chocolate Chip Cookies

Double Chocolate Chip Cookies
1 cup butter or hard margarine, softened
1 1/2 cups granulated sugar
2 large eggs
2 teaspoons vanilla extract
2 cups all-purpose flour
2/3 cup unsweetened cocoa powder
3/4 teaspoon baking soda
1/4 teaspoon salt
1 3/4 cups mini milk chocolate kisses (or substitute milk or semi-sweet chocolate chips)
1/2 cup coarsely chopped nuts, optional
Preheat oven to 350◦F. In a large bowl beat butter, sugar, eggs and vanilla with an electric mixer on medium speed until light and fluffy. In a separate medium bowl, stir together flour, cocoa, baking soda, and salt. Add to butter mixture, beat until well blended. Stir in chocolate chips and nuts, if desired. Drop by tablespoons onto ungreased cookie sheet. Bake for 8 to 10 minutes or until just set. Cool slightly on baking sheet before removing to cool completely.
The recipe comes from my big Hershey's Recipe Collection recipe binder. It called for mini milk chocolate kisses, but I substituted an equal amount of semi-sweet chocolate chips because I didn't think I had any mini kisses on hand (turns out I did, but oh well). The amount called for seems like a lot, but it just makes the cookies chock-full of chocolate! I didn't use nuts. I also didn't use an electric mixer, I just mixed the dough by hand, although it did get fairly stiff after adding the flour mixture. I also didn't drop the dough, but rolled it into 1-inch balls. This worked well because the dough was so stiff and not sticky at all. The cookies stay nice and soft, even after cooling. They are delicious!
West Side Publishing. "Hershey's Double Chocolate Mini Kisses Cookies." Recipe. Hershey's Classic Recipes, Lincolnwood Illinois: Publications International, Limited, 2009. 194.
Monday, March 19, 2012
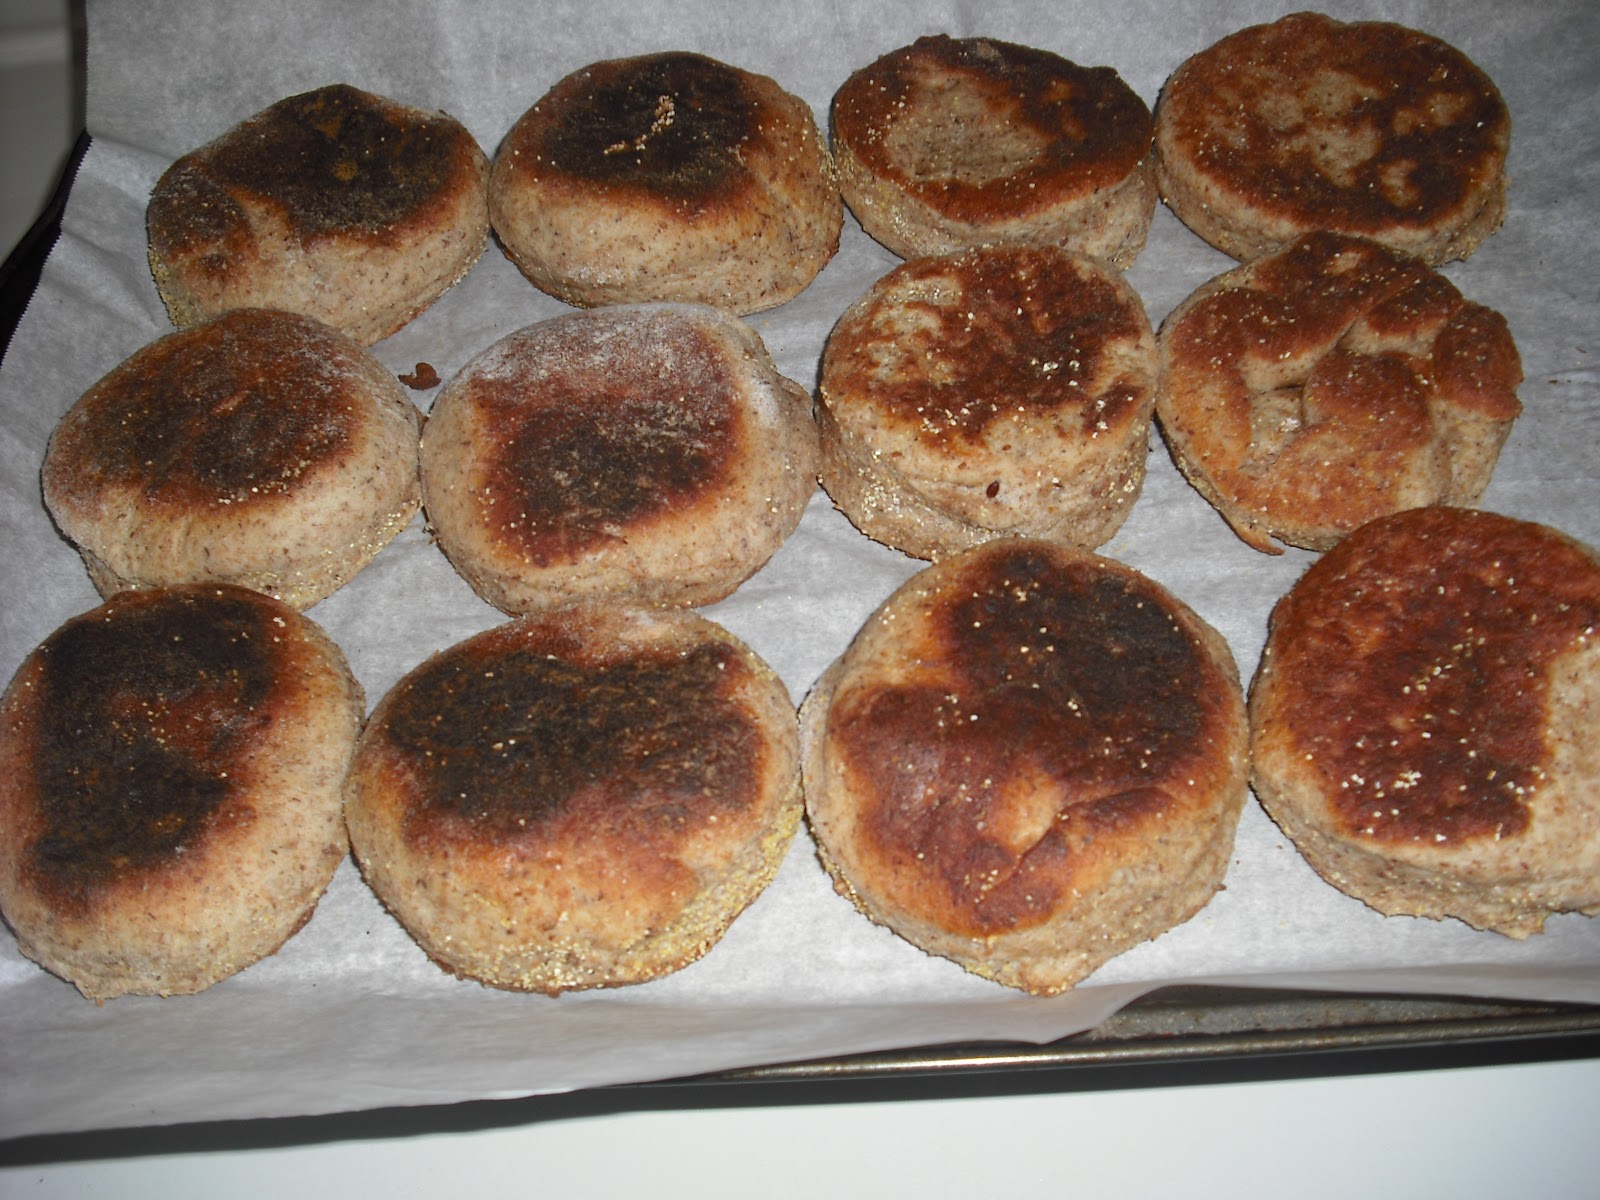
English Muffins
Homemade English Muffins are surprisingly easy to make, and they are definitely well worth it. They make an excellent breakfast or lunch with peanut butter, jam, cream cheese, fruit, yogurt, egg, cheese, tomato, ham, - almost anything. They make great sandwiches and are good served alongside soup too. I got this recipe from Company's Coming "Breads". I made mine whole wheat, and I also added some ground flax seed for added nutrition.
 English Muffins
2 Tablespoons granulated sugar
1/2 cup warm water
1 package (8 grams) active dry yeast
1 cup milk
3 Tablespoons butter or hard margarine, softened
1 large egg, beaten
2 cups all-purpose flour
1 teaspoon salt
1/4 teaspoon ground ginger
2-3 cups all-purpose flour
cornmeal, sprinkle
Paré, Jean. "English Muffins." Recipe. Breads, Edmonton Alberta: Company's Coming Publishing Limited, 1996. 77.
2 Tablespoons granulated sugar
1/2 cup warm water
1 package (8 grams) active dry yeast
1 cup milk
3 Tablespoons butter or hard margarine, softened
1 large egg, beaten
2 cups all-purpose flour
1 teaspoon salt
1/4 teaspoon ground ginger
2-3 cups all-purpose flour
cornmeal, sprinkle
- In a medium bowl, stir together sugar and water. Sprinkle yeast over top. Let stand 10 minutes. Stir to dissolve yeast.
- In a small saucepan, heat milk and butter until lukewarm. Add to yeast mixture. Stir in egg.
- In a large bowl, stir together 2 cups of flour, the salt, and the ginger. Add the yeast mixture and stir.
- Gradually add enough remaining flour to make a soft, smooth dough. Turn onto lightly floured surface and knead 3 to 5 minutes until smooth and elastic.
- Place in a greased bowl, turning once to grease top. Cover with tea towel. Let stand in oven with light on and door closed for about one hour, or until doubled in bulk.
- On a lightly floured surface, roll dough a scant 1/2 inch thick. Cut into 3 1/2 inch rounds. Press each round into cornmeal lightly on both sides.
- Heat a heavy frying pan with oil to medium heat. Brown circles slowly on both sides, about 8 minutes per side.
Paré, Jean. "English Muffins." Recipe. Breads, Edmonton Alberta: Company's Coming Publishing Limited, 1996. 77.
Sunday, March 18, 2012
Mac and Cheeseburger Casserole
Here is an easy, all-in-one, family-pleasing casserole. It combines all four of the food groups, and makes a complete meal. It is tasty and quick and easy to prepare. Then just put it in the oven and relax until dinner time! This dish is very convenient because although the meat and vegetables require a quick precooking time, the pasta does not. There is enough liquid in the casserole to fully cook the pasta while it is in the oven. Just make sure you use a short, quick-cooking pasta shape. The pasta is far from al dente, but still slightly firm.If you are used to very tender pasta, you may want to add a bit more liquid and increase the cooking time, or try precooking the pasta, and just baking the dish for a short amount of time.
 Mac and Cheeseburger Casserole
1 pound (500 grams) extra lean ground beef
2 cups thinly sliced fresh mushrooms
1 medium onion, chopped (about 1/2 cup)
2 cups uncooked macaroni (or other short pasta)
1 can (14 ounces) diced tomatoes, with juices
1 can (284 mL) condensed cream of mushroom soup
2 Tablespoons Worcestershire sauce
1/4 cup grated cheese (I used marble)
Optional Add-Ins: 1 cup chopped red and yellow peppers, 1/2 cup chopped celery, one Tablespoon chili powder.
Preheat a large skillet with a little oil over medium heat. Add the beef and cook thoroughly. Push the beef to the sides of the pan and put the mushrooms, onion, and celery and peppers, if using. Sautee until softened, about five minutes.
Place mixture in a large, oven-proof casserole dish and add the remaining ingredients except for the cheese. Cover and bake at 400◦F for 50 minutes, until pasta is tender. Sprinkle with cheese and let stand 5 minutes before serving.
Saturday, March 17, 2012
St. Patrick's Pot Of Gold Cookies

Chocolate Cookie Cups
1/4 cup butter or hard margarine, softened
1/2 cup granulated (white) sugar
1 large egg
1/4 teaspoon vanilla extract
3 Tablespoons unsweetened cocoa powder
1 cup all-purpose (plain) flour
pinch salt
Preheat oven to 350◦F. Grease a 24-cup miniature muffin tin.
In a medium-sized bowl, cream the butter and the sugar. Add the egg and vanilla and beat until smooth. Add the remaining dry ingredients, mix well. Roll dough into small balls and press each into bottom and up sides of the muffin cups.
Bake for 8 to 10 minutes, or until firm. Cool, then gently loosen cookies from the tin.
Paré, Jean. "Dirt Cups." Recipe. Most Loved Cookies, Edmonton Alberta: Company's Coming Publishing Limited, 2005. 60.
Friday, March 16, 2012
Mushroom Cheese Tartlets
Here are some appetizers I made for Pi Day on Wednesday. They are Mushroom Cheese Tartlets, which are really just mini pies. I didn't really follow a recipe for them, they are really quite simply. I made some oil-based pie crust dough, which I prefer to the heavier shortening-lad pie dough. Oil-based pastry also has slightly more flavor and a better texture which works well with tartlets like this. I took small balls of dough and pressed them into a miniature muffin tin lined with foil squares. I pricked the bottoms of the shells with a fork and baked them at 400◦F for 10 minutes until they were lightly browned. Then I set the shells aside to cool. This step isn't really necessary, but I prepared the shells earlier in the day then filled them later. Then I finely chopped some mushrooms and divided them among the tartlet shells. I added some small slices of marble cheese. You can easily add a variety of other ingredients here - chopped onion, different cheeses, mustard, spices, etc. At this point I wrapped them up and put them in the fridge, but they can also be baked immediately. All they require is five minutes in a 350◦F oven until they are hot and the cheese is melted.


Thursday, March 15, 2012
Chicken and Broccoli Pie
To celebrate Pi Day yesterday, we had pie for dinner. Chicken and Broccoli pie actually. It was quick, easy, and tasty. It is similar in texture to a quiche, but less eggy. The pie is composed of broccoli florets, chopped onion, chopped cooked chicken, milk, eggs, flour, baking powder, salt, pepper, and grated cheese. That's it - pretty simple! Of course this is just a basic recipe, and the ingredients could be varied in many ways.


I found the recipe idea online, but I changed it around quite a bit.
Here is what I did:
I mixed chopped onion, broccoli florets, grated mozzarella cheese, and chopped cooked chicken in the bottom of a round casserole dish. Then I poured a biscuit mixture composed of flour, baking powder, salt, eggs, and milk over this mixture. I covered and baked it at 350◦F for about 40 minutes, sprinkled with some more cheese and baked uncovered for another 5 minutes. This is quite a forgiving dish, as the original recipe called for baking it in a glass pie plate at 400◦F, and contained frozen broccoli and premade biscuit mix. I didn't have any dishes that were ovenproof up to that high of a temperature, so I just baked it at a lower temperature for a longer time. I used fresh broccoli, and made my own biscuit mix. I also used mozzarella cheese instead of the recommended cheddar. All of this worked out really well. I also did the bulk of the work in advance - I mixed the broccoli, onion, and cheese in the bottom of the casserole dish, and whipped up the mixture to pour over top, and placed both in the fridge. Since I didn't have any precooked chicken, I put some breasts in the oven, cut them up, and added them to the bottom of the casserole dish when they were cooked. I poured the biscuit mix over and baked. This dish can be whipped up quickly, or made ahead in advance. Leftovers of this dish also keep well.
Wednesday, March 14, 2012
Happy Pi Day - Caramel Pie

Caramel Meringue Pie
9-inch pie shell, baked and cooled
1 1/4 cups dark brown sugar, packed
2 Tablespoons butter or hard margarine
2 Tablespoons water
1 cup water
3 large egg yolks
3/4 cup milk
2 Tablespoons cornstarch
3 large egg whites, at room temperature
1/4 teaspoon cream of tartar
1/3 cup granulated sugar
Preheat oven to 375◦F. In a large heavy saucepan, heat sugar, butter, and two tablespoons of the water until it boils. Boil for 5 minutes, stirring often to prevent sticking, until it thickens and turns copper-brown. Add 1 cup of water and return to a boil.
In a small bowl, mix the egg yolks, milk, and cornstarch until smooth. Stir into boiling mixture and boil, stirring occasionally, until thickened. Pour into prepared pie shell.
In a large bowl, beat the egg whites and cream of tartar until it forms a stiff froth. Beat in the sugar gradually until stiff. Spread over pie filling, right to the edges. Bake for about 10 minutes or until meringue is golden. Cool completely, then chill until serving.

Paré, Jean. "Caramel Pie." Recipe. Pies, Edmonton Alberta: Company's Coming Publishing Limited, 1992. 63.
Tuesday, March 13, 2012
Homemade Tortillas
For my enchilada bake yesterday, I made my own homemade tortillas. I have tried to make tortillas before, but due to time constraints, they ended up being more like flat breads, as they were not rolled as thinly as they should have been. They still turned out very nice and tasty though, the only trouble I had was a bit of sticking to the pan, so this time I knew to make sure my pan was well oiled. This requires adding a splash of oil for every new tortilla you add. They need oil to cook and sizzle properly, but they don't end up greasy after cooking. Watch them carefully - they only need 30-60 seconds per side. Homemade flour tortillas aren't particularly difficult to make, although the technique of rolling and frying does take practice. The trick is to stretch them as thinly a possible - they should be almost transparent. I have discovered that if you accidentally rip them in spots, once cooked, the hole will tend to patch itself up, so you don't need to worry about minor tears. The dough is very smooth, and easy to work with. Tortillas are very simple - most recipes contain just flour, water, baking powder, salt, and a little fat. The dough requires a short kneading time, and sometimes a short resting time. Then it is divided into pieces, rolled out very thinly, and cooked in a hot frying pan for a very short time on both sides, until some dark spots appear. There are many different recipes for tortillas out there, although they all use the same basic concept. The internet is a good place to look, you can easily find a recipe to suit the amount of servings you need. Tortillas are excellent for burritos, tacos, enchiladas, fajitas, wraps, and even homemade nachos. They keep well, and can be frozen for prolonged storage.


Monday, March 12, 2012
Enchiladas

Sunday, March 11, 2012
Decorated Dessert Pizza

Saturday, March 10, 2012
Brownie Pizza
Ever try making a brownie in a pizza pan? It's quite fun, and makes for a lot more decorating options. It is also easier to slice into wedges and serve. Here is the recipe I used to make a twelve inch pizza. It works very well, bakes nice and evenly, and is simple and quick to whip up. I found the recipe in my big Hershey's Recipe Collection recipe binder.
Brownie Pizza
3/4 cup butter or hard margarine, melted
1 1/2 cups granulated sugar
1 1/2 teaspoons vanilla extract
3 large eggs
3/4 cup all-purpose flour
1/2 cup unsweetened cocoa powder
1/2 teaspoon baking powder
1/4 teaspoon salt
 Preheat oven to 350◦F. Line a 12-inch pizza pan with aluminum foil, grease foil.In a large bowl, mix the butter, sugar, and vanilla. Add the eggs.
In a separate medium bowl, stir together the remaining dry ingredients. add to butter mixture, mix well. Spread evenly into prepared pan.
Bake 20 to 22 minutes or until just set and center springs back when lightly touched. Decorate as desired after cooling completely.
West Side Publishing. "Jumbo Jack-O'-Lantern Brownie." Recipe. Hershey's Classic Recipes, Lincolnwood Illinois: Publications International, Limited, 2009. 265.
Brownie Pizza
3/4 cup butter or hard margarine, melted
1 1/2 cups granulated sugar
1 1/2 teaspoons vanilla extract
3 large eggs
3/4 cup all-purpose flour
1/2 cup unsweetened cocoa powder
1/2 teaspoon baking powder
1/4 teaspoon salt

In a separate medium bowl, stir together the remaining dry ingredients. add to butter mixture, mix well. Spread evenly into prepared pan.
Bake 20 to 22 minutes or until just set and center springs back when lightly touched. Decorate as desired after cooling completely.
West Side Publishing. "Jumbo Jack-O'-Lantern Brownie." Recipe. Hershey's Classic Recipes, Lincolnwood Illinois: Publications International, Limited, 2009. 265.
Friday, March 09, 2012
Cake Walk Cake

Thursday, March 08, 2012
Birthday Cake

After I frosted this cake, I piped buttercream frosting to spell out "Happy Birthday Ms. Penny" in pastel blue. Then I added some ridged drop swoop lines around for a border, and added some little stars in pastel pink buttercream. I am really looking forward to spring, so I used pastel spring colors again! I did this cake fairly quickly using only two tips. It was simple, but I think it looks pretty nice. And you can never go wrong with chocolate cake and fudge icing!
Wednesday, March 07, 2012
Apple Crisp

Everyone has a slightly different recipe for apple crisp, and they swear by their own recipe. This recipe is the one my mother always uses, straight from her head. It consists of apples, sugar, cinnamon, oats, flour, brown sugar, and butter. Some people also like to add nuts, lemon juice, or other spices. Almost any type of apple can work in apple crisp, although some may yield slightly different levels of sweetness and textures, so adjust sugar levels and thickeners accordingly. Some apple crisps will turn out chunkier, and some smoother, almost like applesauce. If you use a combination of different types of apples, you can end up with a very nice texture and balance in sweetness and tartness.
Tuesday, March 06, 2012
Scalloped Potatoes
Scalloped Potatoes is a dish my mother often used to make, especially when we were having ham for supper. She doesn't make it as often anymore, as it is quite a bit of work compared to other methods of preparing potatoes, but she made them today, and it was a real treat! The name scalloped potatoes originated by the way the potatoes were cut - with a special tool that makes a scalloped design. Some also believe the dish was originally made with scallops as well, and that is where the term scalloped came from. The dish consists of these potatoes, along with a white and cheese sauce.
 To make them: boil some potatoes until just barely tender (they will finish cooking in the oven). Meanwhile, melt some butter in a small saucepan. Once melted, add some chopped onion and stir occasionally until bubbling. Add some flour and ground black pepper and mi it up until thick. Then add a cup of milk and heat, stirring occasionally, until boiled and thick. This will be the white sauce, which will layer into a cheese sauce when in the casserole. Once the potatoes are boiled, slice them into thin slices. Arrange half of the slices into a casserole dish, top with slices of cheese (we use marble), and top with half of the white sauce. Repeat layers. Cover and bake for about an hour at 350◦F until hot and bubbly and potatoes are tender.

Monday, March 05, 2012
Honey Oatmeal Cookies
Today I whipped up a quick batch of Honey Oatmeal Cookies. The recipe came from Company's Coming "Cookies". These are simple drop cookies that are super easy and quick to make. The result is a very nice, sweet, chewy cookie with a subtle honey flavor. These oatmeal cookies are on the softer side, but for more crunch they could always be baked for a few minutes longer. They are soft and chewy and very good. The recipe called for raisins, but I did not use any. Instead, I divided the dough in half and added semi-sweet chocolate chips to one half. I left the other half plain, and they were delicious as is! The plain are pictured here in the front and the chocolate chip are in the back.
 Honey Oatmeal Cookies
3/4 cup butter or hard margarine, softened
1/2 cup granulated sugar
1/2 cup soft honey
1 large egg
1 teaspoon vanilla extract
2 cups rolled oats
1 1/4 cups all-purpose flour
1 teaspoon baking soda
1/2 teaspoon salt
Preheat oven to 350◦F. Grease or line baking sheets.
In a large bowl, cream butter, sugar, and honey together well. Beat in egg and vanilla. Add remaining ingredients, mix well. Drop by spoonfuls onto prepared baking sheet. Bake for 12 to 15 minutes. Makes about 4 dozen (48) cookies.
Paré, Jean. "Honey Oatmeal Cookies." Recipe. Cookies, Edmonton Alberta: Company's Coming Publishing Limited, 1989. 21.
Sunday, March 04, 2012
Fair Trade Foods
Fair Trade is an organization that works with developing countries to give producers a fair wage for their laboring work in producing products. Along with food, there are also fair trade beauty products, cotton products, and other products. The Fair Trade organization aims to develop long-term relationships with their producers. Although there is no formal definition of Fair Trade, it is thought of as a trading partnership between developing and developed countries in which producers receive fair wages and proper working and trading conditions, while the final product produced is certified to the standards of the country it is sold in. Fair Trade products may sometimes be more expensive than just regular, but the positive impact these products have make it definitely worth it. Common Fair Trade food items are coffee, chocolate, tea, oil, honey, pasta, and rice. Whenever possible, try to buy Fair Trade products. It is an easy way to help reduce poverty and improve working conditions in developing countries. Fair Trade foods should carry the Fair Trade symbol, pictured below.
 PHOTO CREDIT:"fairtrade" http://leaninggreenonline.com/tag/fair-trade/.Learning Green, n.d. Sunday, March 4, 2012.

Subscribe to:
Posts (Atom)