Basic Puff Pastry Dough
2 cups all-purpose (plain) flour
1 1/4 cups cubed salted butter, frozen (divided)
1/2 cup ice water
lace the flour in a food processor. Add 1/4 cup butter and pulse 12 times.
Add the remaining 1 cup butter and pulse 5 times until butter begins to break up.
Add the water and pulse a couple times until dough seems moistened.
At this point the dough will not look like it is coming together, but don't be tempted to add more water.
Dump the mixture onto a work table and bring it together with your hands until it forms a ball.
Roll out on a lightly floured surface to a rectangle, approximately 12x15 inches.
Fold dough in thirds width-wise, the roll up from the short edge.
Flatten, wrap well, and let chill at least one hour but overnight for best results.
Allow dough to warm to room temperature before using. It will still seem quite firm but once it is begun to roll out, the butter will soften and the dough will become pliable.
Roll out to about 1/4 inch thick. Cut out as many rounds (or fluted rounds) as possible.
Scraps can be gathered and rerolled once and cut, more than that and they will not bake evenly.
Again, it is best to chill these again before baking but it is not crucial.
Bake at 425◦F for about 15-20 minutes until golden and risen, depending on size.
Use for a variety of savory and even sweet dishes: vol-au-vent, tarts, pot pies, mille feuilles, croissants, etc.
Showing posts with label pastry. Show all posts
Showing posts with label pastry. Show all posts
Sunday, November 19, 2017

Monday, October 23, 2017
Easy Butter Pastry
Easy Butter Pastry
1 1/2 cups all-purpose (plain) flour
1 Tablespoon granulated (white) sugar
1/4 teaspoon salt
1/4 cup unsalted butter
1/2 cup ice water
Mix together the flour, sugar, and salt. Blend in the butter until the mixture begins to clump together. Add the water and blend to form a dough. Gently knead into a ball.
At this point the dough can be wrapped and chilled to be used later, or used immediately.
You can use a rolling pin on this dough, but it's really not necessary. It's an easy dough that can just be pressed into the pan.

1 1/2 cups all-purpose (plain) flour
1 Tablespoon granulated (white) sugar
1/4 teaspoon salt
1/4 cup unsalted butter
1/2 cup ice water
Mix together the flour, sugar, and salt. Blend in the butter until the mixture begins to clump together. Add the water and blend to form a dough. Gently knead into a ball.
At this point the dough can be wrapped and chilled to be used later, or used immediately.
You can use a rolling pin on this dough, but it's really not necessary. It's an easy dough that can just be pressed into the pan.

Monday, July 10, 2017
Strawberry Pastry

Saturday, June 24, 2017
Vegan Lemon Pastry Cream
You don't need cream or any dairy or eggs at all to make a nice, smooth, tasty pastry cream.
Vegan Lemon Pastry Cream
1⁄4 cup all-purpose (plain) flour
1 cup non-dairy milk
3 Tablespoons granulated (white) sugar
1 pinch salt
juice of 2 large lemons
1⁄4 teaspoon vanilla extract
In a small saucepan, whisk together the flour with 1/4 cup of the milk. Whisk in the remaining milk, sugar, and salt. Cook the mixture over medium heat, whisking constantly, for 5-6 minutes or until very thick. Add juice and vanilla, then cook again until mixture becomes thickened again. Pour into a bowl and place a piece of plastic wrap directly on the surface to avoid a skin from forming. Cool and chill.

Vegan Lemon Pastry Cream
1⁄4 cup all-purpose (plain) flour
1 cup non-dairy milk
3 Tablespoons granulated (white) sugar
1 pinch salt
juice of 2 large lemons
1⁄4 teaspoon vanilla extract
In a small saucepan, whisk together the flour with 1/4 cup of the milk. Whisk in the remaining milk, sugar, and salt. Cook the mixture over medium heat, whisking constantly, for 5-6 minutes or until very thick. Add juice and vanilla, then cook again until mixture becomes thickened again. Pour into a bowl and place a piece of plastic wrap directly on the surface to avoid a skin from forming. Cool and chill.

Thursday, June 22, 2017
Rhubarb Mille Feuille
Mille Feuille means "a thousand leaves" and refers to the layers of flaky pastry. A mille feuille generally has some kind of filling such as a pastry cream and fruit.
 Rhubarb Mille Feuille =
one piece of puff pastry (my homemade puff pastry squares, freshly baked)
+ vegan lemon pastry cream
+ poached spiced rhubarb pieces
+ rhubarb coulis
+ one piece of puff pastry, dusted with icing sugar and caramelized under the broiler
+ dusting of icing sugar
+ more rhubarb coulis
Recipes for the individual components will follow in the coming days.

one piece of puff pastry (my homemade puff pastry squares, freshly baked)
+ vegan lemon pastry cream
+ poached spiced rhubarb pieces
+ rhubarb coulis
+ one piece of puff pastry, dusted with icing sugar and caramelized under the broiler
+ dusting of icing sugar
+ more rhubarb coulis
Recipes for the individual components will follow in the coming days.
Sunday, May 07, 2017
Vol-au-Vent Shells
Vol-au-Vent Shells
2 cups all-purpose (plain) flour
1 1/4 cups cubed salted butter, frozen (divided)
1/2 cup ice water
 Place the flour in a food processor. Add 1/4 cup butter and pulse 12 times.
Add the remaining 1 cup butter and pulse 5 times until butter begins to break up.
Add the water and pulse a couple times until dough seems moistened.
At this point the dough will not look like it is coming together, but don't be tempted to add more water.
Dump the mixture onto a work table and bring it together with your hands until it forms a ball.
Roll out on a lightly floured surface to a rectangle, approximately 12x15 inches.
Fold dough in thirds width-wise, the roll up from the short edge.
Flatten, wrap well, and let chill at least one hour but overnight for best results.
Allow dough to warm to room temperature before using. It will still seem quite firm but once it is begun to roll out, the butter will soften and the dough will become pliable.
 Roll out to about 1/4 inch thick. Cut out as many rounds (or fluted rounds) as possible. Even vol-au-vent squares or rectangles can be done, if desired.
Scraps can be gathered and rerolled and cut.
Cut a small circle in the center of half the large circles.
Attach this hollowed out circle to the top of a full circle with some egg wash.
Place on a parchment-lined baking sheet and brush the entire thing with egg wash.
Again, it is best to chill these again before baking but it is not crucial.
Bake at 425◦F for about 20 minutes until golden.
These can be prepared a few days in advance, but I prefer to bake them fresh and have them warm with my vol-au-vent.
2 cups all-purpose (plain) flour
1 1/4 cups cubed salted butter, frozen (divided)
1/2 cup ice water
 Place the flour in a food processor. Add 1/4 cup butter and pulse 12 times.
Add the remaining 1 cup butter and pulse 5 times until butter begins to break up.
Add the water and pulse a couple times until dough seems moistened.
At this point the dough will not look like it is coming together, but don't be tempted to add more water.
Dump the mixture onto a work table and bring it together with your hands until it forms a ball.
Roll out on a lightly floured surface to a rectangle, approximately 12x15 inches.
Fold dough in thirds width-wise, the roll up from the short edge.
Flatten, wrap well, and let chill at least one hour but overnight for best results.
Allow dough to warm to room temperature before using. It will still seem quite firm but once it is begun to roll out, the butter will soften and the dough will become pliable.
 Roll out to about 1/4 inch thick. Cut out as many rounds (or fluted rounds) as possible. Even vol-au-vent squares or rectangles can be done, if desired.
Scraps can be gathered and rerolled and cut.
Cut a small circle in the center of half the large circles.
Attach this hollowed out circle to the top of a full circle with some egg wash.
Place on a parchment-lined baking sheet and brush the entire thing with egg wash.
Again, it is best to chill these again before baking but it is not crucial.
Bake at 425◦F for about 20 minutes until golden.
These can be prepared a few days in advance, but I prefer to bake them fresh and have them warm with my vol-au-vent.
Tuesday, June 14, 2016
Skills - Secondary Baking Pastries
Group One Day Two baking - small pastry items (cookies, tarts, pastries).
 |
| Shortbread cookies and chocolate spritz cookies |
 |
| profiteroles, mixed fruit tartlets |
 |
| Raspberry tartlets, choux pastry |
 |
| cookies |
 |
| chocolate-drizzled cookies |
 |
| profiteroles shaped like swans,strawberry coconut tartlets |
 |
| sugar cookies and two-tone cookies |
 |
| chocolate macaroons, fruit cookies |
 |
| fruit tartlets, cream puffs |
 |
| fresh berry fruit tartlets with vanilla pastry cream, lemon meringue cream puffs |
 |
| chocolate raspberry macaroons, lemon coconut shortbread |
 |
| checkerboard cookies, lemon macaroons |
 |
| fruit tartlets with bubble sugar, profiteroles with chocolate garnish |
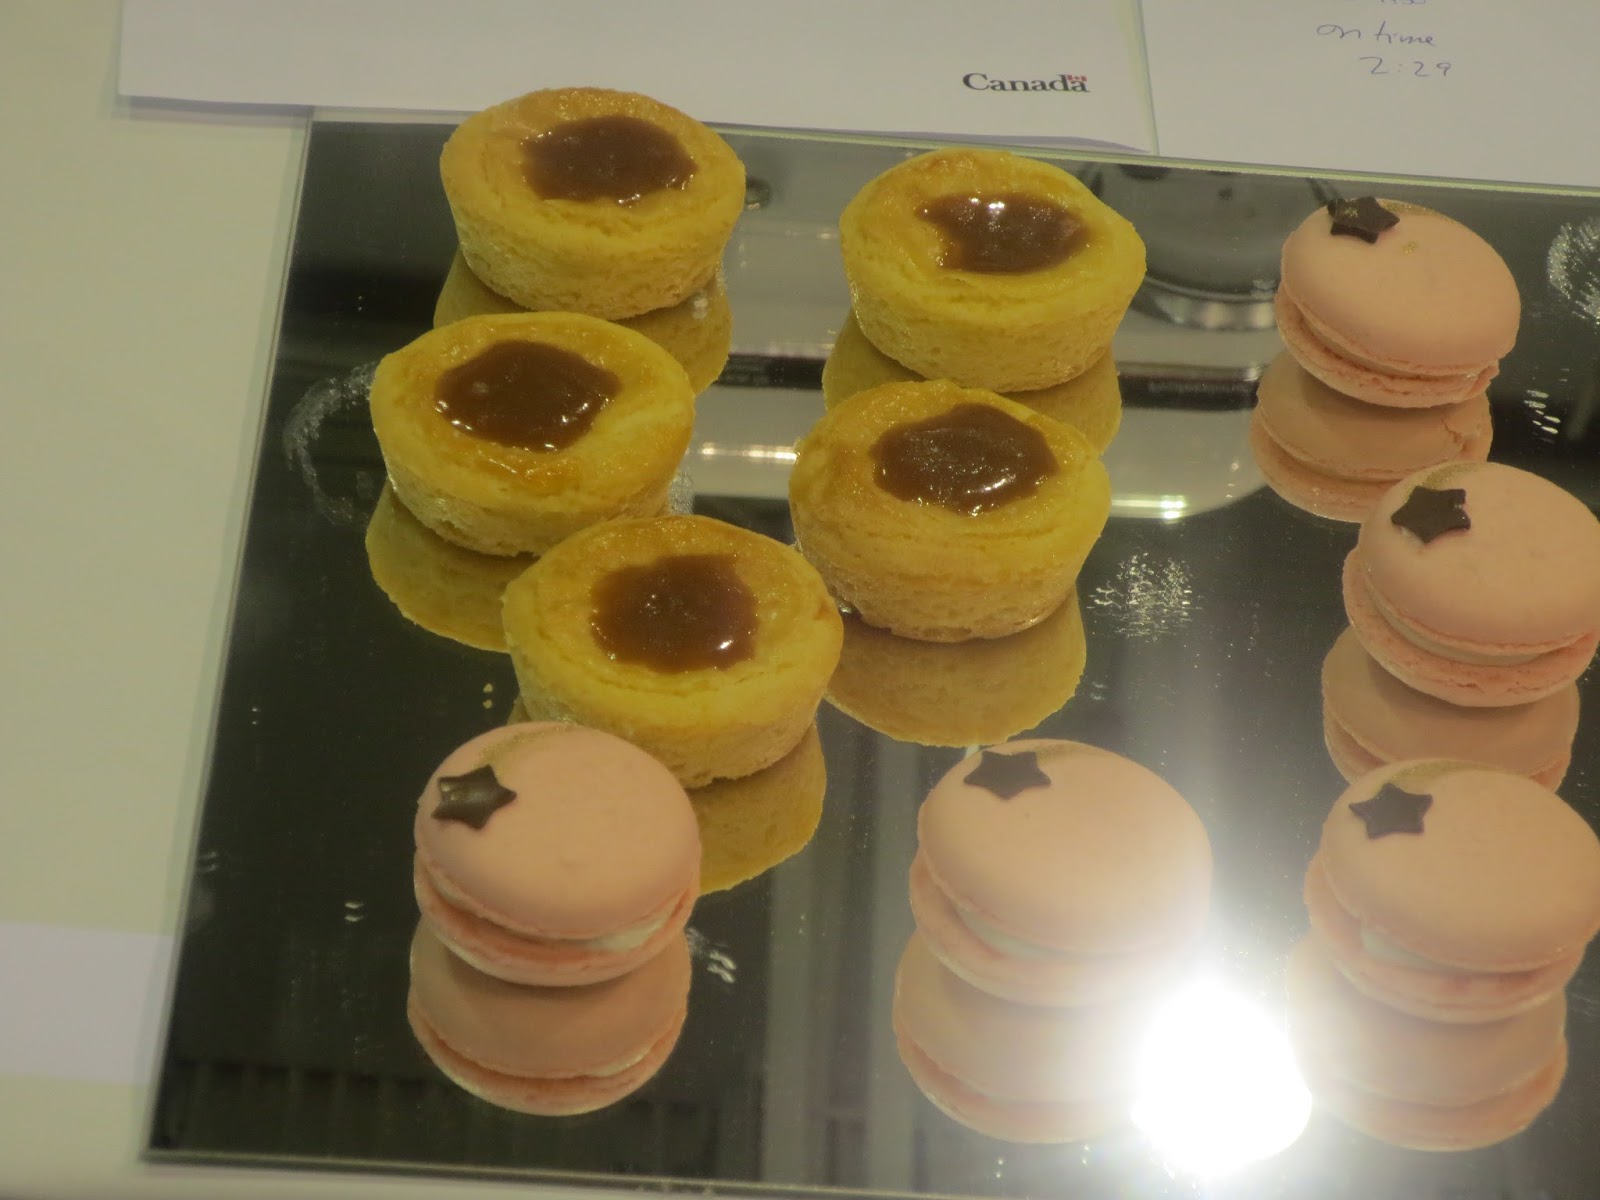 |
| jam tarts, pink macaroons |
 |
| cookies with fruit topping, macaroons |
 |
| chocolate and pastry cream fruit tarts, chocolate dipped cream puffs |
 |
| fruit tartlets, profiteroles with green filling |
Saturday, April 23, 2016
Dough Danish Turnovers

 Going along with the same idea as those pie dough scraps from last week, here we have dough 'turnovers' or shortcut Danish pastries. We took the leftover dough from making a tortiere meat pie, and made mini turnovers and one large turnover. We didn't really worry about getting perfect triangles as we were just utilizing scrap dough anyway.
  Some are filled with dark chocolate chips, which melted just enough to form a nice filling but not enough to ooze out of the pastry. Some are filled with spiced almonds, some with crushed maple walnuts, some with cinnamon sugar, and some with a combination of those. They are simply sealed with water, but also could be brushed with egg wash or milk before baking to allow more toppings to adhere. They can be brushed or dipped in melted butter after baking to give them a little more flavor. This is a basic pie dough for a savory pie, so the dough itself is not very sweet, making it the perfect vessel for a maple glaze or a frosting as well.
Thursday, March 31, 2016
Blueberry White Chocolate Cake
White Chocolate Cake Batter + Blueberries + Raspberry Pastry Cream + Sugared Ginger Crunch + Dark Chocolate Sauce + Caramel Spiral
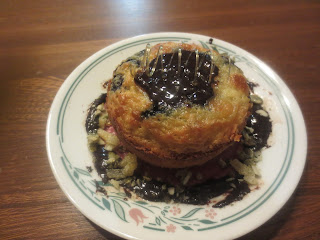

The cake is a simple white chocolate cake batter poured into a ramekin, sprinkled with blueberries, and then baked until firm on the outside but still soft and moist on the inside.
The raspberry pastry cream is just as it sounds and lends a pretty pink color. It is underneath the cake.
The sugared ginger crunch is candied ginger stirred into a basic caramel brittle.
The dark chocolate sauce consists simply of dark chocolate and cream, melted together until silky and smooth.
And the caramel spiral is one of my signature pastry garnishes.
Tuesday, March 22, 2016
Caille en Sarcophage
Here is the main course I made for my black box exam: Pan Roasted Truffle-Scented Quail with Crisp Puff Pastry, Rosemary Mushroom Jus Lié, Glazed Carrot Curls, Cilantro Pesto.


I found the inspiration for this dish online, which means "Quail in Cage" and refers to a fancy, expensive version of quail sitting in puff pastry.
I made my own puff pastry shells.
For the quail, I stuffed it with foie gras, seasoned it with salt and pepper, pan seared it, roasted it, and finished it with truffle oil. I didn't bother tying the legs up or anything.
For the sauce I made a quick rosemary and mushroom jus lie by sweating mushrooms in red wine, and reducing it with jus and rosemary.
On the side, I made a butternut squash puree and cilantro parmesan pesto for the plate, and butter-poached carrot curls.
Wednesday, December 16, 2015
Baked Figs
Baked Figs
fresh figs, tough top and bottom cut off, halved
sweet citrus spice syrup (see )
phyllo pastry
egg wash, water, oil, or melted butter
Toss the fig halves in the syrup until well coated. Lay a sheet of phyllo pastry out, brush with egg wash, butter, or oil (whatever you find tastes the best and sticks the best) and repeat with a few more sheets. Place one fig half (with some syrup) on top and wrap it, closing up the pastry in whatever shape desired and securing with a little or egg or butter or oil. Place pastries on a parchment-lined baking tray and bake at 350◦F for a few minutes until lightly browned and crisp. Serve warm or at room temperature, with some extra syrup to dip if desired.
 This is a quick recipe I came up with to go with baklava when I had some extra ingredients. It makes an easy, different not too-sweet dessert or an interesting addition to a cheese platter.
fresh figs, tough top and bottom cut off, halved
sweet citrus spice syrup (see )
phyllo pastry
egg wash, water, oil, or melted butter
Toss the fig halves in the syrup until well coated. Lay a sheet of phyllo pastry out, brush with egg wash, butter, or oil (whatever you find tastes the best and sticks the best) and repeat with a few more sheets. Place one fig half (with some syrup) on top and wrap it, closing up the pastry in whatever shape desired and securing with a little or egg or butter or oil. Place pastries on a parchment-lined baking tray and bake at 350◦F for a few minutes until lightly browned and crisp. Serve warm or at room temperature, with some extra syrup to dip if desired.

Sunday, October 11, 2015
Syrniki
Syrniki
1 cup cottage cheese
2 egg yolks
1 1/3 cups rice flour
1/4 teaspoon salt
1 Tablespoon granulated (white) sugar
2 Tablespoons unsalted butter
 Squeeze the cottage cheese through a piece of cheesecloth to remove all the excess moisture. Then beat in the egg. Gradually mix in the flour, salt, and sugar until a stiff dough forms that is about the same texture as shortbread cookie dough. You may not need to use all the flour. Press the dough into a flat disc on a piece of plastic wrap, wrap, and refrigerate for at least thirty minutes, until firm. Alternately you could form the dough into a log and refrigerate.
Cut the dough into small pieces - I used a one inch heart-shaped cutter. Alternately you could just cut the dough in squares or slice it from the log. Heat the butter in a medium saucepan or frying pan over low heat until melted. Fry the pastries, about three minutes per side until golden. You can make them as crispy as you like. Drain the pastries on paper towel.
Traditionally these pastries are served with berry kissel or sweet berry sauce and sour cream. I added some sambuca to my berry sauce and also served them with lemon pastry cream to balance the flavors.
Tips and Tricks: If you have the time, the cottage cheese can be weighed down and drained overnight. You can replace the rice flour with all-purpose flour, I just used rice flour to make them gluten-free. Since this pastries are not baked, the change in flour really doesn't affect the texture of them.
1 cup cottage cheese
2 egg yolks
1 1/3 cups rice flour
1/4 teaspoon salt
1 Tablespoon granulated (white) sugar
2 Tablespoons unsalted butter

Cut the dough into small pieces - I used a one inch heart-shaped cutter. Alternately you could just cut the dough in squares or slice it from the log. Heat the butter in a medium saucepan or frying pan over low heat until melted. Fry the pastries, about three minutes per side until golden. You can make them as crispy as you like. Drain the pastries on paper towel.
Traditionally these pastries are served with berry kissel or sweet berry sauce and sour cream. I added some sambuca to my berry sauce and also served them with lemon pastry cream to balance the flavors.
Tips and Tricks: If you have the time, the cottage cheese can be weighed down and drained overnight. You can replace the rice flour with all-purpose flour, I just used rice flour to make them gluten-free. Since this pastries are not baked, the change in flour really doesn't affect the texture of them.
Thursday, January 30, 2014
Chocolate Cream Puff Dough
Chocolate Choux Pastry
1 cup water
1/2 cup + 1 Tablespoon butter
3 Tablespoons unsweetened cocoa powder
1 Tablespoon granulated (white) sugar
1 cup all-purpose (plain) flour
1/4 teaspoon salt
4 large eggs
Preheat oven to 425◦F. Line a baking sheet with parchment paper.
In a medium saucepan, bring the water and butter to a boil. Add the cocoa and sugar.
Add the flour and salt all at once and stir vigorously until the dough forms a ball in the middle of the pan. Remove from heat.
Add the eggs, one at a time, beating until smooth after each addition, until dough is thick and glossy. Pipe or spoon dough into mounds or log shapes (this dough can be used for cream puffs or eclairs). This recipe will make 24 small or 12 large.
Bake for 25 minutes, or until dough looks dry. Mini puffs will take less time to bake. Immediately transfer to a rack to cool, poking a small hole in each to allow steam to escape.
This is a good, basic chocolate recipe that can be used for cream puffs, éclairs, and other pastries. It's pretty easy, but doesn't make a very large batch. I have used it to make éclairs before, and also for my croquembouche from yesterday's post.
1 cup water
1/2 cup + 1 Tablespoon butter
3 Tablespoons unsweetened cocoa powder
1 Tablespoon granulated (white) sugar
1 cup all-purpose (plain) flour
1/4 teaspoon salt
4 large eggs
Preheat oven to 425◦F. Line a baking sheet with parchment paper.
In a medium saucepan, bring the water and butter to a boil. Add the cocoa and sugar.
Add the flour and salt all at once and stir vigorously until the dough forms a ball in the middle of the pan. Remove from heat.
Add the eggs, one at a time, beating until smooth after each addition, until dough is thick and glossy. Pipe or spoon dough into mounds or log shapes (this dough can be used for cream puffs or eclairs). This recipe will make 24 small or 12 large.
Bake for 25 minutes, or until dough looks dry. Mini puffs will take less time to bake. Immediately transfer to a rack to cool, poking a small hole in each to allow steam to escape.
This is a good, basic chocolate recipe that can be used for cream puffs, éclairs, and other pastries. It's pretty easy, but doesn't make a very large batch. I have used it to make éclairs before, and also for my croquembouche from yesterday's post.
Wednesday, January 29, 2014
Chocolate Croquembouche

Croquembouche has been on my list of things I would like to make for a while now. I realize that it is somewhat elaborate and tedious, and I thought I would have a good period of time to make it. Turns out I had to complete everything in the span of about forty minutes. No problem, right? Well sort of, since cream puffs need to be cool to be filled with a mousse, and it's difficult to stack warm cream puffs, and they take about twenty minutes to bake. But using some shortcuts, and slightly sacrificing the elaborateness of this dish, I did pull it off with help.
I began immediately with whipping up the cream puff dough and baking it. I made them quite mini so they would bake and cool faster, and were baked within fifteen minutes. Meanwhile, the chocolate mousse was whipped up. Once the cream puffs were baked, they were placed in the freezer to cool as quickly as possible. However, they were still too warm (and too tiny) to fill with the mousse filling (basically chocolate whipped cream), which is why some mousse was piped and piled on top, and beginning to melt a little. Extra mousse was provided for dipping of course. Now to actually assemble the tower. I whipped up some light caramel on the stove, and dipped the cream puffs in the hot caramel so they would stick together. Since the tower was relatively small, only containing about thirty cream puffs or so, I didn't use a cone base for support, and didn't plan out the structure, I just stuck the cream puffs together. Then I drizzled a little extra caramel over top. The picture isn't great, and doesn't really do the mini tower justice, but I am happy with the result considering the time period I had and it being my first attempt at this dessert!
Thursday, January 03, 2013
Chocolate Éclairs

Chocolate Whipped Cream
1/2 cup whipping cream
1/4 cup granulated (white) sugar
1 Tablespoon unsweetened cocoa powder
1 teaspoon vanilla extract
Whip the cream in a bowl, gradually adding the sugar as eating. Once stiff, fold in the vanilla and cocoa.
Chocolate Sauce
1/2 cup granulated (white) sugar
1/4 cup unsweetened cocoa powder
1/2 Tablespoon cornstarch
pinch salt
1 cup boiling water
1 teaspoon vanilla extract
In a medium saucepan, stir the first four dry ingredients. Stir in the water and vanilla. Heat until boiling, stirring often, then boil for three minutes. Remove from heat. Let cool slightly before using. Good warm or cold. Store leftovers in the refrigerator.
Wednesday, January 02, 2013
Chocolate Choux Pastry
Choux pastry (or pâte à choux) is a French pastry dough used to make cream puffs, éclairs, profiteroles and other pastries. I used it to make éclairs, and chocolate éclairs at that! Here is the recipe, and I will feature the completed éclairs tomorrow.
Chocolate Choux Pastry
1 cup water
1/2 cup + 1 Tablespoon hard margarine
3 Tablespoons unsweetened cocoa powder
1 cup all-purpose (plain) flour
1/4 teaspoon salt
4 large eggs
 Preheat oven to 425◦F. Line a baking sheet with parchment paper.
In a medium saucepan, heat the water, margarine, and cocoa, stirring often, until boiling.
Add the flour and salt all at once and stir vigorously until the dough forms a ball in the middle of the pan. Remove from heat.
Add the eggs, one at a time, beating until smooth after each addition. Pipe or spoon dough into mounds or log shapes (this dough can be used for cream puffs or eclairs). This recipe will make 24 small or 12 large.
Bake for 25 minutes, or until dough looks dry. The recipe also states to poke a small hole or slit in the side with a sharp knife to allow steam to escape, but I forgot to do this and they still turned out fine. Cool on a rack.
These are best when eaten fresh and filled just before eating, to remain crisp.
Chocolate Choux Pastry
1 cup water
1/2 cup + 1 Tablespoon hard margarine
3 Tablespoons unsweetened cocoa powder
1 cup all-purpose (plain) flour
1/4 teaspoon salt
4 large eggs

In a medium saucepan, heat the water, margarine, and cocoa, stirring often, until boiling.
Add the flour and salt all at once and stir vigorously until the dough forms a ball in the middle of the pan. Remove from heat.
Add the eggs, one at a time, beating until smooth after each addition. Pipe or spoon dough into mounds or log shapes (this dough can be used for cream puffs or eclairs). This recipe will make 24 small or 12 large.
Bake for 25 minutes, or until dough looks dry. The recipe also states to poke a small hole or slit in the side with a sharp knife to allow steam to escape, but I forgot to do this and they still turned out fine. Cool on a rack.
These are best when eaten fresh and filled just before eating, to remain crisp.
Wednesday, December 07, 2011
Cream Cheese Tartlet Shells
Here is a super simple, quick, and yummy recipe for easy and versatile tartlet shells. They are a good base for many different tarts, sweet or savory. If you are using them for a slightly sweet but not decadent filling, add a little sugar to the dough. If you are using them for a savory filling, add a little salt. These tartlet shells can be filled before or after baking, depending on your filling. Keep in mind that they puff up a little during baking, so if you fill them before baking, be very modest with your amount of filling. Otherwise, you may end up with a mess on the oven floor. These are easy to make, and miniature muffin cups are the perfect size to bake them in, as long as you don't want them to deep. They are minis - so a lot of filling is not required. I am baking them today to have them ready to fill. I will display the finished product tomorrow.
Cream Cheese Tartlet Shells
3 ounces cream cheese, softened
1/2 cup unsalted butter, softened
1 cup white all-purpose flour
1-3 Tablespoons sugar, if desired
1 teaspoon salt, for savory fillings
 Blend the cream cheese and the butter together until smooth. Add the flour and sugar or salt, and blend. Shape dough into a ball and press into a flattened disk. Refrigerate for at least one hour or up to 24 hours.
Preheat oven to 325◦F. Shape the dough into 24 1-inch balls, press thinly into ungreased miniature muffin cups. Bake for 20 minutes, or until lightly browned. These are very easy to remove within minutes of baking, just when cool enough to handle. Don't try to cool them in the muffin tin.
Cream Cheese Tartlet Shells
3 ounces cream cheese, softened
1/2 cup unsalted butter, softened
1 cup white all-purpose flour
1-3 Tablespoons sugar, if desired
1 teaspoon salt, for savory fillings

Preheat oven to 325◦F. Shape the dough into 24 1-inch balls, press thinly into ungreased miniature muffin cups. Bake for 20 minutes, or until lightly browned. These are very easy to remove within minutes of baking, just when cool enough to handle. Don't try to cool them in the muffin tin.
Thursday, October 13, 2011
Pie Crusts
 When people think of pie, they typically think of the old-time flaky crust created with lard or shortening. Whether it be single, double, or lattice, this is the most commonly used crust. However, there are so many other choices for pie crusts.
These crusts may also be used for cheesecakes and bars. Here are some tried and true crust ideas.
* Butter-based, Oil-based, Shortbread, Shortnut
* Puff pastry, Phyllo pastry
* Graham crumb, Chocolate wafer crumb
* Vanilla wafer crumb, Chocolate chip cookie crumb
* Gingersnap crumb, Cornflake, Crisp rice
You can make pretty much any crust with any kind of cookie, cereal, or cracker crumbs. Just crush the ingredient either by placing it in a sealed plastic bag and rolling a rolling pin over top, or processing it in a blender or food processor. For an eight or nine inch round or square pan, you will need approximately 1 ½ cups of crumbs, ¼ cup sugar (granulated or brown), and six tablespoons of melted butter or hard margarine. All you need to do is mix the three ingredients and pat firmly into the pan. For a 9x13 inch crust, double the ingredients.
PHOTO CREDIT: "Introduction." http://www.marthastewart.com/274216/making-decorative-piecrusts/@center/276949/everything-thanksgiving. MarthaStewart.com, n.d. Thursday, October 13, 2011
Saturday, October 08, 2011
Chocolate Cream Pie

This is my idea of pie. No finicky, shortening-filled flaky pastry to mix, chill, roll out, chill, blind bake, and cool. Just a simple chocolate crust I came up with after looking at other crust recipes; more like a shortbread crust. Add the chocolate cream filling and some chocolate buttercream piping decorations, and you've got yourself a wickedly rich and simple chocolate pie!
Easy Chocolate Pie Shell
3/4 cup all-purpose flour
1/4 cup unsweetened cocoa powder
2 Tbsp. light brown sugar, firmly packed
1/4 tsp. salt
1/4 tsp. baking powder
1/2 cup hard margarine, cut into pieces
3 Tbsp. cold water
Preheat oven to 400◦F. In a medium bowl, stir together the flour cocoa, sugar, salt, and baking powder. Using a pastry bender (or two knives or your fingers) cut in the margarine until mixture is crumbly. Sprinkle water over top, work into a ball. Turn out onto a piece of waxed paper, and gently press it out into a circle, slightly larger than your 9-inch pie plate, using your hands. Gently lift it into the pie plate and press it down to fit. Prick with the tines of a fork all over. Bake for 10 minutes until firm.
Chocolate Cream Pie
1 baked 9-inch pie crust
1 1/4 cups granulated sugar
1/2 cup unsweetened cocoa powder
1/3 cup cornstarch
1/4 tsp. salt
1 can (2 cups) 2% evaporated milk
1 cup fresh 1% milk
1 1/2 tsp. vanilla extract
3 Tbsp. hard margarine, cubed
In a medium saucepan, mix the sugar, cocoa, cornstarch, and salt. Gradually add the milk, stirring until smooth. Bring to a boil over medium-high heat, stirring constantly. Boil for one minute until very thick.
Remove from heat and stir in the vanilla and butter. Spoon into prepared crust. Press plastic wrap directly onto the surface of the pie filling, cool to room temperature. Refrigerate for at least six hours or overnight. Garnish as desired, and keep pie stored in the fridge.
West Side Publishing. "Hershey's Cocoa Cream Pie." Recipe. Hershey's Classic Recipes, Lincolnwood Illinois: Publications International, Limited, 2009. 295.
Subscribe to:
Posts (Atom)