
Tuesday, January 22, 2013
Potato Pork Casserole
The other day we decided to try something a little different for supper. Since pork chops were on sale, we decided to try a pork dish. We don't typically eat pork all that often. I am not a huge pork fan myself, but if pork chops are cooked tender enough so that they aren't tough and dry, I enjoy them. My mother remembered a simple pork casserole recipe she used to make years ago, which my father found and decided to make. The recipe is simple, just lay out pork chops in a casserole dish, layer them with sliced potatoes, cheese, and pour one can of cream of mushroom soup over top. My father did do a few things differently though. He pre-browned the pork chops, just fr a bit of extra flavor and to ensure they cooked, just five minutes per side. He also used a block of fresh cheese cut up, instead pf just slices. The original recipe serves four and calls for four pork chops, but he cooked six. The recipe turned out quite well, except for the potatoes. I guess they should have been sliced thinner, because after being in the oven for an hour at 325◦F immersed in bubbling sauce with the pork chops, they were still very hard. The pork was cooked perfectly at this point, but not the potatoes. Fifteen more minutes of cooking was only drying out the pork, and doing nothing for the potatoes, so they had to be microwaved separately. However, once together, the dish was quite tasty, and the pork chops were certainly tender and moist. The dish would have been even better with some fried onions and mushrooms added to the sauce. So next time, we will either make the potatoes really thin, or parboil them beforehand.


Monday, January 21, 2013
Chocolate Nutella Frosting
This Chocolate Nutella Frosting recipe pairs perfectly with the Nutella Chocolate Cake. The Nutella flavor in it is prevalent, but not overwhelmingly strong. If you want a sweeter, less greasy frosting, use less butter and more icing sugar. If you would like a smoother frosting, add a little more milk (chocolate milk works great!) If you would like a darker, more Nutella-y frosting, simply add more Nutella. If you want it to be a little chocolatier and dark, you can also add a little cocoa powder. Anyway, this is a delicious frosting that would work well on a variety of different cake types! Pictured below is the dark chocolate version, made with a spoonful of extra Nutella, a spoonful of cocoa, and a splash of chocolate milk. It is delicious by the spoonful, like it is eaten here, and not just on cake!
Chocolate Nutella Frosting
1/3 cup butter, softened
1/2 cup Nutella
3 cups icing (confectioners') sugar
2 Tablespoons milk
In a medium bowl, mix the butter and Nutella together until well blended. Gradually stir in the icing sugar, adding the milk as needed. Add enough milk to achieve the desired spreading consistency.

Chocolate Nutella Frosting
1/3 cup butter, softened
1/2 cup Nutella
3 cups icing (confectioners') sugar
2 Tablespoons milk
In a medium bowl, mix the butter and Nutella together until well blended. Gradually stir in the icing sugar, adding the milk as needed. Add enough milk to achieve the desired spreading consistency.

Sunday, January 20, 2013
8-Bit Pixel Designs
This is a follow-up post to the cake from yesterday. It is a bit more commentary on the type of design. As I said yesterday, the design for the Link cake, as well as the Minecraft Creeper cake, came from a sprite, which refers to a computer pixel image of blocks. These pictures can easily be searched online and are available fro a wide range of different video game, television show, movie, book, and other characters. You can create your own sprite as well, but this is a bit more difficult than using one already made. Once you have found the sprite you would like to use, you might just want to do a little more preparation work. You may want to count the number of rows and columns, and number or letter them, or perhaps number each individual square. Decide on the size each square will be. The squares in my Minecraft cake ere 2cm x 2cm, but I had to make the squares on my Link cake smaller, 1.5cm x 1.5cm because there are more squares in this design, and 2cm x 2cm squares would not have fit. This is why planning ahead is important. This also gave me an extra row of squares on the right, but it isn't too noticeable, and I was able to write Happy Birthday at the bottom. You may want to count how many of each color square there are, in order to prepare enough icing. Printing out the sprite is the best bet for reference, you don't need it to be the actual size, just big enough to pick out the details.
These designs works very well on rectangular cakes, but they also work nicely with cookies. Just use a basic sugar cookie dough, and tint the dough different colors as needed (and/or make a chocolate dough as well). Baking the dough as a rectangular and cutting into squares after baking will yield more uniform squares. Though I have learned from my Sudoku Cookie Puzzle (July 13th, 2012) that perfect squares in cookies are still difficult to achieve Be sure to use a cookie dough that isn't too crumbly. Then assemble the cookies on a tray according to the sprite. This is a slightly easier and less messy technique than icing a cake, and still looks really good!
These designs works very well on rectangular cakes, but they also work nicely with cookies. Just use a basic sugar cookie dough, and tint the dough different colors as needed (and/or make a chocolate dough as well). Baking the dough as a rectangular and cutting into squares after baking will yield more uniform squares. Though I have learned from my Sudoku Cookie Puzzle (July 13th, 2012) that perfect squares in cookies are still difficult to achieve Be sure to use a cookie dough that isn't too crumbly. Then assemble the cookies on a tray according to the sprite. This is a slightly easier and less messy technique than icing a cake, and still looks really good!
Saturday, January 19, 2013
Link Cake

To make this cake, I began with a rectangular chocolate Nutella cake. I started by dirty-icing the entire cake in chocolate Nutella icing. I marked out a pattern of squares, each 1.5cm x 1.5cm in the icing, using a ruler. I used a basketweave tip turned upside down, so that the lines (or basket weave) would not show to pipe the different colors into the pattern of squares. Essentially, this made just a flat tip. I piped straight lines to fill in all of the squares. I did one color at a time, as I only have one basketweave tip, and needed to clean it between different colors. This was a fairly simple cake to make. The piping was not difficult, as it consisted simply of lines and squares. It was a very fun cake to make though, and although it may seem a bit tedious, I didn't find that at all. I finished off with a simple zigged border around the bottom edge and a reversed shell border around the top edge. I had just enough room under the Link character to write Happy Birthday.
Friday, January 18, 2013
Nutella Chocolate Cake
I recently received a inquiry with regards to a chocolate cake made with Nutella, or chocolate hazelnut spread. Why not? Nutella is delicious and chocolaty and why not use it in a cake? There must be some good Nutella chocolate cake recipe somewhere! So I searched online, and of course just like anything you search online, I found several results. Many were rich, souffle-like cakes or tortes. Most of them also incorporated more hazelnuts to complement the Nutella. I am planning on decorating this cake, so I just wanted a plan cake I could ice. Here is the recipe I used for my Nutella chocolate cake.
Nutella Chocolate Cake
2 cups all-purpose (plain) flour
3/4 cup unsweetened cocoa powder
1 teaspoon baking soda
1/2 teaspoon salt
3/4 cup butter, softened
2 cups granulated (white) sugar
3 large eggs
1 1/2 cups milk
3/4 cup Nutella
2 teaspoons vanilla extract
Preheat oven to 350◦F. Grease and flour or line with parchment paper two nine inch round pans or one rectangular 9x13 inch pan.
In a medium-sized bowl, mix the first four dry ingredients.
In a separate large bowl, beat the butter. Add the sugar and beat until light and fluffy. Add the eggs, one at a time, beating well after each addition. Beat in the dry ingredients, adding a little of the milk with them. Add remaining ingredients and beat well until smooth. Pour batter into prepared pan(s) and bake for 30-40 minutes or so, depending on the pan, until a toothpick inserted in the center comes out clean.

Nutella Chocolate Cake
2 cups all-purpose (plain) flour
3/4 cup unsweetened cocoa powder
1 teaspoon baking soda
1/2 teaspoon salt
3/4 cup butter, softened
2 cups granulated (white) sugar
3 large eggs
1 1/2 cups milk
3/4 cup Nutella
2 teaspoons vanilla extract
Preheat oven to 350◦F. Grease and flour or line with parchment paper two nine inch round pans or one rectangular 9x13 inch pan.
In a medium-sized bowl, mix the first four dry ingredients.
In a separate large bowl, beat the butter. Add the sugar and beat until light and fluffy. Add the eggs, one at a time, beating well after each addition. Beat in the dry ingredients, adding a little of the milk with them. Add remaining ingredients and beat well until smooth. Pour batter into prepared pan(s) and bake for 30-40 minutes or so, depending on the pan, until a toothpick inserted in the center comes out clean.

Thursday, January 17, 2013
Baking Soda & Baking Powder
Baking soda and baking powder are both
chemical leavening agents, they make baked goods that rise in a short amount of
time in the oven. Unlike yeast, which is a fungi and needs time to ferment in
order for baked goods to rise, chemical leaveners do not need time to ferment,
they simply enlarge air bubbles present in the batter due to the creaming of
ingredients. Both baking soda and baking powder are composed primarily of
sodium bicarbonate, but baking powder also contains added cream of tartar. You
can even make your own homemade baking powder from baking soda, by mixing two
parts of cream of tartar to one part of baking soda. Sometimes an equal amount
of cornstarch to baking soda is added to absorb any unnecessary moisture in the
batter so no reactions take place before a liquid is added.

Baking soda is used alone when an acidic
ingredient is present in the batter. These ingredients include vinegar, citrus
juice, cocoa, buttermilk, sour cream, and yogurt. The sodium bicarbonate and
the acid react when mixed, producing many bubbles (think of baking soda
dissolved in water). Baking soda is generally used in batter that is to be
baked immediately and at lower temperatures for shorter baking times, such as
pancakes and cookies. Too much baking soda leaves a soapy taste and coarse
texture in baked goods. It also turns batters with cocoa slightly red, which is
where Devil’s Food Cake came from. Baking soda can be stored indefinitely,
and is also useful for many other household needs, such as cleaning and
deodorizing.
Most baking powders are double-acting,
meaning reactions take place in two stages. The first stage occurs when the
baking powder is moistened with liquid in the batter. The second stage occurs
in the heat of the oven when the gas bubbles begin to expand. Baking powder can
be used at higher temperatures for longer amounts of time, such as muffins and
biscuits. Too much baking powder in a batter can result in a bitter taste and
tough texture, as well as a quick rise and collapse. Baking powder loses its
effectiveness after a year or so.
You can sometimes use baking powder in
place of baking soda, but not vice versa. A combination of baking powder and
baking soda (usually the majority being powder) is often used in baked goods
that are baked at a high heat or for a long time, but also contain an acidic
ingredient, such as cakes and loaves. Always measure baking powder and baking
soda precisely, and use the one called for in the recipe, otherwise the results
may be disappointing.

PHOTO CREDIT:"DSC_9787"
http://bakingbites.com/2012/06/what-is-the-difference-between-baking-powder-and-baking-soda/ .Baking Bites, n.d. Wednesday, August 22, 2012.
Wednesday, January 16, 2013
The Pursuit of Pleasure
Food brings pleasure to a lot of people. Especially when it's really good food. And even if the pleasure is only temporary. I recently read a true story about a woman who traveled to Italy for four months in a pursuit of pleasure. Food was not the only thing that brought her pleasure during her vacation, as she also found great pleasure in learning Italian, however food was the main thing. It is true that something really delicious, whether it is a chocolate dessert, a fancy turkey dinner, or a really well-made sandwich, or something as simple as a scoop of ice cream, will bring us pleasure to eat. These foods are aesthetically pleasing, they have an enticing aroma, and they taste just oh so good. We would all love to be able to eat whatever we want, as much as we want, but that just is not reality. Sure, some of us seem to be able to consume copious amounts of junk food without experiencing any negative effects, but for the most part, we must eat a nutritious and balanced diet. That being said, there is no reason as to why we cannot take pleasure in eating healthy goods as well. Healthy foods can be delicious too! Some of my favorite foods are quite healthy, I really take pleasure in eating (or drinking) bananas, pineapple, strawberries (okay, just about any fruit), corn on the cob, chocolate milk, Greek yogurt, smoked salmon, peanut butter, and whole grain bread. There are also many foods considered as junk food that can actually be pretty healthy, and definitely pleasurable, such as pizza, dark chocolate, lasagna, and burgers. And of course, any food is fine enjoyed in moderation. We can (and definitely must) enjoy a treat every once in a while, or even a treat everyday if it is kept small, such as cake, pie, burgers and fries, fondue, whatever you take pleasure in eating! It is fine to celebrate and eat!
What I found quite amusing in the story I read, was that the woman was on a self-proclaimed "No Carb Left Behind" tour. It is true that in Italy they seem to eat a lot of pizza, pasta, and bread. But Italian obesity and health rates aren't particularly bad, because they know how to balance pleasure with nutrition and health! This woman simply ate everything she wanted on this vacation, as much as he wanted, stopping at every bakery or gelato stand or pizzeria that looked good, stuffing herself beyond full. Did she gain weight? For sure, but for her it was worth it. Now, I am not encouraging this type of behavior, and I believe we can find pleasure in food without consuming such gross excess such as this. But traveling is a good excuse to expand your horizons, try new foods, and find pleasure in them. And maybe eat a little more than you normally would, because hey, you may only get to visit (insert place name here) once in your lifetime, and you want to really get a cultural feel for the place which can be achieved very well through samples of the local cuisine. Plus, you often do a lot of walking or other activity on vacation, so you'll probably work it of anyway. Finding pleasure in food and balance in nutrition is what it is all about. I myself actually find a lot of pleasure in preparing food for other people (and myself) to enjoy, and watching the pleasure they experience when they try a piece of my baking!
What I found quite amusing in the story I read, was that the woman was on a self-proclaimed "No Carb Left Behind" tour. It is true that in Italy they seem to eat a lot of pizza, pasta, and bread. But Italian obesity and health rates aren't particularly bad, because they know how to balance pleasure with nutrition and health! This woman simply ate everything she wanted on this vacation, as much as he wanted, stopping at every bakery or gelato stand or pizzeria that looked good, stuffing herself beyond full. Did she gain weight? For sure, but for her it was worth it. Now, I am not encouraging this type of behavior, and I believe we can find pleasure in food without consuming such gross excess such as this. But traveling is a good excuse to expand your horizons, try new foods, and find pleasure in them. And maybe eat a little more than you normally would, because hey, you may only get to visit (insert place name here) once in your lifetime, and you want to really get a cultural feel for the place which can be achieved very well through samples of the local cuisine. Plus, you often do a lot of walking or other activity on vacation, so you'll probably work it of anyway. Finding pleasure in food and balance in nutrition is what it is all about. I myself actually find a lot of pleasure in preparing food for other people (and myself) to enjoy, and watching the pleasure they experience when they try a piece of my baking!
Tuesday, January 15, 2013
Dad's Cinnamon Raisin Bread
On the weekend, I cam home from work to find the enticing aroma of freshly made cinnamon raisin bread. My father decided to do some baking, and try his hand at bread again. My father does not do much baking, although he does do a bit of cooking, but he is very good at it when he does bake! He was talking about how he was disappointed that all of our Panettone from Christmas was gone, so I guess he was craving some fruit bread. It isn't really the season for Panettone anymore, and we didn't have all of the ingredients, plus that is my specialty, so my mother suggested he try his hand at cinnamon raisin bread again. My father has tried to make bread before. Some of his white breads have turned out a little heavy, or dense, or salty, but not all bad. He grew up watching his other make bread on a regular basis, and he had tried to make raisin bread like her recipe before too. That one did not turn out as good as hers, or course. So he decided to try a simple, modern recipe. I am happy to report that this one turned out very well! It yielded too large, beautifully risen loaves of white bread flavored with cinnamon and speckled with soft raisins. The bread was delicious, soft and fluffy with a nice crust. It is really good warm from the oven, but excellent toasted with a little butter, and perhaps some cheddar cheese if you have it. It makes good sandwiches, breakfast, or snack. I am really happy this bread worked out so well this time, and that I can enjoy eating it. Hopefully Dad will make some again. I love to bake myself, but when time is short and I am busy, I certainly don't mind others baking for me. It is nice to taste other peoples creations for a change, and see their techniques and recipes. And who can resist warm bread from the oven?


Monday, January 14, 2013
Kaisers
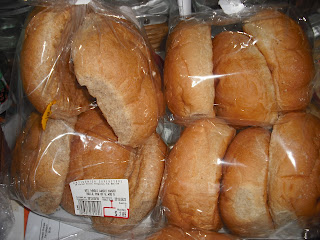
These are the kaiser rolls we used to eat our pulled pork. I didn't make them myself (I would have if I had had the time), but we bought them freshly baked. They come in white, whole wheat, and multigrain, and we tried both the white and the whole wheat. Both types were very light and fluffy, nice big rolls that can hold a lot of pork and absorb the sauce well. They are especially good if you toast them first. Actually, these rolls are good for much more than just pulled pork, they also make really good sandwich buns, rolls to eat with soup, and are especially nice as pizza buns. Just out a little sauce, meat cheese, and vegetables if you wish, and pop them in the oven or toaster oven for a few minutes to toast them and melt the cheese. This is what we did with some if the leftover buns. These buns are especially suited to hold meat, such as beef, pork, chicken, turkey, ham, and cold cuts. They are soft and tasty.

Sunday, January 13, 2013
Pork On A Bun
Here is a supper we recently enjoyed. It is slow cooked pulled pork roast in an apple butter sauce. I am usually not a huge fan of pork, but if it is done right I really enjoy it. And this time, my father certainly did it right. He used the pulled pork recipe our friends gave us after we ate some at their house this summer, and could not stop raving about it. It was so delicious! I believe I featured it a few months ago, when my father tried it the first time in the oven. However, he did not use the same sauce our friends recommended and I did not care all that much for the flavor of the sauce he used. This time my father cooked it long and slow in the slow cooker and used the same sauce as our friends. This time, the pulled pork was much better! It was even more tender and juicy, and the flavor was definitely much better. Here is a picture of it served on a fluffy bun with some sweet potato fries on the side. This is a good dish to make that is not too time consuming or difficult or requires too much prep work, especially when done in the slow cooker. It also just requires a few simple side dishes, like a salad, or vegetables, or potatoes, and a good quality bun. In addition, it is a warming winter dish that fills the house with delicious aromas while it is cooking.


Saturday, January 12, 2013
Glossy Chocolate Frosting
This is the frosting recipe I used for yesterday's Candy Cane Brownies. It is very quick and simply, but chocolaty m fudgey, and delicious. It is also not too sweet and not too buttery, but just right. This makes a good amount for an 8x8 or 9x9 inch pan of squares especially brownies, with a good layer of frosting. It can be doubled for a 9x13 inch pan or a small cake (square or 8-9 inch round). It will also work for cookies and other sweets. For brownies, I whip up this icing while they are baking, and spread it on as soon as they come out of the oven. This typically is not a good idea, but works in this case, giving the brownies a nice, glossy shine, and adding another fudgey layer. Just be careful to spread the icing evenly without lifting up pieces of the brownie. And do not try to cut them until they are at least nearly cooled, tempting as it may be. However, frosting warm cakes and some other squares with this frosting is not advisable.
Glossy Chocolate Frosting
3 Tablespoons butter or hard margarine
1/3 cup cocoa
1 1/3 cups icing (powdered) sugar
2 Tablespoons water, or hot coffee
Put all ingredients in a small bowl, and mix until smooth. Add a little more water or sugar as necessary for desired spreading consistency.
This frosting does not need to be kept refrigerated if made with margarine. For a richer frosting, milk may be used as the liquid, but this will need to be refrigerated. A little vanilla, mint, or other extract may be added for more flavor.
Glossy Chocolate Frosting
3 Tablespoons butter or hard margarine
1/3 cup cocoa
1 1/3 cups icing (powdered) sugar
2 Tablespoons water, or hot coffee
Put all ingredients in a small bowl, and mix until smooth. Add a little more water or sugar as necessary for desired spreading consistency.
This frosting does not need to be kept refrigerated if made with margarine. For a richer frosting, milk may be used as the liquid, but this will need to be refrigerated. A little vanilla, mint, or other extract may be added for more flavor.
Friday, January 11, 2013
Candy Cane Brownies
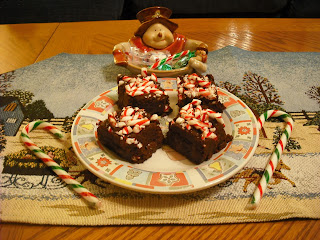
Here is my first attempt at getting rid of leftover candy canes: candy cane brownies. I figured a chocolate brownie with chocolate chips and a chocolaty frosting would help mask a few candy canes. I did not want to put the candy canes in the actual brownie batter, as this may make the brownies unpleasantly crunchy and sticky, but rather just use them as a garnish on top. That way the candy canes may be picked off as well, if they are really unwanted (although that kind of defeats the purpose of the recipe and not wasting candy canes). I could have added a little mint extract to the brownie batter to make mint chocolate brownies to match the peppermint flavor on top, but I did not have any mint extract on hand. I think the brownies are tasty just as s though. And the candy canes do make them look nice, if not add to their flavor.
 Candy Cane Brownies
1/3 cup butter or hard margarine, softened
1 cup granulated (white) sugar
2 large eggs
3/4 cup all-purpose (plain) flour
1/2 cup unsweetened cocoa powder
1/4 teaspoon salt
1 cup semi-sweet chocolate chips
frosting
crushed candy canes
Preheat oven to 350◦F. Grease an 8x8 inch square pan or line with with parchment paper.
In a large bowl, beat the butter and sugar until light and fluffy. add the eggs separately, beating well after each addition. Add the flour, cocoa, and salt, stir well. Stir in chocolate chips. Spread batter into prepared pan, as evenly as possible. Bake for exactly twenty minutes.
Frost with chocolate frosting. I frosted them right after they came out of the oven, for a glossy look, but this does not work well with all frostings. You can also use a vanilla frosting, or cream cheese, or peppermint, or whatever you would like. Before the icing dries, sprinkle the brownies with chopped up or crushed candy canes (make the pieces fairly small, or crush completely). Use as much or as little candy cane as you like.
This recipe looked and sounded good, but during the process I became a little skeptical. After adding the dry ingredients, the batter became very stiff. I mean, I have made cookies from dough that was less stiff than this. I thought the amount of butter was a little low, but I rolled with it, hoping the brownies would not turn out dry. Luckily, they didn't at all. The key is not to overbake them. The chocolate chips also softened into the batter,m rather than becoming hard as in some brownies, and added to the chocolatyness. These are especially good and fudgey when still slightly warm. They may not be as good as other brownie recipes I have made, but still good nonetheless.

1/3 cup butter or hard margarine, softened
1 cup granulated (white) sugar
2 large eggs
3/4 cup all-purpose (plain) flour
1/2 cup unsweetened cocoa powder
1/4 teaspoon salt
1 cup semi-sweet chocolate chips
frosting
crushed candy canes
Preheat oven to 350◦F. Grease an 8x8 inch square pan or line with with parchment paper.
In a large bowl, beat the butter and sugar until light and fluffy. add the eggs separately, beating well after each addition. Add the flour, cocoa, and salt, stir well. Stir in chocolate chips. Spread batter into prepared pan, as evenly as possible. Bake for exactly twenty minutes.
Frost with chocolate frosting. I frosted them right after they came out of the oven, for a glossy look, but this does not work well with all frostings. You can also use a vanilla frosting, or cream cheese, or peppermint, or whatever you would like. Before the icing dries, sprinkle the brownies with chopped up or crushed candy canes (make the pieces fairly small, or crush completely). Use as much or as little candy cane as you like.
This recipe looked and sounded good, but during the process I became a little skeptical. After adding the dry ingredients, the batter became very stiff. I mean, I have made cookies from dough that was less stiff than this. I thought the amount of butter was a little low, but I rolled with it, hoping the brownies would not turn out dry. Luckily, they didn't at all. The key is not to overbake them. The chocolate chips also softened into the batter,m rather than becoming hard as in some brownies, and added to the chocolatyness. These are especially good and fudgey when still slightly warm. They may not be as good as other brownie recipes I have made, but still good nonetheless.
Thursday, January 10, 2013
Leftover Candy Canes
Well Christmas is over, many of the decorations have been taken down, and life is returning back to normal. Except for the candy canes. There is still an overabundance of candy canes around the house. Somehow, we always end up with extra candy canes after Christmas time. Sure, during the holiday season, they look nice as decorations on the tree, or additions to the gingerbread house, or a choice in the candy dish, but by the end of Christmas, I am sick of them. It's not like I go through trouble to find them, or buy them, or request them, or even accept free ones, they just find me. They show up anyway somehow, no matter how much you try to avoid them. They are an inevitable part of the season. See, nobody really likes candy canes. Sure, the bring a bit of festive spirit, and you may eat one or two over the holidays, but nobody really devours them, or enjoys eating them in large quantities (no one I know anyway. If you know someone, I will gladly send them all of my candy canes next January). Candy companies have tried making them more appealing by coming out with outrageous flavors and colors; florescent pink, neon orange, gingerbread, chocolate cappuccino, buttered popcorn??? This is even worse because these candy canes certainly are not Christmasy and cannot be used in recipes either! So what to do with all of the leftovers? As annoying as they can be, it is sure a shame to let all of these candy canes go to waste, even if they are only sticks of sugar with a bit of mint flavoring.
 There just aren't many recipes out there that use candy canes. I have looked. And most of them use candy canes simply as a garnish. Last year, I managed to track down a recipe for candy cane biscotti cookies, that I finally got around to making in February (see February 6th). They weren't bad, and did use up 2/3 cup of candy canes (though still not all of them). However, they were a little on the sticky side, and again, tasted like candy canes. People ate my cookies because they were cookies, not because they had candy canes. Last year, these cookies were something new and interesting, but I doubt I could pull off the same recipe this year and still get willing tasters. I need to come up with something new.
I have found a few more recipes using candy canes, all of them also using chocolate and if you smother something with enough chocolate it's got to be good, right? I will feature my first candy cane recipe tomorrow. I have two more up my sleeve, but I'm hoping only to have to resort to one to get rid of the rest of the candy canes. At least I got to it a bit earlier than last year. The worst part of it all is unwrapping the candy canes. They are wrapped so tight and hard to open, and break and crush so easily, and are soo sticky, and the plastic sticks to your hands and clothes and table and couch in a staticy mess. Last year, I almost cried. This year, my mother was kind enough to unwrap the majority of them for me. I think she may have been close to tears too. I don't know who i will be able to enlist next year, as I am sure there will be candy cane leftovers yet again. Oh well, I'll worry about that when the time comes.
PHOTO CREDIT:"Candy-Canes" http://candycane.ws/history/. Candycane.ws, n.d. Wednesday, January 9, 2013.

I have found a few more recipes using candy canes, all of them also using chocolate and if you smother something with enough chocolate it's got to be good, right? I will feature my first candy cane recipe tomorrow. I have two more up my sleeve, but I'm hoping only to have to resort to one to get rid of the rest of the candy canes. At least I got to it a bit earlier than last year. The worst part of it all is unwrapping the candy canes. They are wrapped so tight and hard to open, and break and crush so easily, and are soo sticky, and the plastic sticks to your hands and clothes and table and couch in a staticy mess. Last year, I almost cried. This year, my mother was kind enough to unwrap the majority of them for me. I think she may have been close to tears too. I don't know who i will be able to enlist next year, as I am sure there will be candy cane leftovers yet again. Oh well, I'll worry about that when the time comes.
Wednesday, January 09, 2013
Nutty Cereal Flakes
Nutty Cereal Flakes
3/4 cup whole wheat flour
3/4 cup natural bran
1/4 cup ground almonds
1/4 cup unsweetened shredded coconut
2 Tablespoons ground flaxseed
1/2 teaspoon salt
1 Tablespoon molasses
1 Tablespoon olive oil
1/4 cup water
Preheat oven to 300◦F. Line a baking sheet with parchment paper.
In a bowl, stir together the first six dry ingredients. Add the liquid and mix well, use your hands. Add a little extra water, a teaspoon at a time, if needed, to form a crumbly dough (like shortbread). Press onto the prepared baking sheet, as thin as possible. Bake for about 30 minutes, until dry. Break into flakes.
This is another tasty and easy cereal recipe to do at home. It is hearty, nutty, and delicious.

3/4 cup whole wheat flour
3/4 cup natural bran
1/4 cup ground almonds
1/4 cup unsweetened shredded coconut
2 Tablespoons ground flaxseed
1/2 teaspoon salt
1 Tablespoon molasses
1 Tablespoon olive oil
1/4 cup water
Preheat oven to 300◦F. Line a baking sheet with parchment paper.
In a bowl, stir together the first six dry ingredients. Add the liquid and mix well, use your hands. Add a little extra water, a teaspoon at a time, if needed, to form a crumbly dough (like shortbread). Press onto the prepared baking sheet, as thin as possible. Bake for about 30 minutes, until dry. Break into flakes.
This is another tasty and easy cereal recipe to do at home. It is hearty, nutty, and delicious.

Tuesday, January 08, 2013
Four Grain Bread
Four grain bread isn't a typical name for a bread. Five grain, seven grain, twelve grain, or just multigrain are all common, but four grain is a bit unusual. Oh well, I like this bread because it uses four of my favorite grains that I always have on hand: whole wheat flour, oats, bran, and flax. It is a hearty bread recipe that is fairly easy to do.
Four Grain Bread
3/4 cup warm water
2 teaspoons granulated sugar
1 package instant yeast
2 cups whole wheat flour
1/2 cup old-fashioned rolled oats
1/2 cup natural wheat bran
1/2 cup ground flaxseed
1 teaspoon salt
1 cup milk
1 1/4 cups water
1/4 cup oil
2 Tablespoons honey
2 Tablespoons molasses
3 cups whole wheat flour
In a small bowl, dissolve the sugar and the water. Sprinkle the yeast over top and let stand for ten minutes until frothy. Stir to dissolve yeast.
Meanwhile, in a large bowl, stir together the next five dry ingredients.
In a separate medium bowl, heat the milk and water until very warm. Add the oil, honey, and molasses. Stir in the yeast mixture. Add this to the dry ingredients, mix until smooth.
Gradually add the remaining flour until a soft dough forms. Knead for 8-10 minutes until smooth and elastic.
 Allow to rise until doubled in bulk, about 75 minutes.
Punch dough down. Divided in two. Place in two greased 9x5 inch loaf pans.
Allow to rise until doubled in bulk, about 45 minutes.
Bake at 375◦F for 25 minutes. This bread slices and freezes really well, hence the photo!
Four Grain Bread
3/4 cup warm water
2 teaspoons granulated sugar
1 package instant yeast
2 cups whole wheat flour
1/2 cup old-fashioned rolled oats
1/2 cup natural wheat bran
1/2 cup ground flaxseed
1 teaspoon salt
1 cup milk
1 1/4 cups water
1/4 cup oil
2 Tablespoons honey
2 Tablespoons molasses
3 cups whole wheat flour
In a small bowl, dissolve the sugar and the water. Sprinkle the yeast over top and let stand for ten minutes until frothy. Stir to dissolve yeast.
Meanwhile, in a large bowl, stir together the next five dry ingredients.
In a separate medium bowl, heat the milk and water until very warm. Add the oil, honey, and molasses. Stir in the yeast mixture. Add this to the dry ingredients, mix until smooth.
Gradually add the remaining flour until a soft dough forms. Knead for 8-10 minutes until smooth and elastic.

Punch dough down. Divided in two. Place in two greased 9x5 inch loaf pans.
Allow to rise until doubled in bulk, about 45 minutes.
Bake at 375◦F for 25 minutes. This bread slices and freezes really well, hence the photo!
Monday, January 07, 2013
Chocolate Cheese Coconut Pie
Since I had some extra cream and some extra cream cheese around, I found a recipe that incorporates just the right amount of both. And it is a chocolate pie, and who doesn't like chocolate pie? This recipe is very simple and quick to make as well. It is quite rich, so cut pieces small.
 Chocolate Cheese Coconut Pie
9 inch pie shell
1 cup whipping cream
1 package (8 ounces/20 grams) cream cheese, cut into cubes
1 cup semi-sweet chocolate chips
1 teaspoon vanilla extract
1/2 cup flaked coconut
Preheat oven to 350◦F. In a medium saucepan over medium heat, heat the cream and cream cheese until mixture is melted and almost completely smooth. Add the chocolate and vanilla, continue heating until melted and smooth. Stir in the coconut. Pour into prepared pie shell. Bake for about 35 minutes. Pie will set upon cooling. Cool, then chill in the refrigerator for a few hours before serving.
For this recipe, I used a homemade shortbread pie crust. I patted enough of the mixture into the pan to make a pie shell, then I sprinkled a bit of the extra on top of the chocolate filling around the edge before baking for a little extra shortbread crumble.

9 inch pie shell
1 cup whipping cream
1 package (8 ounces/20 grams) cream cheese, cut into cubes
1 cup semi-sweet chocolate chips
1 teaspoon vanilla extract
1/2 cup flaked coconut
Preheat oven to 350◦F. In a medium saucepan over medium heat, heat the cream and cream cheese until mixture is melted and almost completely smooth. Add the chocolate and vanilla, continue heating until melted and smooth. Stir in the coconut. Pour into prepared pie shell. Bake for about 35 minutes. Pie will set upon cooling. Cool, then chill in the refrigerator for a few hours before serving.
For this recipe, I used a homemade shortbread pie crust. I patted enough of the mixture into the pan to make a pie shell, then I sprinkled a bit of the extra on top of the chocolate filling around the edge before baking for a little extra shortbread crumble.
Sunday, January 06, 2013
Multigrain Triangle Breads
Multigrain Triangle Breads
2 cups warm water
2 teaspoons granulated (white) sugar
1 package instant yeast
1 1/2 Tablespoons olive oil
1 teaspoon salt
1/2 cup natural wheat bran
1/2 cup ground flaxseed
3 cups whole wheat flour
In a large bowl, dissolve the sugar in the water. Sprinkle the yeast over top and let stand for ten minutes until frothy. Whisk in oil and salt. Stir in bran, flax, and 2 1/2 cups flour. Knead for 8-10 minutes, adding remaining flour as necessary. Let rise for 45 minutes until doubled in bulk OR refrigerate dough for up to one day in a greased plastic bag, bring to room temperature, then allow to rise (dough may expand slightly in the fridge).
Punch dough down, knead into a ball, then flatten into a circle approximately 1/4 inch thick. Cut into 16 triangles stretching them as necessary to thin them to uniform shape. Place on parchment lined baking sheets, cover, and let rest for 15 minutes. Bake in batches at 425◦F for about 12 minutes, until golden.
 This is my own take on a middle eastern flatbread recipe. I think these beads are very tasty and pretty simple to make compared to many other flatbread recipes. The are a nice mixture of grains and are tasty for breakfast, a small lunch, or as a side for supper. My father describes these as "parsnip-shaped" rather than triangular, but what can you do?
2 cups warm water
2 teaspoons granulated (white) sugar
1 package instant yeast
1 1/2 Tablespoons olive oil
1 teaspoon salt
1/2 cup natural wheat bran
1/2 cup ground flaxseed
3 cups whole wheat flour
In a large bowl, dissolve the sugar in the water. Sprinkle the yeast over top and let stand for ten minutes until frothy. Whisk in oil and salt. Stir in bran, flax, and 2 1/2 cups flour. Knead for 8-10 minutes, adding remaining flour as necessary. Let rise for 45 minutes until doubled in bulk OR refrigerate dough for up to one day in a greased plastic bag, bring to room temperature, then allow to rise (dough may expand slightly in the fridge).
Punch dough down, knead into a ball, then flatten into a circle approximately 1/4 inch thick. Cut into 16 triangles stretching them as necessary to thin them to uniform shape. Place on parchment lined baking sheets, cover, and let rest for 15 minutes. Bake in batches at 425◦F for about 12 minutes, until golden.

Saturday, January 05, 2013
Potato Grain Bread
I found this recipe in my Company's Coming "The Potato Book". I am always looking for new whole wheat bread recipes to try, and I was cooking some potato anyway, so I figured this would be an interesting recipe to try. The list of ingredients may be a bit long, but the process is rather easy.It makes two beautiful, hearty loaves of bread that slice really well and are great for sandwiches The bread is a little on the dense side, probably because of the potatoes, as it certainly was not due to a lack of rising. Other than that, it is great Of course I used all whole wheat flour and no all-purpose (white) flour. It is surprising that I did not add some ground flaxseed too.
Potato Grain Bread
1 cup all-purpose (plain) flour
1 cup whole wheat flour
1/2 cup all-bran cereal
1/2 cup rolled oats (not instant)
2 Tablespoons granulated (white) sugar
1 package instant yeast
2 teaspoons salt
2 cups very warm water
1/4 cup milk
1/3 cup molasses
1/4 cup butter or hard margarine
1 cup mashed potatoes
4 1/2 cups all-purpose (plain) flour, approximately
 In a large bowl, stir together the first seven dry ingredients. Make a well in the center.
Meanwhile in a medium saucepan, heat the next five ingredients until very warm and margarine is melted. Add to well, beat for two minutes. Work in enough remaining flour and knead for 8-10 minutes until smooth and elastic. Allow to ruse for 75 minutes, until doubled in bulk.
Punch dough down, divide in half. Shape into two loaves. Place each in a greased 9x5 inch loaf pan. Let rise for 45 minutes until doubled in bulk.
Bake at 375◦F for 35 to 40 minutes, covering the tops with foil for the last ten minutes if needed to avoid over-browning.
Paré, Jean. "Brown Grain Bread." Recipe. The Potato Book, Edmonton Alberta: Company's Coming Publishing Limited, 2004. 24.
Potato Grain Bread
1 cup all-purpose (plain) flour
1 cup whole wheat flour
1/2 cup all-bran cereal
1/2 cup rolled oats (not instant)
2 Tablespoons granulated (white) sugar
1 package instant yeast
2 teaspoons salt
2 cups very warm water
1/4 cup milk
1/3 cup molasses
1/4 cup butter or hard margarine
1 cup mashed potatoes
4 1/2 cups all-purpose (plain) flour, approximately

Meanwhile in a medium saucepan, heat the next five ingredients until very warm and margarine is melted. Add to well, beat for two minutes. Work in enough remaining flour and knead for 8-10 minutes until smooth and elastic. Allow to ruse for 75 minutes, until doubled in bulk.
Punch dough down, divide in half. Shape into two loaves. Place each in a greased 9x5 inch loaf pan. Let rise for 45 minutes until doubled in bulk.
Bake at 375◦F for 35 to 40 minutes, covering the tops with foil for the last ten minutes if needed to avoid over-browning.
Paré, Jean. "Brown Grain Bread." Recipe. The Potato Book, Edmonton Alberta: Company's Coming Publishing Limited, 2004. 24.
Friday, January 04, 2013
Heart Drag Design

To make this design, a flat plate with a bit of a rim works best. Spoon the bottom sauce n to the plate in a layer thin enough to just cover. Spread it out in a neat circle. Now place drops of the other sauce a little bit in from the edge of the plate at even intervals. It does not to be exact, and depends on the size of the plate of course. Two really good tools to do this are eye-droppers, which dispense a tiny bit of liquid and are very accurate, and a squeeze bottle. Squeeze bottles are often used for candy making and dessert presentation. They are plastic bottles with small opens that are used to dispense sauces and candy melts. I used the latter. Once you have both sauces on the plate the e\next part is easy and fun. Take a toothpick and place it in the bottom sauce between two dots. Then drag the toothpick through the middle of each dot, and don't left the toothpick up until you have gone all the way around the plates. This will turn the dots into hearts. This is pretty simple, but looks quite professional. I used a sauce that stayed liquid in the fridge, so I was able to prepare my plates a few hours in advance. Although the sauce may have been easier to eat if it had hardened a bit! Don't prepare them too early though, because the hearts could melt into the bottom sauce. And be careful carrying them to the table, if you tip the plate a little the hearts could run. This design works well with small desserts that can be placed in the center of the circle of hearts.

Thursday, January 03, 2013
Chocolate Éclairs

Chocolate Whipped Cream
1/2 cup whipping cream
1/4 cup granulated (white) sugar
1 Tablespoon unsweetened cocoa powder
1 teaspoon vanilla extract
Whip the cream in a bowl, gradually adding the sugar as eating. Once stiff, fold in the vanilla and cocoa.
Chocolate Sauce
1/2 cup granulated (white) sugar
1/4 cup unsweetened cocoa powder
1/2 Tablespoon cornstarch
pinch salt
1 cup boiling water
1 teaspoon vanilla extract
In a medium saucepan, stir the first four dry ingredients. Stir in the water and vanilla. Heat until boiling, stirring often, then boil for three minutes. Remove from heat. Let cool slightly before using. Good warm or cold. Store leftovers in the refrigerator.
Subscribe to:
Posts (Atom)