Showing posts with label brownie. Show all posts

Tuesday, May 03, 2016

Quick Nutella Brownie In A Mug

Quick Nutella Brownie In A Mug
1/4 cup all-purpose (plain) flour
1/8 cup granulated (white) sugar
1/8 cup unsweetened cocoa powder
1/8 cup oil
pinch salt
splash vanilla extract
1 large scoop nutella (definition of 'large' is at your discretion)

Mix all ingredients together well, spoon into a greased microwave-safe mug, and microwave on HIGH (100% power) for 90 seconds or until cake if firm.Top with another large scoop of nutella.
VERY IMPORTANT: Try to let it cool before serving!!! It will be hard to resist but it will also be extremely hot. 

Wednesday, January 27, 2016

Vegan Chocolate Brownie In A Mug

Wednesdays have been throwing me off lately. I try to stay at least one day ahead on blog posts, so a post is ready to go if I am busy one day and I can just hit 'publish'. But for some reason I never have them ready for Wednesdays. I prepr on the weekend, and on Thursday, but Wednesdays? I know I am busy on Wednesdays and get home very late. But here it is now, just before tomorrow and I haven't put a post up yet. 

Here's something quick; simple but delicious. A good choice for those humpday Wednesdays when you just need a chocolate fix to get you through the rest of the week, but don't have time for effort. In less than five minutes you can make, cook, and eat this delicious, and healthy brownie option.

Individual Vegan Microwave Chocolate Brownie
1/4 cup whole wheat flour (can use plain or probably a gluten-free option)
2 Tablespoons unsweetened cocoa powder
1 Tablespoon nut butter
1 Tablespoon blackstrap molasses (or sub maple syrup for a sweeter taste)
2 Tablespoons non-dairy milk
optional: splash vanilla or preferred extract, sprinkle of cinnamon, dash of chocolate chips or chopped nuts

Mix all ingredients together well. I find this works better if you do this in a small bowl, then transfer the mixture to a small, microwave-safe mug, but if you only want to dirty one dish, you can mix it right in the mug. Microwave on HIGH (100% power). I LOVE my brownies ooey and gooey, so I only microwaved for 30 seconds. If you prefer a more cake-like brownie, microwave for up to two minutes. I recommend cooking it in thirty second intervals and checking to see how set it is. 

I topped my brownie with quick chocolate sauce (cocoa powder and molasses heated until smooth) and cashew coconut butter. A yummy afternoon snack!

Sunday, December 27, 2015

Ultimate Brownie Skillet

Ultimate Brownie Skillet
1/2 cup oil of choice (canola, coconut, vegetable)
3/4 cup sugar of choice (granulated, coconut, brown, date)
1 teaspoon vanilla extract
3/4 teaspoon baking powder
1/2 teaspoon salt (or less if you use salted caramel)
1/2 cup unsweetened cocoa powder
3/4 cup flour of choice (all-purpose, whole wheat, oat, spelt)
2 large flax eggs (2 Tablespoons ground flaxseed mixed with 1/3 cup water, let stand a few minutes)
1/4 cup dark chocolate chips
1/4 cup chips of choice (semisweet, peanut butter, white chocolate)
Other optional add-ins (about 1/4 cup): chopped nuts, nutella, peanut butter, chopped chocolates or candies

Peanut butter caramel
Dark chocolate sauce
Maple caramel sauce
Ice cream of choice (vanilla, chocolate, non-dairy)

Preheat oven to 325◦F. Generously oil a ten inch cast iron skillet.
In a large bowl, mix together the oil, sugar, vanilla, baking powder, and salt. Add the cocoa, flour, and eggs, and mix all together. Then stir in the chips and add-ins.
This will not seem like very much batter, but spoon it into the prepared pan, then press it out with the palm of your hand so it forms a thin layer covering the entire bottom of the pan. Bake for 20 minutes until the edges seem a bit dry and firm. The brownie will still appear to be very soft.

Place the brownie on the stovetop, and let it sit for at least ten minutes. Carryover cooking will occur and the brownie will firm up a bit. If you don't mind a really ooey-gooey soft brownie that will not hold its shape in nice pieces when cut from the pan, and you don't mind burning your tongue, you can dig in straight away! If you want a brownie with more of a baked brownie texture and a piece you can actually slice, wait up to twenty minutes, the brownie will stay plenty warm. Don't leave the brownie in the pan much longer than forty minutes if you have any leftovers (leftovers, good one!), as the brownie will continue cooking and if you plan to reheat leftovers, it will overbake. 

Use a plastic or rubber or wooden utensil to cut pieces of the brownie and serve it - the brownie is very soft anyway, and a knife or metal utensil will scratch the pan. Serve the brownie with peanut butter caramel (recipe will follow), dark chocolate sauce (recipe will follow), maple caramel sauce (recipe will follow), and ice cream, or desired toppings.
I made this as part of my brother's Christmas present - at his request - and I really jazzed it up for him. He loved it! I began with a vegan brownie recipe, even subbing oil for the margarine because the only margarine I could find contains whey powder. Then I discovered the chocolate chips also contain milk ingredients. So everything else is vegan (the brownie batter without the add-ins, the peanut butter caramel, the chocolate sauce, and the maple caramel), but then I served it with vanilla ice cream for him since he isn't vegan.

Wednesday, October 07, 2015

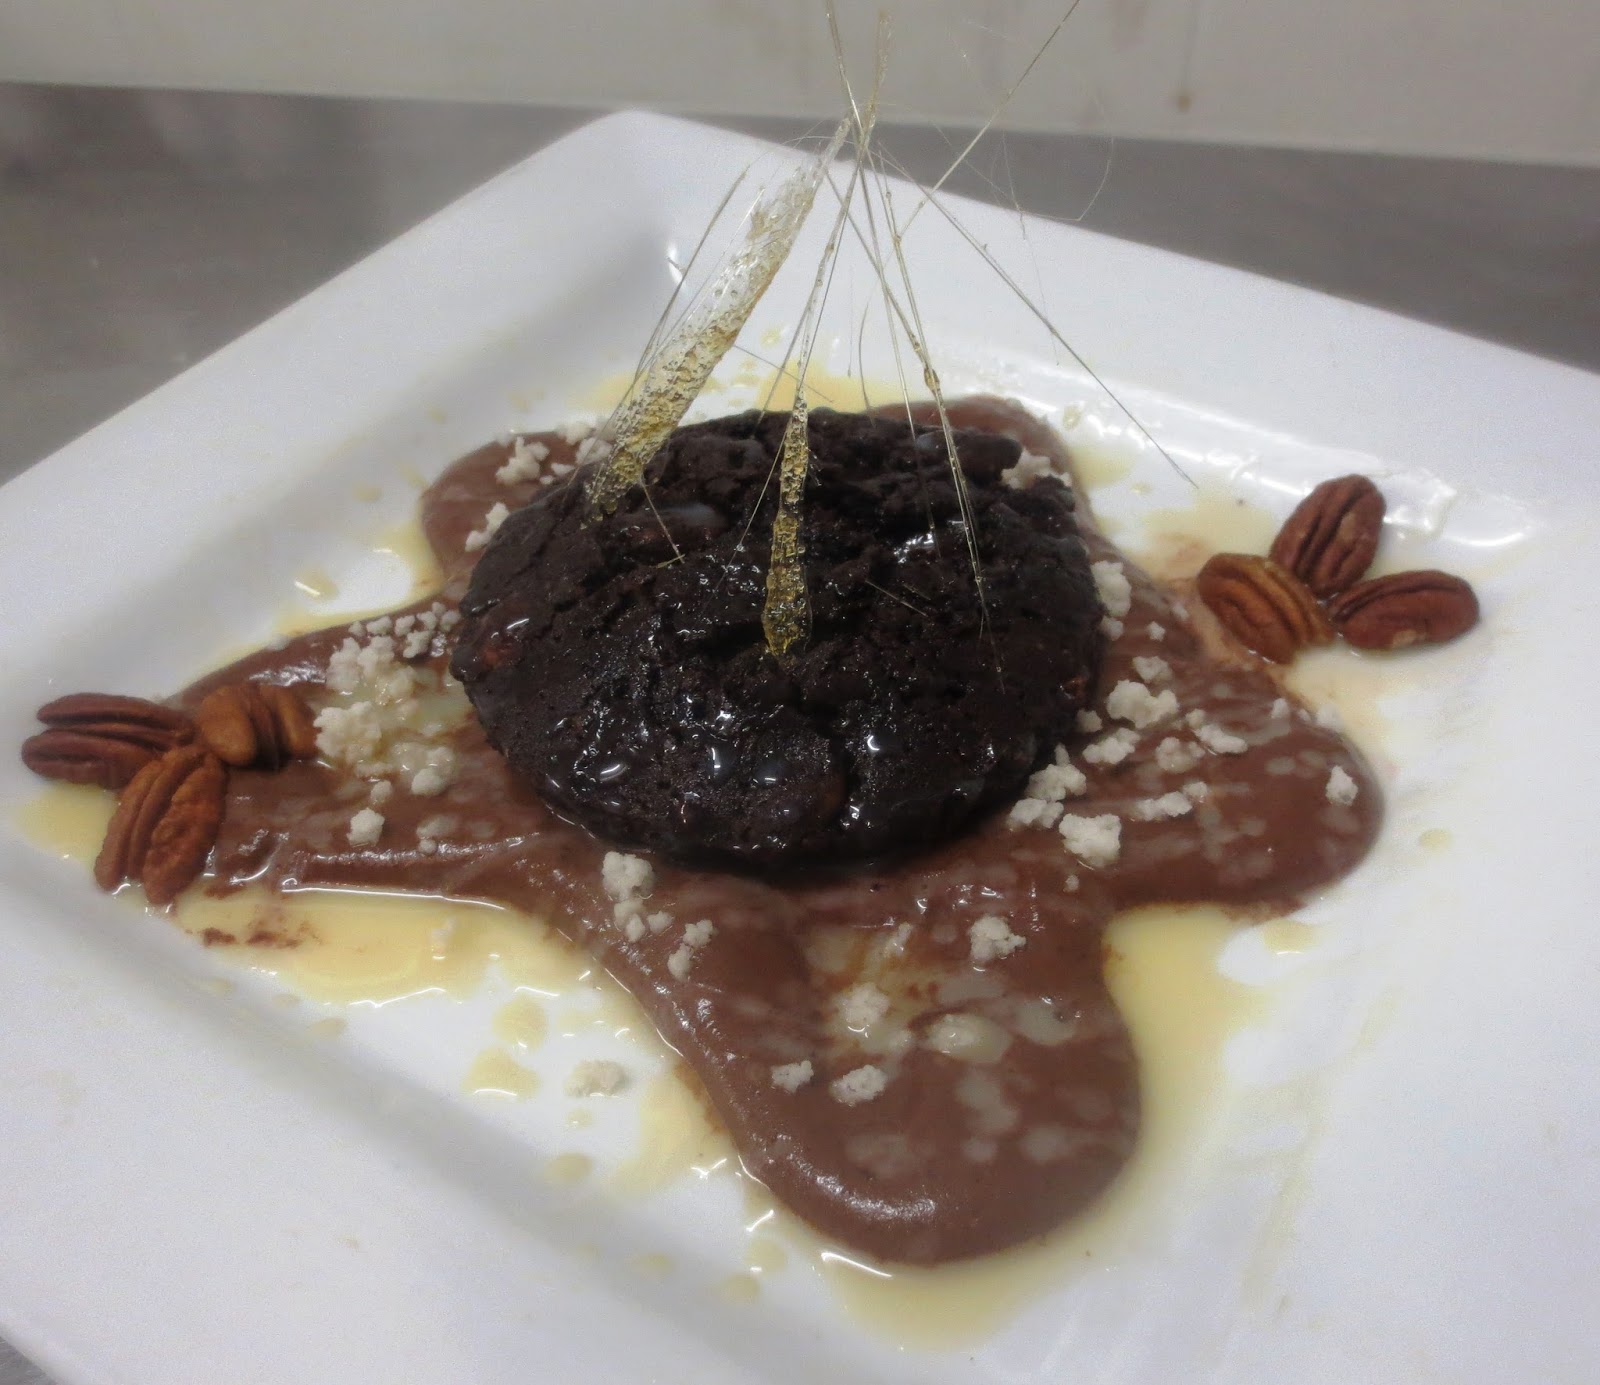
Maple Pecan Brownie Bomb

Maple Pecan Brownie
1/4 cup unsalted butter
scant 1/4 cup dark cocoa powder
1 large egg
1/3 cup maple syrup
1/2 cup all-purpose flour
1/4 cup chopped pecans
1 Tablespoon maple syrup

Spiced Dark Chocolate Mousse
85 grams dark chocolate chips
1 Tablespoon dark cocoa powder
37 grams unsalted butter
3 large eggs, separated
37 grams granulated (white) sugar
2 teaspoons chocolate chili powder

Caramel Crunch Candy
1/4 cup granulated (white) sugar
1/4 cup water

Caramel Web
2 Tablespoons granulated (white) sugar

White Chocolate Maple Ganache
1/4 cup white chocolate chips
scant 1/4 cup whipping cream
1 Tablespoon maple syrup

Begin with the BROWNIE. Preheat oven to 350◦F. Grease two small (four inch) fluted tart pan or similar mold.
Melt the butter and cocoa over low heat. Beat the egg, then beat in the maple syrup. Whisk in the cocoa mixture, then the flour and nuts. Spoon batter into prepared pans. Bake for 15 minutes, cool slightly, unmold, then poke lightly with the tines of a fork. Pour a little extra maple syrup over top and allow the brownies to absorb it. Cool completely.

Move on to the MOUSSE. Melt the chocolate, cocoa, and butter in a bowl over a pan of just simmering water. Meanwhile, whisk the egg whites until soft peaks form, then whisk in the sugar until stiff peaks form. Gently whisk in the egg yolks. Mix the chili into the chocolate mixture, then whisk this into the eggs. Chill until set, or chill in the freezer to speed up the process.

Next make up the CARAMEL CRUNCH CANDY. Put the sugar and water into a small saucepan over low heat until mixture hardens. Stir it to form separate chunks, then set it aside to cool slightly.

For the CARAMEL WEB heat the sugar over very low heat until it is melted and golden. Set aside to cool slightly until barely cool enough to handle. Once cool, pull off long, thing strands. 

Meanwhile, make the WHITE CHOCOLATE MAPLE GANACHE by heating the chocolate and cream in a bowl over a pot of barely simmering water until melted and smooth. Stir in the maple syrup, then set aside to cool and thicken slightly.

To assemble: Spread some chocolate mousse on a plate in the shape of a star. Place the brownie in the center. Drizzle the entire plate with the ganache. Garnish with the candy. Place the caramel web strands on top of the brownie to form a nest. Garnish with additional pecans if desired.

Saturday, February 28, 2015

A Week's Worth of Nutella Breakfasts

Nutella - a smooth, decadent chocolate hazelnut spread. It is marketed as being "part of a nutritious breakfast'", but then again, what breakfast product isn't these days? Anything can be 'part' of a nutritious breakfast as long as the rest of the breakfast is balanced and nutritious and you don't binge on that item. That being said, Nutella isn't terrible - nuts are very nutritious, being naturally high in protein, fiber, and vitamins. They are however high in calories and fat (the good fats), especially concentrated nut butters. Natural nut butters with no additives are great breakfast spreads, and Nutella is full of Vitamin E rich hazelnuts. It also contains a touch of cocoa for added decadence and skim milk powder. Of course it also has added oil and sugar, which makes it not so good. But that doesn't stop me from incorporating it into my breakfasts.

This week I will be posting a week's worth of breakfasts with one common ingredient - Nutella. These have Nutella as the main ingredient - not just spread on the top. There are so many great ways to enjoy Nutella - here are a few ideas.
For today, this is not a breakfast per se (although it could be I suppose), but a quick Nutella idea. Gently warm a brownie in the microwave, then spread it with Nutella. Top it with a little ice cream or whipped cream if desired, then more Nutella.

Sunday, August 25, 2013

Ferrero Rocher Brownie Bites

If you are not familiar with Ferrero Rocher chocolates, they consist of a whole roasted hazelnut surrounded by a creamy caramel filling and crisp wafer coated in milk chocolate and chopped hazelnuts. Yum! Though most are familiar with the classic chocolate, there are also two other types of Ferrero Rocher out there; the Ferrero Rondnoir, which is a dark chocolate creation, and the Raffaello, which is an almond in a creamy coconut coating. Ferrero Rocher are exquisite creations, and very delectable. They are wrapped in fancy gold cup packaging and are a bit pricey, but make great gifts for Valentine's Day, Christmas, and birthdays. I found some extra Ferrero Rocher chocolates at my house, though it is a bit of a surprise they had not been gobbled up. I remember seeing a recipe for brownie bites with a Ferrero Rocher in the middle, smothered with a caramel and caramel cream cheese frosting. Though I did not bother with the frosting, these brownie bites are still divine!
Ferrero Rocher Brownie Bites
1 brownie mix or brownie recipe, about 18.5 ounces or enough to make an 8x8 inch pan or 24 miniature muffin cups full
24 Ferrero Rocher chocolates, or use any other chocolates you think will work, unwrapped
caramel sauce, if desired
frosting, if desired

Preheat oven to 350◦F. Line 24 miniature muffin cups with paper liners. 
Prepare the brownie mix, and divide batter evenly among the muffin cups, filling them 3/4 full.
Bake for 11-13 minutes, or as directed.
Immediately press a chocolate into the center of each warm brownie bites. Be gentle, but press it in so the brownie sinks a bit. The chocolate will melt a bit, but will firm upon cooling.
Cool completely. Add a dab of caramel sauce, and a swirl of frosting if desired.

I used mostly original Ferrero Rochers, but I also had a few of the dark and coconut kind. I used a basic brownie cup recipe I have used before with another type of candy; chocolate peanut butter cups. You can find that recipe here:  Peanut Butter Cup Buttons.

Thursday, April 18, 2013

Coconut Marshmallow Mud Cake

This Coconut Marshmallow Mud Cake is a favorite dessert of my brother's, and loved by the entire family, it is a specialty of my mother. It's also a special treat because it seems elaborate (though really isn't), and we don't get to have it very often, it was always reserved for special occasions. We refer to it as Mississippi Mud Pie, though it isn't really a pie, and I'm not sure how Mississippi is involved. Nevertheless, it is chocolaty, fudgey, and deep, rich, and delicious. Even if you are not a fan of one of the ingredients, such as coconut, nuts, or marshmallows, you will appreciate them and what they contribute to this dessert! The photo doesn't do this dessert the justice it deserves. Here is the process:

LAYER #1
A rich, fudgey chocolate brownie layer baked in a 9x13 inch pan. Contains cocoa, shredded coconut and chopped nuts, if desired.

LAYER #2
A jar of marshmallow fluff is spread over the base as soon as it comes out of the oven.

LAYER #3
A rich chocolate icing is dolloped over the marshmallow fluff while the brownies are still warm. 
The icing can be spread in a single, smooth layer over the marshmallow fluff, but this is quite difficult to achieve. As an alternative, the icing may be swirled with the marshmallow with the top of a butter knife, as if making a marble cake or cheesecake. We much prefer the latter option, as not only is is easier, but we think the swirls of chocolate and marshmallow look really pretty too!
Serving options:
  • We have never tried them warm from the oven. My guess is they would be delicious but extremely messy, soft, and difficult to cut.
  • Allow them to cool to room temperature, then try. Still messy but not quite as bad.
  • Refrigerate them until firm, and enjoy cold. Much easier to cut.
  • These should be stored in the fridge, but allow to come to room temperature before serving.
  • Take a square straight from the fridge and reheat it in the microwave for no more than 30 seconds. It warms the brownie and melts the topping a little, without being too messy. This is my favorite way to eat them!

Monday, November 12, 2012

Peanut Butter Chip Brownie Cups

I was asked to make a dessert with peanut butter and chocolate, and this is one I ended up making. Basically it is a rich chocolate brownie batter with peanut butter chips stirred into it baked in muffin tins. These are sweet, rich, and delicious. The only problem was I baked them a tad too long. If I had taken them out two minutes earlier, they would have been moister and a bit more like brownies. But they still tasted just great, despite a little overbaking!
Peanut Butter Chip Brownie Cups
1 cup butter or hard margarine, melted
2 cups granulated (white) sugar
2 teaspoons vanilla extract
4 large eggs
3/4 cup unsweetened cocoa powder
1 3/4 cups all-purpose (plain) flour
1/2 teaspoon baking powder
1/2 teaspoon salt
1 1/3 cup peanut butter chips
+ 1/3 cup for topping

Preheat oven to 350◦F. Line muffin tins with paper liners.
In a large bowl  mix the butter, sugar, and vanilla. Beat in the eggs. Beat in cocoa. Add flour, baking powder, and salt, mix well. Stir in chips. 
Divide batter evenly among muffin cups. Bake for about 25 minutes until firm. Do not overbake!
The original recipe called to press 5-6 of the remaining chips into each brownie, but I did this before baking to ensure they stuck. It does make the topping look a little nicer. Original recipe called for 18, but I got 20 fairly large.These would probably be nice as mini cupcakes too, if you have enough mini muffin tins. Recipe comes from my giant Hershey's binder.

West Side Publishing. "P.B. Chips Brownie Cups." Recipe. Hershey's Classic Recipes, Lincolnwood Illinois: Publications International, Limited, 2009. 140.

Wednesday, May 30, 2012

Fudge Brownie Pie

Here is a very simple and quick but excellent dessert. It can easily be whipped up in a flash with ingredients on hand, and can be served as is, or dressed up in a number of ways for a fancier dessert. It is also delicious, and a popular dessert for chocolate lovers.
Try serving it with ice cream and a cherry, whipped cream and chocolate swirls, or hot fudge sauce. Even if you serve it plain, it will be divine!
Fudge Brownie Pie
2 eggs
1 cup sugar
1/2 cup butter or hard margarine, melted
1/2 cup all-purpose flour
1/3 cup cocoa
1/4 teaspoon salt
1 teaspoon vanilla extract
1/2 cup chopped nuts (optional)

Preheat oven to 350◦F. Lightly grease an 8-inch pie plate.
Beat eggs in medium bowl; blend in sugar and butter. Stir together flour, cocoa and salt; add to butter mixture. Stir in vanilla and nuts, if desired. Pour into prepared pie plate.
Bake 25 to 30 minutes or until almost set. (Pie will not test done in center.) Cool; cut into wedges. 

West Side Publishing. "Fudge Brownie Pie." Recipe. Hershey's Classic Recipes, Lincolnwood Illinois: Publications International, Limited, 2009. 331.