Ooey Gooey Chewy Cookie Bars
CRUST
3/4 cup all-purpose (plain) flour
1/2 cup granulated (white) sugar
1/3 cup unsweetened cocoa powder
1/4 teaspoon salt
1/4 cup melted butter or hard margarine (1/2 stick)
TOPPING
2 cups milk chocolate chips
3 cups miniature marshmallows
1 1/2 cups flaked or shredded coconut (I used unsweetened)
1 cup chopped nuts (I left them out)
1 can (14 ounces) sweetened condensed milk
(I used a 300mL can, although 14 ounces is actually equivalent to 414 mL)
Preheat oven to 350◦F. Spray or line a 9x13 inch rectangular baking pan.
CRUST: In a medium bowl, mix the flour, sugar, cocoa, and salt. Drizzle the melted butter over, mixing with a fork until mixture forms small beads. Press into prepared pan.
TOPPING: Sprinkle ingredients in order given over crust, ending with the milk being poured over as evenly as possible. Bake for about 25 minutes. These cut well warm or room temperature, but do not refrigerate them before cutting, they will be too solid (actually, just don't refrigerate them at all).
This recipe came from another one of my funny cooking novels. These bars certainly are ooey, gooey, and chewy. They have a little bit of everything for everyone. Even if you aren't a fan of one of these ingredients, they all tie together very nicely to make a sweet and delicious square, with plenty of chocolate. The crust is also very nice, and holds all of the toppings nicely. These are also so quick to make and require very little prep work.
Fluke, Joanne. "Ooey Gooey Chewy Cookie Bars." Recipe. Cherry Cheesecake Murder, New York: Kensington, 2006. 364-366.
I had some leftover plain yogurt in the fridge again. Plain yogurt is excellent for baking, but too plain to eat on its own in my opinion. I did not have any recipes in mind that use plain yogurt, so I looked for a whole wheat bread recipe, since I kneaded (haha) to make whole wheat bread anyway. I found this recipe online, but I was a little skeptical about trying it. The yeast is not proofed in this recipe. I am used to bread recipes that call for dissolving a small amount of sugar in warm water, sprinkling the yeast over top, and allowing it to stand for ten minutes to activate. In this recipe, the yeast is added to water alone, and just stirred right in, followed immediately by the other ingredients. Since the recipe had good reviews, I decided to go ahead and try this method, although I did change quite a few other things in this recipe. It worked great, this bread even rose better than some of my others that used proofed yeast. This is a very foolproof bread recipe that can be tweaked as you like - add nuts, seeds, other grains, or whatever you wish! Another plus to this recipe - it slices very nicely and had a great, sturdy texture and relatively mellow flavor, making it perfect for sandwiches!

Whole Wheat Yogurt Bread
1 cup warm water
1 package active dry yeast (quick-rise)
1 Tablespoon granulated (white) sugar
1 teaspoon salt
1/2 cup plain yogurt, at room temperature (let it sit out for 15 minutes)
1 Tablespoon olive oil
1/3 cup natural bran
1/3 cup ground flax seed
1 cup whole wheat flour
1 2/3 - 2 cups additional whole wheat flour
In a large bowl, sprinkle the yeast then the sugar over the water and dissolve. Add remaining ingredients except for the second amount of flour and beat well. Gradually stir in enough remaining flour to form a dough that pulls away from the sides of the bowl.
Knead for 6 to 8 minutes, until dough is smooth and elastic.
Place dough in a bowl sprayed with cooking spray, turn dough once to coat. Cover with a piece of plastic wrap lightly sprayed with cooking spray, and a tea towel. Let rise for an hour, or until doubled in bulk.
Spray a 9x5 inch loaf pan with cooking spray. Punch dough down, form into a loaf and place in prepared loaf pan. Cover with a new piece of plastic wrap lightly sprayed with cooking spray, and a tea towel. Let rise for about half an hour, or until doubled in bulk.
Bake at 375◦F for 35-40 minutes.
Here are the results from the home cooking competition I entered at the local exhibition. I was also awarded fourth overall exhibitor, for which I received a basket full of goodies, including ingredients and baking equipment. This basket seems to be perfectly suited to me because it contains cocoa, chocolate chips, and a muffin tin that is formed to make animal shaped muffins. It looks super cute and I cannot wait to use it! I was also awarded a ribbon for my first place chocolate cake, which means it was the best entry in the Cakes And Sweets category, which included ten different sections. I am quite happy of my winnings, especially considering there seemed to be more entries this year than last year, preserves are included in the point accumulation, and I did not do preserves while many others did, and most of my competitors have many more years of experience than I do. Points are awarded for each award, higher points for a first place win and lower points for a third place win. Then the points are added up to determine the overall top exhibitors. Here's how my entries placed:
4th Place Overall Exhibitor
Junior
CHOCOLATE CAKE - Classic Chocolate Cake - 2nd
BROWNIES - Double Chocolate Brownie Bars - 1st
BAKED SQUARES - Chocolate Coconut Squares - 2nd
DARK FUDGE - Chocolate Potato Fudge - 2nd
SOFT MOLASSES COOKIES - Soft Molasses Spice Cookies - 2nd
MUFFINS - Oatmeal Chocolate Chip Banana Muffins - 2nd
DECORATED CUPCAKES - Flower Cupcakes - 1st
DESSERT USING LOCALLY GROWN FRUIT - Blueberry Struesel Cake - 1st
Senior
CHOCOLATE CAKE - Classic Chocolate Cake -1st
plus ribbon for best entry in category
BROWNIES - Double Chocolate Brownie Bars - 1st
BAKED SQUARES - Chocolate Coconut Squares - 1st
DARK FUDGE - Chocolate Potato Fudge - 3rd
SOFT MOLASSES COOKIES - Soft Molasses Spice Cookies - 1st
MUFFINS - Strawberry Banana Muffins - 2nd
ZUCCHINI LOAF - Double Chocolate Zucchini Loaf - 1st
Pictured above is the basket of goodies I won! Listed below are the dates of when I featured each of these baked goods on my blog, in case you would like to have a second look at some award-winning recipes!
Classic Chocolate Cake - I have never actually shared this recipe, but it has been featured many times as decorated birthday and celebration cakes. I refer to it as my "signature chocolate cake recipe".
Double Chocolate Brownie Bars - March 23rd, 2012
Chocolate Coconut Squares - May 27th, 2012
Chocolate Potato Fudge - May 14th, 2012
Soft Molasses Spice Cookies - August 28th, 2012
Oatmeal Chocolate Chip Banana Muffins - August 25th, 2012
Decorated Cupcakes - August 29th, 2012
Blueberry Struesel Cake - August 24th, 2012
Strawberry Banana Muffins - July 5th, 2012
Double Chocolate Zucchini Loaf - August 10th, 2012
The past few days I have been very busy baking up a storm. I have entered a bunch of my baked goods in a local baking competition at the exhibition. I competed in this for the first time last year, and I was quite pleased with the results. I entered five different items twice, each in the junior and the senior category since I qualified for both. I placed either first, second, or third with every item in both categories. The results of last year are posted in my entries from September 1st and 2nd, 2011. This year, I qualify for both the junior and senior categories again, so I will be entering five of the same items in both, along with two additional items in just the senior category and three additional items in just the junior category. The junior and senior categories do not contain the same listing of baked items, and the senior has a lot more selection, which is why I am baking a few individual junior and senior items. However, since many items overlap, I chose many of those, since this way I only need to bake the item once but can enter it twice.
So lately I have been busy baking, frosting, decorating, slicing, packaging, and labeling my baked goods. I haven't featured many of these items on the blog because they are mostly tried and trued recipes I have made before, so they have already been featured on the blog before. I also had a few things stored in the freezer that I will be exhibiting, to save time and some baked items actually benefit from a short time in the freezer (and some certainly don't). All items need to be sliced to perfection, just the right size and shape. Then they need to be placed on paper plates in plastic bags and tied up and labeled. It's all a little bit time consuming, and a bit tedious to ensure everything looks perfect, but the baking part is certainly fun and it all pays off. This year I have fifteen separate entries, composed of ten different baked items, because five of the items are being entered twice into both the junior and senior categories. Here is a picture of all of my entries, sliced, bagged, labeled, and ready to go. I will have the results tomorrow!


These are a few cupcakes I decorated using chocolate cupcakes from my signature chocolate cake recipe, and my signature buttercream icing in purple, pink, blue, and green. I just chose three simple flower designs, all of which I have done before. The pink and blue flowers I have done on cupcakes before, but they were miniature cupcakes, which seemed to work better because it required less petals and covered less space. They are featured in my March 1st, 2012 post of Flower Cupcakes, along with some buttercream roses. The purple flower I have only done on cakes before. These are featured in a few of my cakes, most recently on my mother's birthday cake on August 21st. They can look slightly different depending on exactly how you pipe them. All three designs seemed to work out fairly well on these large cupcakes. I filled in the centers of all of the flowers with some simple green icing, using either my open #3 round tip or my open star tip for the pink flower. The purple flower is a simple drop swirl flower using flower tip #150. The blue flower is simply swirls using an open star tip. The pink flower also uses flower tip #150, in an outward and upward motion, which is a bit difficult to describe. These are all simple flowers you can pipe directly onto cakes or cupcakes, which certainly comes in handy if you are not very good at piping buttercream roses or working with fondant or gum paste. These are also simpler, and often tastier than a slab of fondant or a mountain of buttercream.
This cookie recipe came from a local newspaper almost a year ago, and I am only getting around to trying it now. These cookies certainly are soft and moist as long as you do not overbake them, and they are very spicy and certainly taste like molasses. I used dark brown sugar, which brought out the molasses flavor even more. I did not have any nutmeg, so I just left it out, but added some of my secret ingredients instead. I also did not have any turbinado sugar on hand, so I sprinkled the cookies with more dark brown sugar before baking. I found this dough fairly wet when I mixed it up, so it definitely needs to chill. I used a small ice cream scoop to form the cookies, which may have been a bit too big. The cookies spread and flattened out quite a bit, but they are still nice and soft.
Soft Molasses Cookies
1/2 cup butter or hard margarine, softened
1/2 cup packed brown sugar
1/2 cup molasses
1 large egg
2 cups all-purpose (plain) flour
2 teaspoons baking soda
1 Tablespoon ground ginger
1 1/2 teaspoons ground cinnamon
1/2 teaspoon ground cloves
1/4 teaspoon ground nutmeg
1 teaspoon instant coffee granules
1 teaspoon vanilla extract
1/4 cup water
1 Tablespoon turbinado sugar for topping, optional
In a large mixing bowl, cream the butter and sugar. Add the molasses and egg and beat until fluffy.
In a separate medium bowl, whisk together all dry ingredients.
In a measuring cup, dissolve the coffee in the vanilla, then add the water.
To the butter mixture, add half of the flour, followed by half of the coffee mixture, then repeat with remaining flour then coffee mixture.
Chill dough in the fridge for at least an hour, overnight, or up to one week.
When ready to bake, preheat oven to 400◦F and line cookie sheets with parchment paper.
Drop dough by teaspoons two inches apart onto prepared cookie sheets. Sprinkle with a little turbinado sugar, if desired. Bake for 8 to 10 minutes, until cookies are puffed and golden but still soft. Cool on the cookies sheets for two minutes before removing to cool completely.
Here is my father's attempt to use up some cucumber, specifically the larger ones that don't have the best flavor. He decided to make a batter and fry up some of the cucumber. He sliced it, then dipped it in a batter mixture he made up based on several different recipes. He used an egg, some milk, a pinch of baking powder, a pinch of salt, and a lot of flour to make the batter. He fried the cucumber on a griddle, the one we use for pancakes (I think this was because we had pancakes earlier that day, and the griddle was already set up). The result were some pieces of cucumber that were not crisp and crunchy from the garden, but not soft and tender from cooking either. I think they needed to be cooked a little longer, because the batter on the outside wasn't very brown and crispy either. Speaking of the batter, it reminded me very much of pancakes. Whether this was due to the cooking method or the batter itself (or both), I don't know. I like cucumbers and I like pancakes, but together I don't really care for cucumbers wrapped in pancakes. Actually, at first I thought it was cucumber wrapped in mozzarella cheese, because that's what it looked like to me. Oh well, I applaud the effort, and it wasn't too bad of an attempt to use up cucumber (hey, it got us to eat some, didn't it?). However, i think a breadcrumb coating might be better. Or a thinner batter with some more flavor to it - add some spice to it. Maybe the cooking method wasn't quite the right choice either, deep-frying may have given a better texture with slightly more flavor. Even shallow frying, which is just using a little oil in the bottom of the pan, would have worked better too. Oh well, you can't discover anything until you experiment. Maybe next we will try cucumber wrapped in mozzarella cheese, I have had that combination before and it is pretty good.

Yesterday I took a walk out to our tiny vegetable garden along the side of the house. I noticed, as usual, the cucumbers seem to have taken over the tiny patch. Sure, they left enough room for a few decent tomato plants, and a little bit of room for some peas, beans, green peppers, and lettuce, but the majority is cucumbers. That isn't a terrible thing, since I really do like cucumbers and I eat quite a bit of it. But there is only so much cucumber one can eat. Cucumber is best eaten fresh and raw from the garden, just after a quick rinse. Peeling isn't necessary and slicing is even optional. But once you eat some raw cucumber with your meal, or even as a sack, and add some to your salad and some to your sandwich, what more can you do with it? Cucumber isn't really a vegetable you can add to many cooked dishes, it doesn't work well in baked goods like zucchini does, and its high water content means it doesn't withstand freezing very well. The only other option is to pickle and preserve it I guess. Since we don't have the proper equipment for that, and aren't really big fans of pickles, and preserves, and that kind of thing, we will share our cucumbers with those who do. This is what I harvested yesterday. Some of these cucumbers were left to grow way too big. We will keep the small ones for eating as is, because they will have much better a flavor than the big ones. I also found a few tomatoes while I was at it, a few regular and a few cherry, which are so fun to eat just to rinse and pop in your mouth. Happy harvesting to all!

I am always looking for a little something different to make when it comes to banana muffins, since we always seem to have ripe bananas around. Our usual banana muffin recipe does not contain oats, so I decided to try this oatmeal banana muffin recipe and add some mini chocolate chips to it. I found the basic idea for this in Company's Coming "Muffins & More". These muffins turned out a bit darker than I expected. They don't taste burnt at all, so maybe they are meant to be dark, but using a lower oven temperature of 375◦F or even 350◦F probably wouldn't hurt. If you do use 400◦F, try checking the muffins a few minutes earlier. This muffin recipe also uses the standard two bowl muffin mixing procedure. Although many muffin recipes call for adding the combined liquid ingredients to a well in the combined dry ingredients, I usually prefer to add the dry to the liquid, as I find you won't end up with dry flour at the bottom that way, and less mixing is involved, which is preferable in muffin making to prevent them from becoming tough.
Oatmeal Chip Banana Muffins
1 1/2 cups all-purpose (plain) flour
1 cup rolled oats
1/2 cup granulated (white) sugar
2 teaspoons baking powder
1 teaspoon baking soda
1/2 teaspoon salt
1/2 cup miniature semi-sweet chocolate chips
2 large eggs
1/4 cup cooking oil
1/4 cup milk
1 cup mashed overripe bananas (about 3 large)
Preheat oven to 400◦F. Grease or line muffin cups with paper liners.
In a large bowl, mix the first seven ingredients. Make a well in the center.
In a separate medium bowl, beat the remaining ingredients. Add to well, stir until moistened. Divide among muffin cups. Bake for about 20 minutes or until a toothpick inserted in the center comes out clean.
There were still some fresh blueberries lingering in the fridge, so I decided to look for a recipe that specifically calls for fresh blueberries instead of frozen, because I can bake with frozen blueberries anytime. I found this tasty looking cake, which I also remember eyeing last year, but I didn't get the chance to make it then. This year I made up this cake ahead of time, and put it in the fridge for a few hours. Then it got baked later on in the day so I could enjoy it warm from the oven as a snack. It is delicious warm, but I bet it would be good at room temperature and probably quite tasty cold as well. You could serve this cake with ice cream or whipped cream if you wish, but it really doesn't need it.
Blueberry Streusel Cake
STREUSEL TOPPING
1/3 cup all-purpose (plain) flour
1/3 cup granulated (white) sugar
1 teaspoon ground cinnamon
1/4 cup cold unsalted butter, cut into pieces
CAKE BATTER
1/4 cup unsalted butter, softened
1/2 cup granulated (white) sugar
1 large egg
1 teaspoon vanilla extract
1 teaspoon baking powder
1/4 teaspoon salt
1 cup all-purpose (plain) flour
1/3 cup milk
2 cups fresh blueberries
Preheat oven to 350◦F. Butter or spray an 8x8 inch square baking pan.
STREUSEL: In a small bowl, mix the flour, sugar, and cinnamon. Cut in the butter until crumbly.
CAKE: In a large bowl, beat the butter and sugar until light and fluffy. Beat in the egg and vanilla. Add the baking powder, salt, and 1/3 cup of flour. Stir in 1/2 of the milk, then 1/3 cup flour, remaining milk, and remaining flour. Pour batter into prepared pan. Sprinkle blueberries over top, then sprinkle with streusel. Bake for 40 - 50 minutes until a toothpick inserted into the center comes out clean.
"Blueberry Cake.”
http://www.joyofbaking.com/BlueberryCake.html . Joy of Baking, n.d. Friday, August 24, 2012.
I love summertime for many reasons; the warmth, the sunshine, the vacations, the freedom and relaxation, but most importantly, the food. With summertime comes an abundance of fresh, great tasting produce. A great number of fresh fruits and vegetables are in season some time in the summer. It is even better if you have your own garden. Then you can just walk outside, pick something and eat it. It doesn't get much fresher or tastier than that! We have a very small vegetable garden and a little rhubarb plant in our backyard. It isn't much, but we already have more cucumbers than we know what to do with, and they certainly taste better than any you would buy at the store, no matter how local or fresh they claim to be. We also have some tomatoes and green peppers. Our other vegetables aren't quite ready yet, but hopefully they will be soon. We are also lucky enough to have neighbors and friends with gardens who are willing to share and trade their vegetables with us. I also look forward to the fresh fruits of the summer, even if I can't find them in my backyard. There are Farmer's Market's and local grocery stores that carry these fresh, local fruits at reasonable prices. We had an excellent strawberry season, with a few batches of strawberries still coming in. Blueberry season just began, and I have already taken advantage of it and baked a few blueberry items. Fresh cherries can still be found around, which are best for eating just as is, in my opinion. And peaches and plums are still around too. Aside from fresh fruits and vegetables, there are some other tastes of summer too. Fruit smoothies, any grilled food, corn on the cob, hamburgers and hotdogs, lemon meringue pie, and of course, ice cream, all remind me of summer. I may not get a chance to enjoy every summertime food now, but I'll be sure to have a taste of one of these in the wintertime to bring me back.

PHOTO CREDIT:"758icecream"
http://www.photo-dictionary.com/phrase/391/ice-cream.html#b .Photo Dictionary, n.d. Wednesday, August 22, 2012.
Peanut Butter Bars
1/2 cup butter or hard margarine, cut up
1/2 cup packed brown sugar
1/2 cup all-purpose (plain) flour
1 1/2 cups quick-cooking rolled oats
1/4 cup corn syrup
3/4 cup semi-sweet chocolate chips
1/2 cup smooth peanut butter
A handful of finely chopped peanuts for the top, optional
Preheat oven to 350◦F. Grease or line an 8x8 or 9x9 inch square baking pan.
In a medium saucepan over medium heat, stir the first five ingredients until melted and smooth. Press into prepared pan. Bake for 15 minutes until set and edges are golden. Cool.
In a small saucepan over medium heat, melt the chocolate chips with the peanut butter. Spread evenly over base. Sprinkle with peanuts, if desired.
These are some quick and easy bars I whipped up. Anyone who likes the classic combination of chocolate and peanut butter will love these. They are so quick and easy and keep well. Do not refrigerate them before cutting, or they will be too hard. Actually, don't bother refrigerating them at all, they are better at room temperature. This recipe may easily be doubled to fit a 9x13 inch pan. I didn't have any peanuts for the top, so I was trying to think of something else that might look nice, just to add a little more jazz to the bars. I thought of both toffee bits and shredded coconut, but I did not want to open either package just for a handful, and these flavors didn't really go with the chocolate and peanut butter. I settled on a simple dusting of icing sugar.
For her birthday yesterday, my mother asked for a simple, moist white cake. Since I usually refuse to use a cake mix, though my mother does like them, we settled on a one bowl white cake I have made before. It has a pretty good flavor and is fairly moist. It is also a very firm cake and is very easy to decorate.
My mother also prefers my father's "margarine milk" icing to my buttercream icing. She often finds my buttercream icing too sweet and rich (which is why I love it so much). My buttercream icing uses a large proportion of butter, along with icing sugar and milk. My father's margarine milk uses just a little margarine, along with a lot of icing sugar and milk. This is another reason I needed a sturdy cake, margarine milk is either made quite runny or too stiff to spread on a delicate cake. So I got my father to make his margarine milk icing and completely fill and frost the cakes for me. As I had expected, margarine milk icing is not as easy as buttercream icing to spread and frost cakes, which is another reason I prefer buttercream. Margarine milk just does not achieve the same fluffy texture as buttercream, so it is either too runny and runs off the cake, or is too stiff and tears the cake. It seemed to spread pretty well on these cakes though, which was good. Then I used my usual buttercream icing for the piping, flowers, and decorations, because buttercream is much easier to pipe.
For the piping decorations, I used some pastel pink, because it is my mother's favorite color. I paired it with some pastel blue lettering, and some green for the leaves and stems of the leaves. I searched and looked at a lot of buttercream flower decorating ideas online, and practiced some, drew some out, and tried to decide which ones I liked the best. I find cake decorating goes better if you have a plan of what you are doing. Of course you can never really fully decide until you are in the process, and then you may discover that some decorating techniques won't work on your cake. For example, when I was trying to decide what techniques to use on this cake, I ruled out flowers going up the sides of the cake, because the cake was not high enough to do this. I also ruled out two borders and just made one. I ruled out certain types of piped flowers because I can't do them well (I'll keep practicing). That's why I shied away from buttercream roses, they don't turn out the greatest, especially on hot days.
I finally settled on piping some sweet peas, which are basically half roses, as a border around the top edge of the cake. These are made by using the same tip as for buttercream roses, and basically making three flat petals. I spaced them out, and used my leaf tip to pipe some leaves attached to them and a vine going around the edge of the cake. Next I piped the lettering. I am practicing my own writing, so I did not use the fancy lettering press I have. It also would have been tricky to use this in a circle, as I did here. I did this not only to make room for the flowers in the middle, which I wanted to be the focal point of the cake, but also because I wanted to practice this. This is a good technique to master as well. To finish, I piped several drop swirl flowers in the middle of the cake. I like to refer to these as pansies, and they are an easy alternative to roses. They use the same tip, but you do not need a flower nail to make these, you can pipe them directly on the cake. I used my leaf tip to add the centers of the flowers (a plain open tip would have worked, but why change tips if you don't really need to?). Then I added some leaves as well. My mother loves flowers, she loves pink, so I just made a simple flower themed cake with a lot of pink. I knew she wouldn't want the cake overdone or too fancy.
Happy Birthday Mom!
Here are some homemade veggie bean burgers I made. This was my first time making veggie burgers (or any type of burger at all actually). There are so many vegetable burger recipes out there using so many different ingredients! I didn't know whether to make a tofu burger, a bean burger, a vegetable burger, a potato burger, a mushroom burger, or a grain burger. Veggie burgers often contain some form of soy based protein or beans, along with some vegetable fillers, often onion, carrot, and celery, and a grain to bind it together, such as flour, quinoa, brown rice, or breadcrumbs. Many veggie burger recipes don't use egg because they are also vegan recipe. Most veggie burger recipes contain a bevy of healthy, and often strange or expensive, ingredients, such as quinoa, brown rice, lentils as fillers; as well as a slew of vegetables, including corn, pumpkin, squash, and spinach. You can also just grill a portabella mushroom cap, and eat that like a burger. I have had a few of these "burgers" before, and when done right, they are very tasty and have a nice, meaty texture. For my first try, I decided to take the basics of a simple recipe I found online, and alter it as I pleased. I settled on a simple bean burger recipe with chili sauce to give it a bit of kick. I haven't tasted many veggie burgers, so I don't know how good this one was, but it certainly had flavor, and a texture I liked, soft and moist with a crisp exterior.

Chili Bean Burgers
1 can (540 mL) white kidney beans, drained, rinsed, and patted dry
1/2 medium onion, diced
2 Tablespoons finely shredded carrot
1 large egg
1/2 cup dry breadcrumbs
1/4 cup chili sauce
1/2 teaspoon garlic powder
1/4 teaspoon paprika
Mash the beans in a bowl with your hands. Mash them to your preference - more if you like a smooth-textured veggie burger, less if you like some texture. Add in the onion and carrot, then add the remaining ingredients and mix well, using your hands if necessary. Form into patties (I got five from this recipe). These can be wrapped in waxed paper and refrigerated until needed, or cooked immediately. They can be fried in a pan of oil at medium heat for about 10 - 12 minutes, or grilled on the barbecue for 10-15 minutes. Serve on a bun with your favorite toppings.
Tonight we are barbecuing hamburgers and veggie burgers for supper, so naturally I decided to try making my own burger buns. Surprisingly, I have never tried this before, we usually just use store bought buns, but I wanted to try my hand at making some. There are actually many recipes for this, and you can adapt regular dinner roll recipes and simply shape them differently (this works for hotdog buns too). I decided to try a simple recipe for my first time. They turned out ok, but didn't rise all that well while baking, despite rising nicely beforehand. I also may have baked them a bit too long, so they are more crisp rather than soft and chewy, but still tasty. Because they did not rise well, they were cut thin, and a bit tricky to slice in half. Next time I will choose a less humid and rainy day to try them, but they certainly went well with the hamburgers and veggie burgers barbecued tonight, which I will feature in tomorrow's post.
Hamburger Buns
1 1/2 cups warm water
1/4 cup granulated sugar
1 package (8 grams) active dry yeast
1 large egg
1/4 cup cooking oil
1/2 teaspoon salt
4 1/2 cups all-purpose flour
In a large bowl, stir the sugar into the warm water. Sprinkle the yeast over top and let stand undisturbed for ten minutes until bubbly. Stir to dissolve yeast. Add eggs, oil, and salt. Work in enough flour until dough pulls away from the sides of the bowl. Turn onto floured surface and knead for 8 to 10 minutes until dough is smooth and elastic. Shape dough into balls the size of tennis balls. Flatten slightly and place two inches apart on a baking sheet. Allow to rise for about an hour, or until doubled in bulk. Bake at 375◦F for about 20 minutes.
This zucchini pie is not the typical type of a pie you would think of. It is more like a quiche with no crust, but less eggy. It can also be baked in either a pie pan or a square pan. It is good warm, cooled, or cold, and stores well in the refrigerator. It cuts quite nicely into small squares or large wedges, and can easily be doubled for large crowds. It is quick, easy, and very tasty. A good way to use zucchini during zucchini season when you get tired of it plain. I used yellow zucchini because that's what I had, but green will add more color. The yellow looks like cheese, speaking of which, you could always add some grated mozzarella cheese to the batter too, it would be delicious. You can use whatever spices you would like, and serve this pie with whatever you wish! My grandmother shared this recipe with me, so I am not sure where it originally came from. I used a decorative quiche pan to bake mine, any type of pan will work really, just adjust cooking time accordingly.
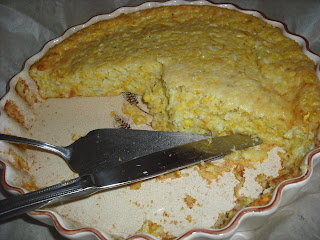
Zucchini Pie
1 cup all-purpose flour
1 1/2 teaspoons baking powder
1/4 teaspoon salt
1 Tablespoon oil (or melted butter)
4 large eggs
1/2 cup oil
3 cups fresh zucchini, grated or finely chopped
1 cup diced onion (1 medium)
1/2 cup grated Parmesan cheese
1/2 teaspoon salt
1/2 teaspoon ground black pepper
1/2 teaspoon parsley
1/2 teaspoon marjoram
Preheat oven to 350◦F. Grease a 9-inch pie plate or an 8x8 inch square baking pan.
In a small bowl, stir together the flour, baking powder, and salt. Stir in the oil.
In a separate large bowl, beat the eggs and the oil. Add the zucchini and onion. Add the flour mixture along with the remaining ingredients. Pour into prepared pan. Save some of the Parmesan cheese to sprinkle on top, or use extra. It turns golden and crisp and adds some more flavor and texture. Bake for 40-50 minutes until set.
Blueberry Hazelnut Cheesecake Squares
CRUST
1 1/4 cups all-purpose (plain) flour
3/4 cup finely chopped, toasted hazelnuts
1/3 cup granulated (white) sugar
pinch salt
1/2 cup cold butter, cut into small pieces
FILLING
2 packages (250 grams/8 ounces each) cream cheese, softened
3/4 cup granulated (white) sugar
2 Tablespoons all-purpose (plain) flour
3 large eggs, at room temperature
1/4 cup heavy cream (milk works too, as long as you use full fat cream cheese)
1 teaspoon vanilla extract
1 teaspoon almond extract
1 1/2 cups fresh or frozen blueberries
Preheat oven to 325◦F. Butter a 9x9 inch square baking pan.
CRUST: In a large bowl, stir together all ingredients except the butter, then cut in the butter until mixture resembles coarse crumbs. Press into prepared pan. Bake for 15 to 20 minutes until golden and firm.
FILLING: In a large bowl using a wooden spoon, beat the cream cheese and the sugar. Add the flour, then add the eggs, one at a time, beating well after each addition. Stir in cream and extracts, then gently fold in blueberries. Pour onto prepared crust. Bake for 30-35 minutes or until center is just set. Let cool to room temperature for an hour, then cover and refrigerate for at least three hours.
This is a new blueberry recipe I just tried this year! I already knew that cheesecake and blueberries go well together, and I like the combination of blueberries with hazelnuts. All together this makes really nice squares. I usually do not bake with nuts, but hazelnuts are my favorite, and they really add a buttery texture and nice flavor and crunch to these squares. These squares come together fairly easily, and taste really good. It comes from my huge baking book, that I like to refer to as my baking bible. I used one of the tablespoons of flour called for in the recipe to coat the blueberries so they would not sink in the batter. I also found that my pan of cheesecake took a lot longer to bake, maybe because I used an 8x8 inch pan, which would make the batter deeper, but I found it cooked a lot better when I turned up the oven temperature to 350◦F.
Williams - Sonoma. "Blueberry Cheesecake Squares with Hazelnut Crust." Recipe. Essentials of Baking, San Francisco: Oxmoor House, 2003. 152.
August is the month when one of my favorite fruits is ripe any ready to pick: blueberries! Blueberry season always brings back memories of picking blueberries in a blueberry field near my grandparent's house with all of my family when we would go down to visit in late August. We don't really get to do that anymore, now we rely on our local Farmer's Market for large boxes of fresh blueberries. Blueberries are a bit of a pain to pick anyway, because they are so small, and often small leaves, twigs, and grass end up in your collection as well, or too many blueberries end up in your mouth. I love baking with blueberries. My mother and I have a few go-to blueberry items we bake every year, which include her special blueberry muffins, and the recipe for blueberry yogurt cake we discovered in our newspaper a few years ago. I also like to try new blueberry recipes each year. Last year I tried Brown Butter Blueberry Muffins and Blueberry & Brown Butter Squares, a bit of a coincidence that they both used brown butter, but that flavor seems to pair very well with blueberries. I still have new recipes using blueberries on my list of baked goods I would like to try, so I will be sure to get to some of them. We keep some blueberries out to use for baking within a few days, and freeze the rest for baking with later on. Blueberries freeze very well, and frozen blueberries are almost interchangeable with fresh in baked items. I tend to use blueberries mostly in breads and muffins and loaves, but they are also good in squares, cakes, and even some savory dishes. And of course they make excellent jam!

PHOTO CREDIT:J-11.jpg"
http://gardenofeaden.blogspot.ca/2012/04/how-to-grow-blueberries.html .The Garden of Eaden, n.d. Tuesday, August 14, 2012.

This is a recipe I found and revised. I had a container of cherry yogurt in the fridge that I did not really like. There was nothing wrong with it, just not the type I like and am use to. I certainly did not want to waste it, so I found a recipe that actually called for a large amount of cherry yogurt. Then I changed around the rest of the recipe to match the ingredients I had. The original recipe did not call for peaches, but I think they pair well with the cherry flavor. The cherry yogurt I used was a very thick, Greek fruit on the bottom yogurt, so I made sure it was well stirred before using. It added a few chunks of real cherry and it also had quite a bit of sugar, which made the muffins fairly sweet. The yogurt also made the muffins nice and moist, even though the batter seemed fairly dry and thick as I was mixing it. It was not nearly as liquidy as most muffin batters, and I was thinking of adding a splash of milk, because the recipe does not call for a liquid besides eggs and yogurt. The muffins did not need it though, the yogurt is sufficient liquid to bind the ingredients together. I got 15 large muffins out of this batch, and they rose quite nicely!
Cherry Peach Muffins
1/4 cup butter or hard margarine, softened
2/3 cup packed brown sugar
2 large eggs
1/2 teaspoon vanilla or almond extract
1 1/2 cups cherry yogurt
2 1/3 cups all-purpose (plain) flour
2 teaspoon baking powder
1/2 teaspoon baking soda
1/2 teaspoon salt
3/4 cup peeled, chopped fresh peaches (2 medium)
Preheat oven to 375◦F. Line muffin cups with paper liners or grease them.
In a medium bowl, beat the butter and sugar. Beat in eggs, then extract and yogurt. In a separate large bowl, stir the next four ingredients together, make a well. Add the liquid ingredients to the dry and stir until just moistened. Stir in the peaches. Divide batter among muffin cups. Bake for 22 to 24 minutes or until muffins are well risen, firm to the touch, and a toothpick inserted into the center of a muffin comes out clean.
Garlic bread is a popular side dish that goes well with many different meals. It is most commonly served with pasta, in particular Italian pasta dishes, such as spaghetti and meatballs and lasagna. Garlic bread can be purchased all ready and premade at many grocery stores in the bakery, bread, refrigerator, or freezer section. However, it is pretty easy to do at home yourself, and does not take much longer. Making your own garlic bread is also cheaper, and it will be fresher than storebought garlic bread. Simply pick up a freshly baked crusty bread in the bakery section of the grocery store. Many stores bake these breads fresh every day, so go early in the morning, or ask out back if they have any just baked. They often come in special bags when they are this fresh. There will probably be a choice of breads, generally crusty Italian breads are used for garlic bread, but French bread, Farmer's bread, or a whole wheat or multigrain version of any of these breads will work well too. Slice the bread in half horizontally. Spread both sides with garlic spread - a storebought tub works fine, but if you want to make your own garlic spread, even better! Do not be shy with the garlic spread, use lots! Put the halves back together. This can be wrapped and stored in the refrigerator until needed, or heated right away. Just pop it in the oven wrapped in aluminum foil at 350◦F for 10-15 minutes until hot. Then slice and serve. This is basically the same as the garlic bread you can purchase at the store, Italian bread sliced and spread with garlic spread, but it is cheaper and you can use fresh bread, while premade garlic bread at the store is usually made with day-old bread.


