Mom's Cherry Cake
3 large eggs
3/4 cup oil
1 1/4 cups granulated (white) sugar
1-2 teaspoons almond extract
2 1/4 cups all-purpose (plain) flour
1 package (four serving size) instant vanilla pudding mix
2 teaspoons baking powder
1/2 teaspoon salt
1 - 11/2 cups red and green maraschino cherries, chopped
Preheat oven to 350◦F. Grease and flour a 10-inch bundt pan.
In a large bowl, beat the eggs. Beat in the oil and sugar. Beat in the almond extract. Stir in the flour, pudding, baking powder, and salt. Fold in the cherries. Bake for 45-60 minutes until a toothpick inserted in the center comes out clean.
My mother found this idea for a cherry cake that used a white cake mix, but she made her own recipe that is from scratch. This cake is really moist and sweet with chunks of plump cherries. It doesn't even need a frosting. I bet the addition of some chopped nuts would be welcome as well!
This is a blog of items I have baked, including recipes from the many cookbooks I own, my own created recipes, and recipes from other sources. I will write about what I have made and post a picture along with it! During stretches when I go without baking, I will write a brief article about some aspect of cooking, baking, ingredients, or preparation techniques.
Saturday, January 24, 2015
Friday, January 23, 2015
Mushroom Black Bean 'Meat'loaf
In my cooking adventures, I like to try healthier options and vegan and vegetarian options. I also like to try to pass these creations off as 'normal', so I can receive unbiased comments and people will actually try them. This is a 'meat'loaf recipe I developed that has no meat, yet the color and appearance is just like meatloaf. The texture may be slightly softer, depending on what type of meatloaf you are use to. The mushrooms provide the dark color and meaty texture and the beans provide the protein. The other vegetables and sauce are added for extra nutrition, flavor, and moistness, and the oats are used as a binder and for texture. The result? This meatloaf is anything but dry, but may be a bit too moist for meat lovers. The flavor is good too, but doesn't exactly mimic beef. In the end, it is a good, healthy meatloaf alternative.
Mushroom Black Bean 'Meat'loaf
1 small carrot, very finely diced or shredded
1 small onion, very finely diced or shredded
2 packages (250grams/8ounces each) white button mushrooms
2 cloves garlic, minced
1 can (590mL) black beans, well-drained
1/3 cup old-fashioned oats
2 large egg whites (or substitute flax eggs or extra sauce for a vegan version)
1 cup tomato sauce of choice
salt and pepper, to taste
Heat a little oil in a large frying pan over medium heat. Sauté the carrot, onion, mushrooms, and garlic until just tender, about ten minutes or so. The vegetables can be finely chopped in a food processor (or by hand) either before or after cooking - they will cook much faster if chopped first.
Transfer vegetables to a food processor and chop if needed, then add the beans and process until well combined. Add the oats and egg whites just until mixture comes together. Then stir in 1/2 cup tomato sauce and seasonings by hand.
Preheat oven to 375◦F. Line an 8x8-inch square pan with parchment paper.
Spread the mixture evenly in prepared pan, it may seem wet but will firm up in the oven. Bake for about an hour, broiling for the last few minutes if a crispy top crust is desired. Heat the remaining 1/2 cup sauce and pour over top. Serve as you would meatloaf!
I forgot to get a picture of an individual slice of it before we dug in...
Mushroom Black Bean 'Meat'loaf
1 small carrot, very finely diced or shredded
1 small onion, very finely diced or shredded
2 packages (250grams/8ounces each) white button mushrooms
2 cloves garlic, minced
1 can (590mL) black beans, well-drained
1/3 cup old-fashioned oats
2 large egg whites (or substitute flax eggs or extra sauce for a vegan version)
1 cup tomato sauce of choice
salt and pepper, to taste
Heat a little oil in a large frying pan over medium heat. Sauté the carrot, onion, mushrooms, and garlic until just tender, about ten minutes or so. The vegetables can be finely chopped in a food processor (or by hand) either before or after cooking - they will cook much faster if chopped first.
Transfer vegetables to a food processor and chop if needed, then add the beans and process until well combined. Add the oats and egg whites just until mixture comes together. Then stir in 1/2 cup tomato sauce and seasonings by hand.
Preheat oven to 375◦F. Line an 8x8-inch square pan with parchment paper.
Spread the mixture evenly in prepared pan, it may seem wet but will firm up in the oven. Bake for about an hour, broiling for the last few minutes if a crispy top crust is desired. Heat the remaining 1/2 cup sauce and pour over top. Serve as you would meatloaf!
I forgot to get a picture of an individual slice of it before we dug in...
Labels:
beans,
carrots,
ground meat,
meat,
mushrooms,
onion,
sauce,
vegetables,
vegetarian
Thursday, January 22, 2015
Parsley Cashew Pesto
One day not too long ago, I adverted a mini crisis. You see, it is difficult to garnish a soup with pesto if you have no basil on hand to make the pesto. Since there was plenty of parsley on hand, I decided why not try parsley pesto? Traditionally, pesto is made with basil and pine nuts and Parmesan cheese, but now you see recipes specifically titled 'basil pesto' because many other herbs are common as well. The truth is, basil is a grainy green sauce. I came up with this recipe on a whim, and ingredient amounts certainly are not exact, as I just eyeballed them and adjusted as needed. More olive oil can certainly be added for a smoother consistency. So try making a pesto with any type, or a combination of, fresh herbs and/or leafy greens such as spinach. Try any type of nut, and any type of finely grated cheese. I like to leave the cheese out altogether and substitute flax or wheat germ for added nutrition. Although I think olive oil provides the best flavor, certainly another oil could be used. Try other spices instead of just pepper as well.
Parsley Cashew Pesto
1 bunch fresh parsley, leaves only (about 2 cups loosely packed)
1/3 cup cashew nuts (roasted and salted are fine, if unsalted just add more seasoning to taste)
2-4 cloves garlic, finely chopped
2 Tablespoons ground flaxseed or wheat germ
1/3 cup olive oil
salt and pepper, to taste
Process the parsley, nuts, garlic, and flaxseed in a food processor until nuts are finely chopped and ingredients are combined. With the processor running on low, slowly stream in the olive oil. Taste, and season as desired.
Parsley Cashew Pesto
1 bunch fresh parsley, leaves only (about 2 cups loosely packed)
1/3 cup cashew nuts (roasted and salted are fine, if unsalted just add more seasoning to taste)
2-4 cloves garlic, finely chopped
2 Tablespoons ground flaxseed or wheat germ
1/3 cup olive oil
salt and pepper, to taste
Process the parsley, nuts, garlic, and flaxseed in a food processor until nuts are finely chopped and ingredients are combined. With the processor running on low, slowly stream in the olive oil. Taste, and season as desired.
Wednesday, January 21, 2015
Hollandaise Sauce
As someone who has been a lover of cooking and food for years, I have never made a hollandaise sauce. As far as I can remember, I have never even tasted a hollandaise sauce - either real or from a package. It's not a common household dish and I don't often eat at many high-end restaurants. It also tends to be offered very limitedly - reserved for things like Eggs Benedict and grilled asparagus. So, not personally knowing how this sauce was supposed to look or taste aside from textbook explanations, I dived into my first attempt making it.
Next I clarified my own butter by slowly melting, then boiling a pound of butter to remove the milk solids and leave only pure butterfat. I kept this warm, but not too warm.
Then I began with my egg yolks, continuously whipping them with a little water over a double boiler until they were pale yellow and thick.
Next, the moment of truth and the trickiest part - slowly but continuously whip the warm clarified butter into the egg yolks, beginning only a drop at a time, and speeding up only when the emulsion begins to form.
This was all going quite well up to this point - the sauce was smooth, pale yellow, and thick, just like the descriptions. But suddenly, after adding another drop of butter, the sauce just completely split on me, as hollandaise often does. It happened so fast, and went from such a pretty looking sauce to a curdled mess.
Despite my attempts to rescue it - depending on whether your sauce split because it was too hot or too cold, sometimes a drop of cold water may be added or a fresh egg yolk may be whipped in to save it, it was past the point of no return. I seasoned it to taste with fresh lemon juice and salt and pepper anyway, and discovered the taste was still excellent and rich and buttery, but the sauce didn't have that velvety, coat the tongue texture it was supposed to.
So what went wrong? Hollandaise sauce is very technical and there are so many variables.
Was the reduction too hot, too cold, reduced too much, or not reduced enough?
Was the clarified butter too hot, too cold, or not properly clarified and unstable?
Were the egg yolks whipped too little, too much, too quickly, or heated too much?
Was the butter added too quickly, or was too much butter added?
Was it the fact I did not have a stainless steel bowl and had to substitute glass?
I may never know. What I do know, is my second attempt, sadly, turned out worse. I think this time either the egg yolks became too hot during cooking over the double boiler, or the bowl I used was too big and caused the eggs to overcook. I wasn't overly fond of my first taste of hollandaise sauce, now I am the type of person who has no problem eating rich sauces by the spoonful. But I don't much like the slightly sour flavor hollandaise imparts. After two failed attempts at making it, I think I dislike hollandaise sauce even more. Maybe one day I will perfect the art of making a perfect hollandaise.
| Hollandaise sauce served on an English muffin. |
I made a reduction of crushed peppercorns and shallots in some vinegar, reducing the mixture by half. I kept this warm, but not too warm.
Next I clarified my own butter by slowly melting, then boiling a pound of butter to remove the milk solids and leave only pure butterfat. I kept this warm, but not too warm.
Then I began with my egg yolks, continuously whipping them with a little water over a double boiler until they were pale yellow and thick.
Next, the moment of truth and the trickiest part - slowly but continuously whip the warm clarified butter into the egg yolks, beginning only a drop at a time, and speeding up only when the emulsion begins to form.
This was all going quite well up to this point - the sauce was smooth, pale yellow, and thick, just like the descriptions. But suddenly, after adding another drop of butter, the sauce just completely split on me, as hollandaise often does. It happened so fast, and went from such a pretty looking sauce to a curdled mess.
| Broken hollandaise sauce looks like a curdled, grainy mess. |
So what went wrong? Hollandaise sauce is very technical and there are so many variables.
Was the reduction too hot, too cold, reduced too much, or not reduced enough?
Was the clarified butter too hot, too cold, or not properly clarified and unstable?
Were the egg yolks whipped too little, too much, too quickly, or heated too much?
Was the butter added too quickly, or was too much butter added?
Was it the fact I did not have a stainless steel bowl and had to substitute glass?
| Successful hollandaise sauce is thick, smooth, and velvety. |
Tuesday, January 20, 2015
Marmalade Bars
Marmalade Bars
4 cups all-purpose (plain) flour
1 1/2 cups packed light brown sugar
1/4 teaspoon salt
1 1/2 cups butter or hard margarine, softened
2 large eggs
2 cups orange marmalade
Preheat oven to 350◦F. Grease or line a 9x13 inch rectangular pan.
In a large bowl, crumble together all ingredients except the marmalade until well blended. Press two-thirds of the mixture into the prepared pan.Spread evenly with the marmalade, then crumble remaining crust over top. Bake for about 25 minutes until light golden.
This is sort of similar to the recipe for jam bars, except the crust is more tender and crumbly and doesn't require the fuss of rolling and cutting. I bet this recipe is great with any type of jam, and would be especially tasty with a homemade jam filling.
4 cups all-purpose (plain) flour
1 1/2 cups packed light brown sugar
1/4 teaspoon salt
1 1/2 cups butter or hard margarine, softened
2 large eggs
2 cups orange marmalade
Preheat oven to 350◦F. Grease or line a 9x13 inch rectangular pan.
In a large bowl, crumble together all ingredients except the marmalade until well blended. Press two-thirds of the mixture into the prepared pan.Spread evenly with the marmalade, then crumble remaining crust over top. Bake for about 25 minutes until light golden.
This is sort of similar to the recipe for jam bars, except the crust is more tender and crumbly and doesn't require the fuss of rolling and cutting. I bet this recipe is great with any type of jam, and would be especially tasty with a homemade jam filling.
Monday, January 19, 2015
Butterscotch Pudding
This is one of those self-sauced cakes, that has a firm cake-like texture on the top, a gooey pudding-like texture in the middle, and a sweet sauce on the bottom. The best part is - it is all made in one dish and just baked in the oven. These puddings are excellent hot but leftovers are also good cold. I have made chocolate, hot fudge, and lemon sauced puddings before, now here is a sweet butterscotch version.
Butterscotch Pudding
CAKE
2 cups all-purpose (plain) flour
1 cup granulated (white) sugar
4 teaspoons baking powder
1/4 teaspoon salt
1 cup milk
1/4 cup butter or hard margarine, softened
SAUCE
2 cups packed brown sugar
2 Tablespoons butter or hard margarine
2 teaspoons vanilla extract
4 cups hot water
Preheat oven to 350◦F.
CAKE: Mix all ingredients together in a large bowl, then spread into a 9x13-inch rectangular pan.
SAUCE: Stir all ingredients together and pour over batter in pan, but DO NOT stir. Now bake for 30 minutes until a cake is formed at the top. A toothpick inserted in the cake part should come out clean, but if you stick it to the bottom of the pan, there will be a sauce. Great warm with ice cream!
Butterscotch Pudding
CAKE
2 cups all-purpose (plain) flour
1 cup granulated (white) sugar
4 teaspoons baking powder
1/4 teaspoon salt
1 cup milk
1/4 cup butter or hard margarine, softened
SAUCE
2 cups packed brown sugar
2 Tablespoons butter or hard margarine
2 teaspoons vanilla extract
4 cups hot water
Preheat oven to 350◦F.
CAKE: Mix all ingredients together in a large bowl, then spread into a 9x13-inch rectangular pan.
SAUCE: Stir all ingredients together and pour over batter in pan, but DO NOT stir. Now bake for 30 minutes until a cake is formed at the top. A toothpick inserted in the cake part should come out clean, but if you stick it to the bottom of the pan, there will be a sauce. Great warm with ice cream!
Sunday, January 18, 2015
Raisin Muffins
When you are tired or the standard old chocolate chip muffins (not that that is possible), or want to be healthier (not that a good dose of chocolate isn't healthy), or are just looking for something different, try this delicious raisin muffin recipe (not that chocolate chips aren't delicious too).
Raisin Muffins
1 1/2 cups raisins
1 cup water
1/2 cup butter or hard margarine, softened
3/4 cup packed light brown sugar
1 large egg
1 teaspoon vanilla extract
2 cups all-purpose (plain) flour
1 teaspoon baking powder
1 teaspoon baking soda
1 teaspoon ground cinnamon
1/2 teaspoon ground nutmeg
pinch salt
In a medium saucepan bring the raisins and water to a boil. Simmer for ten minutes then set aside to cool slightly.
Preheat oven to 375◦F. Grease or line 18 muffin cups.
In a large bowl, cream together the butter and sugar. Add the egg, then the vanilla. Stir in the raisins along with 1/2 cup of the cooking water. Stir in the remaining dry ingredients.
Bake for about 20 minutes until a toothpick inserted in the center comes out clean.
Raisin Muffins
1 1/2 cups raisins
1 cup water
1/2 cup butter or hard margarine, softened
3/4 cup packed light brown sugar
1 large egg
1 teaspoon vanilla extract
2 cups all-purpose (plain) flour
1 teaspoon baking powder
1 teaspoon baking soda
1 teaspoon ground cinnamon
1/2 teaspoon ground nutmeg
pinch salt
In a medium saucepan bring the raisins and water to a boil. Simmer for ten minutes then set aside to cool slightly.
Preheat oven to 375◦F. Grease or line 18 muffin cups.
In a large bowl, cream together the butter and sugar. Add the egg, then the vanilla. Stir in the raisins along with 1/2 cup of the cooking water. Stir in the remaining dry ingredients.
Bake for about 20 minutes until a toothpick inserted in the center comes out clean.
Saturday, January 17, 2015
Almond Buttercream
For most cakes I decorate, as seen on this blog, I tend to use my signature vanilla buttercream. Buttercream is the perfect icing for piping, spreading, decorating, and coloring. It is also simple and quick to make and, in my opinion, the tastiest!
However, I wanted the same texture, but a slightly different flavor to go with my cocoa butter pecan tank cake. I wanted something a little nutty to go with the pecans. So on a whim, I used a good amount of almond extract in place of the usual vanilla extract. I wish there was a such thing as pecan extract, because that would have matched the flavor of the cake perfectly. I'm sure pecan extract does exist, it just definitely isn't as common and I did not have any on hand.
The result? Almond extract certainly did add a nutty flavor, and made the icing's taste reminiscent of marzipan - a sweet almond paste candy or coating. If you like marzipan (I do), then that's definitely a good thing. Also my icing was colored with a small amount of cocoa powder, so the nutty chocolate flavor of the icing matched the nutty chocolate flavor of the cake. I am not going to use almond extract for every batch of buttercream I make from now on, but I certainly will when I desire a slightly different flavor or if it pairs better with the cake (or I am craving marzipan).
However, I wanted the same texture, but a slightly different flavor to go with my cocoa butter pecan tank cake. I wanted something a little nutty to go with the pecans. So on a whim, I used a good amount of almond extract in place of the usual vanilla extract. I wish there was a such thing as pecan extract, because that would have matched the flavor of the cake perfectly. I'm sure pecan extract does exist, it just definitely isn't as common and I did not have any on hand.
The result? Almond extract certainly did add a nutty flavor, and made the icing's taste reminiscent of marzipan - a sweet almond paste candy or coating. If you like marzipan (I do), then that's definitely a good thing. Also my icing was colored with a small amount of cocoa powder, so the nutty chocolate flavor of the icing matched the nutty chocolate flavor of the cake. I am not going to use almond extract for every batch of buttercream I make from now on, but I certainly will when I desire a slightly different flavor or if it pairs better with the cake (or I am craving marzipan).
Friday, January 16, 2015
Cocoa Butter Pecan Cake
I have never made a butter pecan cake before. I’ve seen it in the boxed
mixes, but never really had or made an authentic one. I received a request for
one, and began looking up recipes. Of course being the chocoholic I am, I
decided to enrich my version with a touch of cocoa as well. If you prefer a
plain butter pecan cake, simply replace the cocoa with ¼ cup additional flour.
Cocoa Butter Pecan Cake
1 ½ cups finely chopped pecans
2 cups granulated (white) sugar
8 large egg whites
2 teaspoons almond extract
3 cups cake/pastry flour
¼ cup unsweetened cocoa powder
1 cup milk
Preheat oven to 350◦F. Melt the two Tablespoons of butter. Spread the
pecans on a baking sheet, drizzle with the melted butter, and toast, stirring
often, for about 20 minutes until golden and fragrant. Set aside to cool.
Meanwhile, leave oven set to 350◦F. Grease and flour your pans (three
9-inch round pans or tank cake pans or whatever).
In a large bowl, beat the butter and sugar until light and fluffy. Beat
in the egg whites, one at a time, beating well after each addition. Beat in the
almond extract.
Sift together the flour, cocoa, and baking powder. Stir into the butter
mixture in three additions, alternately with the milk in two additions, beating
until just combined. Fold in the pecans.
Bake for about 25 minutes until a toothpick inserted in the center
comes out clean. Cool in the pans for 10-15 minutes before turning out to cool
completely.
I really liked how this butter pecan cake turned out – it has a buttery
flavor without being greasy. It is chock full of pecans that provide lots of
flavor since they are toasted, and add texture to the cake without being
crunchy. Because of the use of many egg whites, the cake is fluffy in texture –
just be sure not to overmix, a no-no for cakes contrary to popular belief. Try
butter pecan cake for a little something different or for pecan lovers!
Thursday, January 15, 2015
Tank Cake
Here is the birthday cake I made for my wonderful boyfriend this year.
Each year I like to make him a themed birthday cake that has to do with
something he likes. I have never asked him what design he would like on his
cake, as I prefer it to be a surprise. Although this year I did ask what flavor
cake he would like, and he decided on something different than the typical
chocolate – butter pecan, with a hint of chocolate. I also asked, just for fun,
what design he would like, telling him I had already decided and planned it,
and that his answer wouldn’t change anything. Ironically (or not, because I
guess I do know him pretty well) he said a tank cake, as he is an avid
collector of model tanks. He gave me an exact model type too, but I know a lot
less about tanks and didn’t think I could pull off that much detail.
Shaping a cake like a tank is actually pretty simple – all you need is three standard-sized pans: a 9x13-inch rectangular pan, a 9x5-inch loaf pan, and a round ramekin. Filling these three cake pans requires slightly more batter than provided by a standard two layer cake mix; I used a recipe designed to fill three 9-inch round layer pans. Use your favorite flavor, bake as usual, cool, then trim off any uneven edges and rounded tops. You will also need to cut out a small rectangle, approximately four inches long and one and a half inches wide, two inches from either end of the cake, on one short side of the 9x13 –inch rectangular cake. Cut this piece in half horizontally. One half will be used for the barrel, the other half is to test the quality of your cake (eat it). Frost each layer individually, then stack as pictured, adding and smoothing frosting around the edges. You will need a support for the barrel – I used a chocolate kiss, but a mound of icing or other chocolate would do the trick as well.
Next comes the fun part – decorating. I think the cream-filled
chocolate sandwich cookies really make excellent wheels (are they called wheels
on a tank?), but alternately molded chocolate or piped frosting could be used
instead. I piped star borders in a slightly darker shade of frosting all around
the edges of the tank for some character, and piped “Happy Birthday Julian” on
the top. If your frosting job isn’t perfect, just call them ‘battle scars’ and
move on. I have seen several tank cakes covered in fondant, but as mentioned
numerous times before, I prefer working with and eating buttercream. I didn’t
want to make the cake tank grey, as I didn’t think that looked as edible, nor
did I want to go with camouflage or tank green, for reasons based on appearance, taste, and authenticity.
I almost went with hot pink (an inside joke), but settled on a beige/light
brown color. There are tanks of this color and that allowed me to use cocoa to
color the icing – much better tasting and much better for you than food dyes.
Happy Birthday Julian! :)
Wednesday, January 14, 2015
Parsnip and Celery Pals
This is a quick vegetable side dish I made using simple vegetables you can easily find this time of year. It really isn't a complicated recipe, but many people don't think of pairing parsnip and celery. Their flavors certainly do complement each other, with the celery being slightly bitter and the parsnip nutty and sweet. They also cook well together because you can large dice them both, and the parsnip is cut small enough to cook quickly and the celery is large enough to refrain from becoming mushy. Celery sweetens when cooked properly, and I much prefer it to raw. Parsnips are very hard and crunchy raw. The two vegetables are different colors as well.
To cook them, I melted a little butter in a frying pan, then sautéed them along with some minced garlic. Toward the end I seasoned to taste with salt, freshly ground black pepper, and dried rosemary, though any herbs and spices would bring a little more freshness to the dish.
Tuesday, January 13, 2015
Chicken Cordon Bleu En Croûte
Chicken Cordon Bleu seems to be one of those dishes, like crème brûlée or foie gras (which is literally just duck fat), that just sounds so fancy and restaurant-quality. Really, it's just the classical French name, but names do sell, and these items are associated as high class. They are not necessarily difficult to make, but they can be nailed or not so great. Everyone seems to know chicken cordon bleu involves chicken with ham and Swiss cheese, but not many are really aware of the origin of the name. Well, most of these French terms cannot be taken literally, and cordon bleu just refers to meat wrapped around cheese. So you could have steak cordon bleu or pork cordon bleu, but chicken is by far the most common.
Add another French term - en croûte - to the mix, and it sounds even fancier, when really I am simply baking the chicken, ham, and cheese in a pastry crust.
I have had chicken cordon bleu a few times, but this was my first time making it. Here is my recipe for chicken cordon bleu en croûte.
Chicken Cordon Bleu En Croûte
oil
boneless, skinless chicken breasts
thin ham slices, diced
Swiss cheese, grated
2 cups all-purpose (plain) flour
4 teaspoons baking powder
1 teaspoon salt
1/2 cup butter or hard margarine, cold
1 cup milk
Trim off any pieces of fat from the chicken. Slice each piece in half horizontally almost all the way through and open like a book. Pound until very thin and flattened, but not paper thin.
Heat a little oil in a frying pan over medium heat. Place about two to three teaspoons ham and a good heaping two tablespoons cheese on one end of each chicken breast. Press down to compress. Gently roll up chicken breast. You may secure with toothpicks if needed.
Sear the chicken breasts for a few minutes on all sides until golden.
Meanwhile, preheat oven to 375◦F. Line a baking sheet with parchment paper.
Prepare the crust by mixing the flour, baking powder, and salt together. Cut in the butter until crumbly. Mix in the milk, dough will be soft. Knead lightly until dough comes together. Roll out on a lightly floured surface to a rectangle about one centimeter thick. Cut into squares or rectangles just large enough to wrap around the chicken breasts.
Place a chicken breast in a crust square and pull the sides up, overlapping on top. Biscuits can then be brushed with milk, egg wash, or a little melted butter if desired. Place on prepared baking sheet and bake for about 20 minutes until the chicken is cooked thorough. Be sure to remove toothpicks before serving/eating.
One word of advice: CHEESE! Do NOT skimp on the cheese! You want the cheese oozing out of the chicken - that is the beauty of the dish. If you think there is too much cheese, you are probably wrong, as long as you can still roll up the chicken around it. A little ham goes a long way but you need a lot of cheese.
Add another French term - en croûte - to the mix, and it sounds even fancier, when really I am simply baking the chicken, ham, and cheese in a pastry crust.
I have had chicken cordon bleu a few times, but this was my first time making it. Here is my recipe for chicken cordon bleu en croûte.
Chicken Cordon Bleu En Croûte
oil
boneless, skinless chicken breasts
thin ham slices, diced
Swiss cheese, grated
2 cups all-purpose (plain) flour
4 teaspoons baking powder
1 teaspoon salt
1/2 cup butter or hard margarine, cold
1 cup milk
Trim off any pieces of fat from the chicken. Slice each piece in half horizontally almost all the way through and open like a book. Pound until very thin and flattened, but not paper thin.
Heat a little oil in a frying pan over medium heat. Place about two to three teaspoons ham and a good heaping two tablespoons cheese on one end of each chicken breast. Press down to compress. Gently roll up chicken breast. You may secure with toothpicks if needed.
Sear the chicken breasts for a few minutes on all sides until golden.
Meanwhile, preheat oven to 375◦F. Line a baking sheet with parchment paper.
Prepare the crust by mixing the flour, baking powder, and salt together. Cut in the butter until crumbly. Mix in the milk, dough will be soft. Knead lightly until dough comes together. Roll out on a lightly floured surface to a rectangle about one centimeter thick. Cut into squares or rectangles just large enough to wrap around the chicken breasts.
Place a chicken breast in a crust square and pull the sides up, overlapping on top. Biscuits can then be brushed with milk, egg wash, or a little melted butter if desired. Place on prepared baking sheet and bake for about 20 minutes until the chicken is cooked thorough. Be sure to remove toothpicks before serving/eating.
One word of advice: CHEESE! Do NOT skimp on the cheese! You want the cheese oozing out of the chicken - that is the beauty of the dish. If you think there is too much cheese, you are probably wrong, as long as you can still roll up the chicken around it. A little ham goes a long way but you need a lot of cheese.
Monday, January 12, 2015
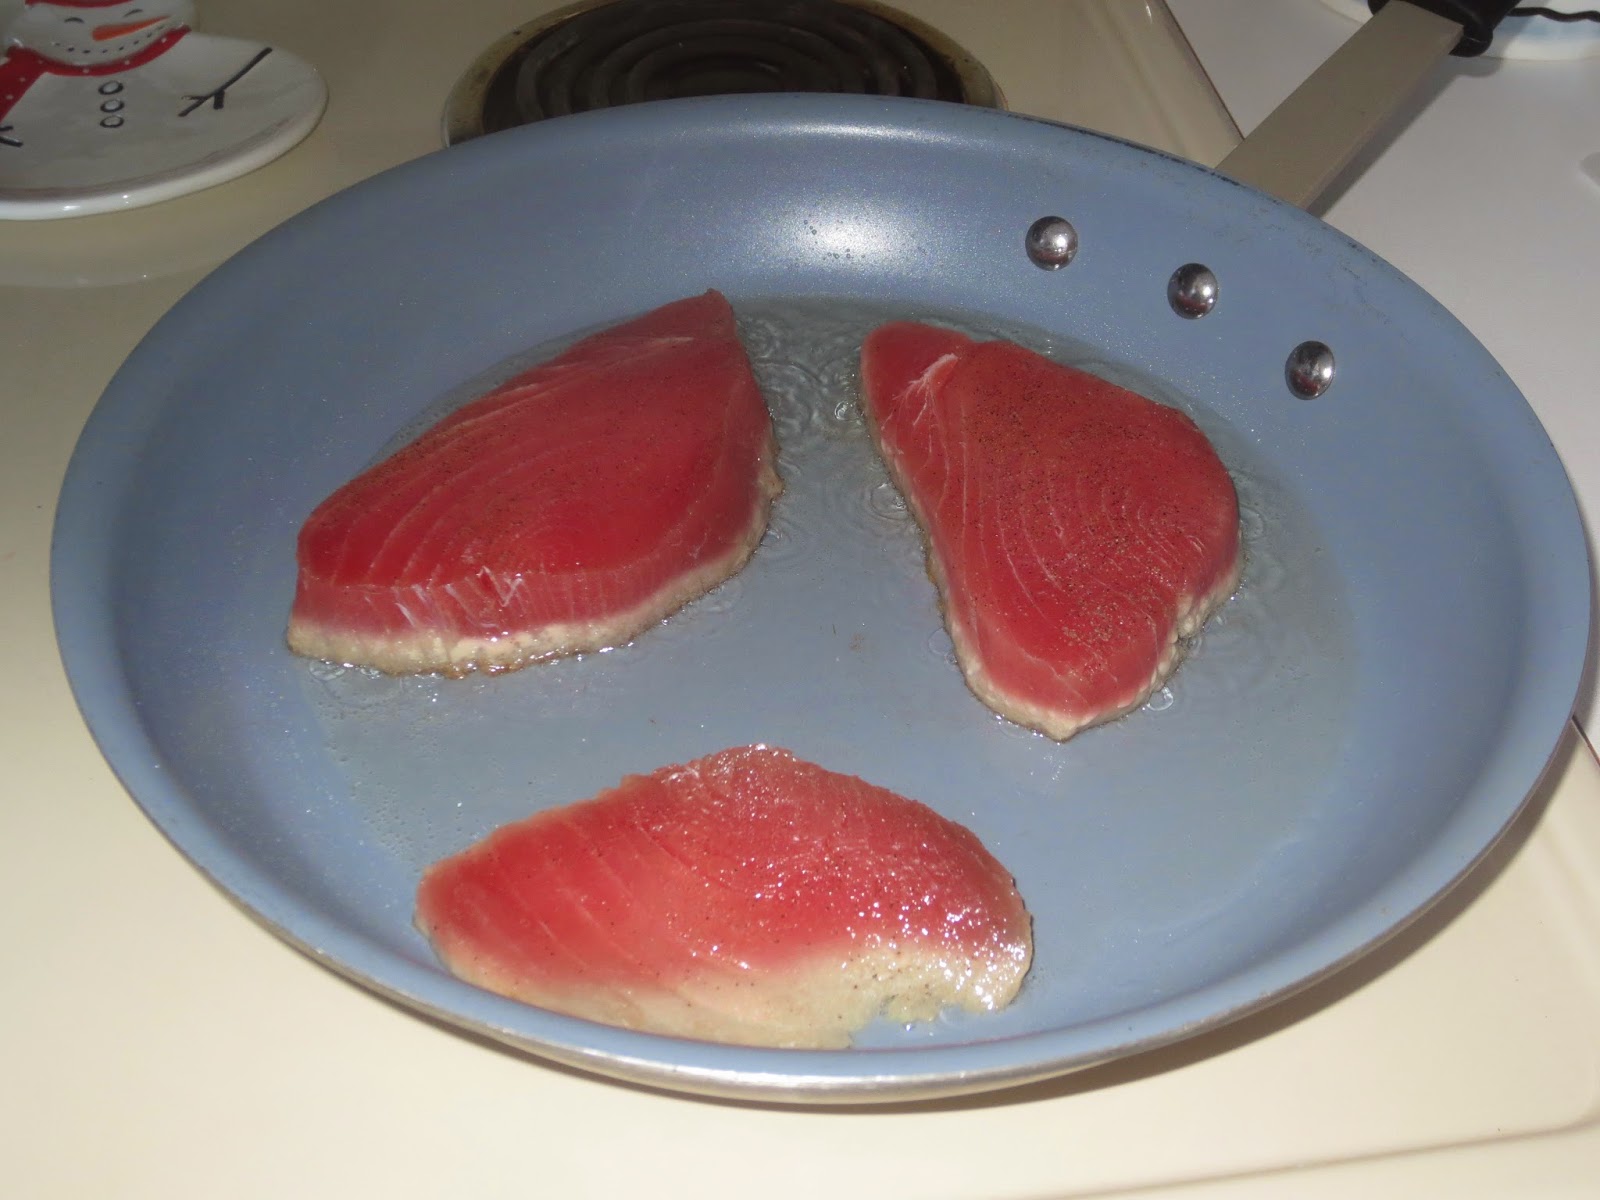
Seared Tuna Steak
- The tuna must be very fresh, high-quality, and preferably sustainable.
- Gently cut the tuna into slices about one inch or two centimeters thick. If you cut it any thinner, it will overcook for sure. Thicker is acceptable though.
- Season both sides of the tuna with salt and ground black pepper. You can of course use other seasonings, but I like to keep it simple and let the tuna do the talking.
- Heat some vegetable oil in a frying pan over high heat. You want the pan to be really hot.
- Place the tuna steaks in the pan and cook for about 90 seconds per side - just enough time to give it a nice color but not long enough to cook the inside.
- Remove the tuna steaks from the pan and place on a platter to rest for a few minutes. Brush with some olive oil for flavor and to prevent it from drying out.
- Slice open the tuna with a fork, admire that beautiful pink color, and devour!
Sunday, January 11, 2015
Nutella Inspired Tarts
Yesterday I featured Nutella Inspired Truffles. Today I am featuring Nutella Inspired Tarts. This creation is based off yesterday's recipe: both use the same primary ingredients and have the same flavors, but neither of them actually uses Nutella - just chocolate and hazelnuts used to recreate the beloved flavor. Actually, I suppose I featured these posts in the wrong order, as the original recipe was meant as a pie or tart crust, and I formed some truffles with the leftover mixture. Either way, the base recipe is featured in yesterday's post. Here is the process I used for making these tarts.
I used miniature aluminium pie plates and pressed the crust mixture into them in a layer thick enough to cover the pan. Then I stuck them in the freezer until firm. Once firm, I gently removed them from the pie plates. In hindsight, although this may allow for a prettier presentation, it was not the best idea for transporting and serving the tarts. Since the crust mixture is not baked, it falls apart easily when handled too much or warmed to room temperature, so the tarts would have held together much better if I had left them in the pan.
Making the best of things, I placed them on a plate and did not move them until it was time to eat. The filling is a chocolate cream cheese mixture. I then used cranberries to form a heart on each tart, and garnished with some meringue icing I had (as I prefer it to whipped cream based on flavor), as well as some strawberry slivers.
This makes nice individual tarts where you can vary flavors to suit your tastes (see yesterday's truffle post) and create unique designs. Alternately you could make one large pie, but I like the elegance of individual servings.
I used miniature aluminium pie plates and pressed the crust mixture into them in a layer thick enough to cover the pan. Then I stuck them in the freezer until firm. Once firm, I gently removed them from the pie plates. In hindsight, although this may allow for a prettier presentation, it was not the best idea for transporting and serving the tarts. Since the crust mixture is not baked, it falls apart easily when handled too much or warmed to room temperature, so the tarts would have held together much better if I had left them in the pan.
Making the best of things, I placed them on a plate and did not move them until it was time to eat. The filling is a chocolate cream cheese mixture. I then used cranberries to form a heart on each tart, and garnished with some meringue icing I had (as I prefer it to whipped cream based on flavor), as well as some strawberry slivers.
This makes nice individual tarts where you can vary flavors to suit your tastes (see yesterday's truffle post) and create unique designs. Alternately you could make one large pie, but I like the elegance of individual servings.
Saturday, January 10, 2015
Nutella Inspired Truffles
This is not a traditional truffle recipe, but it is a really quick and even nutritious truffle recipe. It uses ingredients with natural sugars and healthy fats. Although these are not the smooth, melt-in-your-mouth type truffles, they have a bit of texture and are more like decadent energy bites. I call them Nutella inspired, because the chocolate and hazelnut flavors are reminiscent of Nutella. I used frozen strawberry halves as a surprise center, though almost anything could be used or you can leave them without a center.
Nutella Inspired Truffles
1 cup whole hazelnuts
2 Tablespoons unsweetened cocoa powder
1/2 cup dates
pinch salt
strawberry halves (fresh or frozen), or desired filling
Process all ingredients in a food processor until well combined - hazelnuts should be ground and dates should be puréed so they are basically undetectable but hold the mixture together. Taste and add a little more salt, or you can add a sweetener if you wish though the dates do provide sufficient sweetness. Add a touch of cinnamon or vanilla extract if desired.
Transfer mixture to a bowl and refrigerate for a few hours until firm enough to roll into balls without crumbling.
Roll into balls, placing a strawberry half or desired filling in the middle, then rolling to encase it. Refrigerate again until firm. At this point the truffles can then be dipped in chocolate for added decadence, or just served with chocolate shavings on the side.
Variations are endless and go as follows:
Nuts: almonds, pecans, cashews, walnuts, peanuts, coconuts, macadamia nuts, brazil nuts
Fruit: raisins, dried cranberries, cherries, prunes, figs
Filling: small pieces of fresh, frozen, or dried fruits; whole nuts, chocolate pieces; cookie pieces; jams, preserves, or dessert sauces
Flavorings: cinnamon, ginger, vanilla extract, almond extract, lemon extract, ground coffee
Nutella Inspired Truffles
1 cup whole hazelnuts
2 Tablespoons unsweetened cocoa powder
1/2 cup dates
pinch salt
strawberry halves (fresh or frozen), or desired filling
Process all ingredients in a food processor until well combined - hazelnuts should be ground and dates should be puréed so they are basically undetectable but hold the mixture together. Taste and add a little more salt, or you can add a sweetener if you wish though the dates do provide sufficient sweetness. Add a touch of cinnamon or vanilla extract if desired.
Transfer mixture to a bowl and refrigerate for a few hours until firm enough to roll into balls without crumbling.
Roll into balls, placing a strawberry half or desired filling in the middle, then rolling to encase it. Refrigerate again until firm. At this point the truffles can then be dipped in chocolate for added decadence, or just served with chocolate shavings on the side.
Variations are endless and go as follows:
Nuts: almonds, pecans, cashews, walnuts, peanuts, coconuts, macadamia nuts, brazil nuts
Fruit: raisins, dried cranberries, cherries, prunes, figs
Filling: small pieces of fresh, frozen, or dried fruits; whole nuts, chocolate pieces; cookie pieces; jams, preserves, or dessert sauces
Flavorings: cinnamon, ginger, vanilla extract, almond extract, lemon extract, ground coffee
Friday, January 09, 2015
Cranberry Orange Sauce
120 grams granulated (white) sugar
juice of one large orange
+ enough water to make 2/3 cup liquid
175 grams fresh or frozen cranberries
1 teaspoon ground cinnamon
grated zest of one large orange
Combine the sugar, orange juice, and water in a medium saucepan and bring to a boil. Add the cranberries and cinnamon and simmer for about 15 minutes, until berries have burst. Add the zest and simmer an additional five minutes until thickened. Cool and refrigerate.
This is another holiday recipe, though cranberry sauce goes well with many meats all year-round. This version gets a little extra flavor from orange and cinnamon. This makes a small batch - about a cup - but can easily be doubled or tripled. Cranberry sauce is so easy to make and so much better than that found in a can.
120 grams granulated (white) sugar
juice of one large orange
+ enough water to make 2/3 cup liquid
175 grams fresh or frozen cranberries
1 teaspoon ground cinnamon
grated zest of one large orange
Combine the sugar, orange juice, and water in a medium saucepan and bring to a boil. Add the cranberries and cinnamon and simmer for about 15 minutes, until berries have burst. Add the zest and simmer an additional five minutes until thickened. Cool and refrigerate.
This is another holiday recipe, though cranberry sauce goes well with many meats all year-round. This version gets a little extra flavor from orange and cinnamon. This makes a small batch - about a cup - but can easily be doubled or tripled. Cranberry sauce is so easy to make and so much better than that found in a can.
Thursday, January 08, 2015
Turkey Stuffing
This post may be coming a little late, considering turkey dinners with stuffing and all the trimmings tend to be most popular during the Thanksgiving and Christmas season. But here is the stuffing I made for our New Year's turkey feast. Stuffing is a good, basic dish to know how to make, and can be used in a wide variety of dishes - chicken, turkey, goose, duck, even pork and fish. It can also take on a range of flavors - add some cranberries, nuts, or other vegetables. Stuffing is an incredibly easy dish to make, almost as easy as those box mixes, which seem to be popular, but just cannot beat the flavor of homemade. Some homemade recipes just don't seem to turn out great, so it is important to find a really good one. This is a really good one, in my opinion anyway. I'm not really a stuffing fan, I never eat the boxed mixes and have tasted and not really cared for some homemade versions, but this one I love. It's definitely got the typical stuffing seasons, along with a few vegetables and plenty of bread - and it is a bit on the wetter side, just the way I like it!
Turkey Stuffing
1/2 cup clarified butter
1 medium white onion, small dice
2 stalks celery, small dice
one pound stale white bread, in small cubes (use baguette, French, Italian, sandwich, rolls, or a combination)
1 egg, beaten
2 Tablespoons chopped fresh parsley
1 teaspoon ground thyme
1/2 teaspoon rosemary
salt and pepper, to taste
1 1/2 cups turkey or chicken stock (use less if you like a drier stuffing)
Heat the butter in a medium frying pan over medium heat. Add the onion and celery and sauté, without browning, until onion is translucent and vegetables are quite soft.
Meanwhile, toss together the bread, egg, parsley, thyme, rosemary, and seasonings together in a large bowl. Stir in the vegetables and butter from the pan. Pour the stock over top and mix in.
Place mixture in a buttered 9x13 inch rectangular dish or casserole dish of similar size and cover with foil. The stuffing can then be refrigerated if prepared in advance.
Bake covered at 350◦F for 45-60 minutes until hot. Stuffing is pretty forgiving if you put it in a little late or need to keep it in longer while the main course is still being prepared. It also reheats well. Makes approximately eight servings.
Turkey Stuffing
1/2 cup clarified butter
1 medium white onion, small dice
2 stalks celery, small dice
one pound stale white bread, in small cubes (use baguette, French, Italian, sandwich, rolls, or a combination)
1 egg, beaten
2 Tablespoons chopped fresh parsley
1 teaspoon ground thyme
1/2 teaspoon rosemary
salt and pepper, to taste
1 1/2 cups turkey or chicken stock (use less if you like a drier stuffing)
Heat the butter in a medium frying pan over medium heat. Add the onion and celery and sauté, without browning, until onion is translucent and vegetables are quite soft.
Meanwhile, toss together the bread, egg, parsley, thyme, rosemary, and seasonings together in a large bowl. Stir in the vegetables and butter from the pan. Pour the stock over top and mix in.
Place mixture in a buttered 9x13 inch rectangular dish or casserole dish of similar size and cover with foil. The stuffing can then be refrigerated if prepared in advance.
Bake covered at 350◦F for 45-60 minutes until hot. Stuffing is pretty forgiving if you put it in a little late or need to keep it in longer while the main course is still being prepared. It also reheats well. Makes approximately eight servings.
Wednesday, January 07, 2015
Homemade Angel Food Cake
Here I made one layer each of chocolate and white angel food cake from one batch. Angel food cake is light, fluffy, sweet, and surprisingly fat-free. It is great with fresh fruit and cream or ice cream, but can also be used in layer cakes.
Tuesday, January 06, 2015
Italian Meringue Buttercream
Normally when I make cakes and need to decorate them, I almost ALWAYS make buttercream icing. I like buttercream icing for it's versatility - easy to spread, pipe, and color. It is really easy to make, you can whip up as much or as little as you need, and it always turns out. It keeps well refrigerated or frozen, works well as a filling, and can be flavored as desired. I also love the taste of buttercream - fresh pure butter and sweet, soft icing sugar - need I say more?
Other frosting types I have tried include fudge, ganache, flat, royal, and whipped cream. Of course fudge frosting and ganache are awesome as well, but you cannot use chocolate frosting for everything. For this puzzle cake, I decided to try a new type of frosting - Italian meringue buttercream. Now I have made meringues before (though never Italian) and I have made buttercream before, so I had the basics down.
Italian meringue is a meringue (mixture of egg whites and sugar) that is fully cooked by beating hot sugar syrup into the whipped egg whites until the mixture cools and stiff peaks are formed. To make Italian buttercream, small pieces of softened butter is then beaten into the Italian meringue. Italian meringue is not difficult to make, but does take some time to do. First, the sugar syrup must be prepared to just the right temperature without crystallizing. Next, the whites need to be beaten to soft peaks. Then, the sugar syrup must be beaten into the whites, ensuring the hot syrup touches neither the bowl nor the beaters. It is then beaten until cool, at least ten minutes for a good batch. So this icing requires a lot of beating, and a standmixer certainly would help!
I really liked the Italian meringue, as it was glossy and smooth, but too thin to use as a frosting. Once I added the butter, it was the proper consistency but I didn't like the flavor as much. Italian buttercream is light, fluffy, white, and smooth, and has a delicate texture yet a rich flavor. It isn't great for piping but ideal for delicate cakes that cannot be spread with a heavy frosting.
Other frosting types I have tried include fudge, ganache, flat, royal, and whipped cream. Of course fudge frosting and ganache are awesome as well, but you cannot use chocolate frosting for everything. For this puzzle cake, I decided to try a new type of frosting - Italian meringue buttercream. Now I have made meringues before (though never Italian) and I have made buttercream before, so I had the basics down.
Italian meringue is a meringue (mixture of egg whites and sugar) that is fully cooked by beating hot sugar syrup into the whipped egg whites until the mixture cools and stiff peaks are formed. To make Italian buttercream, small pieces of softened butter is then beaten into the Italian meringue. Italian meringue is not difficult to make, but does take some time to do. First, the sugar syrup must be prepared to just the right temperature without crystallizing. Next, the whites need to be beaten to soft peaks. Then, the sugar syrup must be beaten into the whites, ensuring the hot syrup touches neither the bowl nor the beaters. It is then beaten until cool, at least ten minutes for a good batch. So this icing requires a lot of beating, and a standmixer certainly would help!
I really liked the Italian meringue, as it was glossy and smooth, but too thin to use as a frosting. Once I added the butter, it was the proper consistency but I didn't like the flavor as much. Italian buttercream is light, fluffy, white, and smooth, and has a delicate texture yet a rich flavor. It isn't great for piping but ideal for delicate cakes that cannot be spread with a heavy frosting.
Monday, January 05, 2015
Chocolate Collar
Chocolate collars are simple garnishes to wrap around cakes and other desserts. They are surprisingly easy to make and add a touch of elegance (not to mention an extra dose of chocolate) to any dessert. Chocolate collars can be made in a wide range of sizes, flavors, designs, and even different shapes. They can be plain chocolate or sport different shapes and symbols, and even inscriptions, and can be made from just one type of chocolate or several types of chocolate. They can form the outside of a dessert to hold cream fillings, or can simply make a different outside of a cake aside from the typical frosting.
Here is the general procedure for making a chocolate collar:
- Cut a strip of parchment paper of the desired height and length (a large enough diameter to go around the cake or dessert). It helps to leave an inch or so on either end as a tab for easier handling.
- Place this strip of parchment on another piece or any work surface you don't mind getting chocolate on. Tape the strip down.
- Melt or temper the desired type(s) of chocolate until just smooth.
- Pour, pipe, drizzle or spread over the parchment in the desired pattern.
- - For a smooth, plain collar, use one type of chocolate and spread it evenly over the entire length of parchment.- For a lacy collar, use one or more types of chocolate, place in a piping or plastic bag, and drizzle over the collar in random patterns and loops, being sure to cover enough of the parchment to give the collar stability.- For other designs, including writing, you will likely need to pipe on the shapes in one type of chocolate, let it set for a minute or two, then spread a different type of chocolate over the entire strip of parchment to cover.
- Let the chocolate set for only a few minutes. You want it to be set so it doesn't run, but still pliable to be able to form.
- Carefully wrap the collar around the cake or dessert, it should stick to the frosting. Leave the parchment paper on. Leave the chocolate to set for at least an hour before removing it. It can also be chilled, but will be brittle and should be cut with a hot, sharp knife.
I used a chocolate collar to decorate my puzzle cake. It was my first time making one, but not my first time trying out some chocolate work. To make mine, I used about an ounce each of dark and white chocolate, and piped it in random polka dots of various sizes onto the parchment. Then once this set, I covered this with four ounces of milk chocolate. I also spread the top of the collar in waves, instead of creating a smooth top edge.
Subscribe to:
Posts (Atom)